The Liftmaster Learn Button: Your Guide To Easier Garage Access
If you own a Liftmaster garage door opener, you’ve likely heard about the Learn button. This small button is more important than it seems. It helps you connect new remotes, clear old codes, and set up accessories. Many people struggle with garage door remotes, but the Learn button makes things much easier. Whether you are a homeowner, a technician, or someone renting a property, understanding how the Learn button works can save you time and prevent frustration.
This article will explain what the Liftmaster Learn button is, where to find it, and how to use it safely. You’ll learn step-by-step instructions, see common mistakes, and get practical tips. There are also data tables and answers to the most frequent questions. By the end, you’ll feel confident about managing your Liftmaster opener.
What Is The Liftmaster Learn Button?
The Learn button is a small, colored button found on Liftmaster garage door openers. It’s usually located on the rear or side panel of the opener’s motor unit. This button is central to programming new remotes, keypads, and accessories. When pressed, it enables your opener to “learn” a new device or erase stored codes.
Liftmaster started using the Learn button in the early 2000s to make setup easier. Before this, programming remotes was more complicated and often required special tools. Today, almost all modern Liftmaster openers have this button.
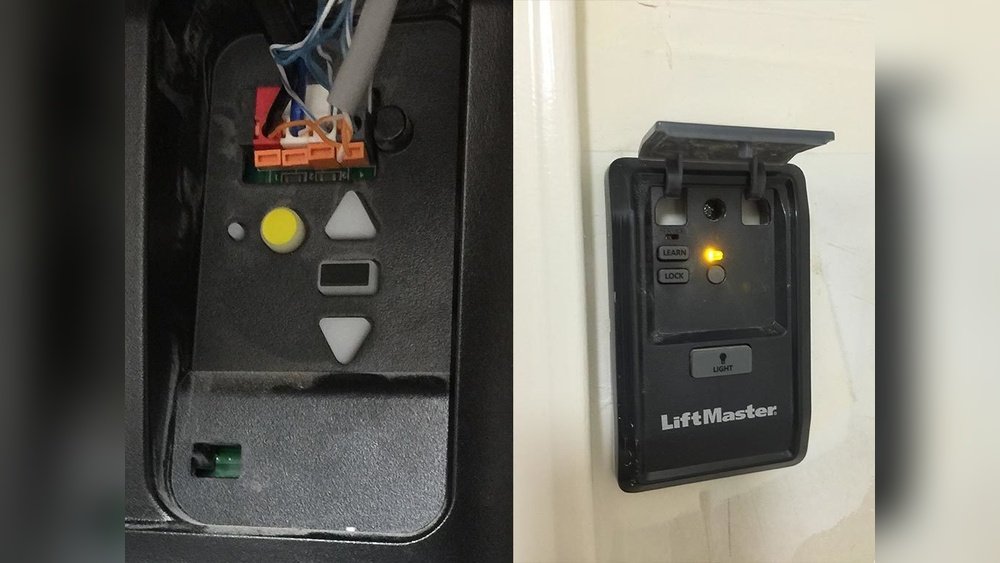
Typical Locations And Colors
On most models, the Learn button is next to the LED indicator light. Its color is important—it shows which technology your opener uses. The most common colors are:
- Yellow: Newer models (Security+ 2.0)
- Purple: Mid-2000s models (Security+)
- Red/Orange: Older models (Security+)
- Green: Early models (basic security)
The color tells you what type of remote or keypad is compatible. For example, yellow buttons only work with Security+ 2. 0 remotes.
Why Is The Learn Button So Important?
This button is more than just a tool for programming remotes. It’s the main way to manage your opener’s security features. If you move into a new house, you can erase old codes and set your own. If you lose a remote, the Learn button lets you remove it from your system.
It also helps with troubleshooting problems.
Many beginners don’t realize the Learn button can help with advanced setups, like connecting smart home systems or upgrading security. Knowing how to use it gives you more control over your garage access.
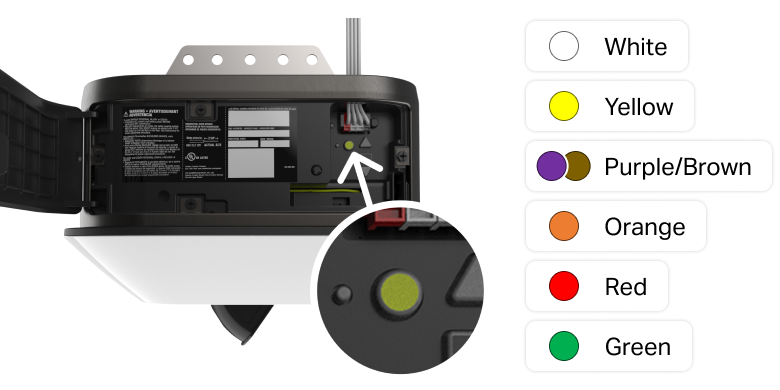
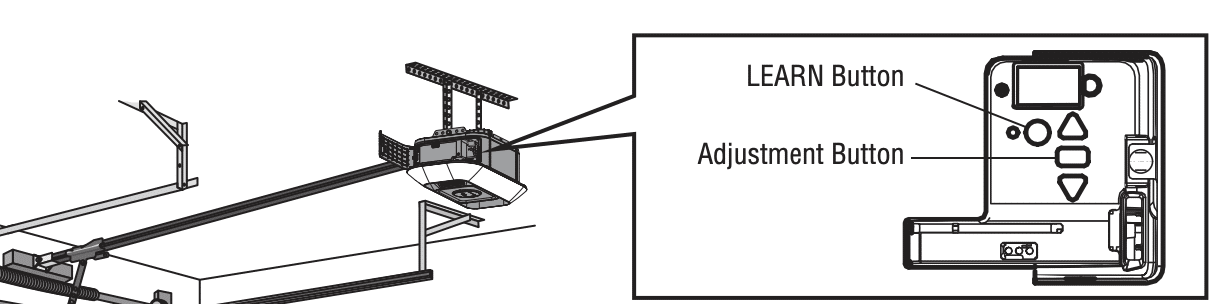
How To Find The Liftmaster Learn Button
Finding the Learn button is easy once you know where to look. It’s usually under the light cover or on the back of the opener unit.
Step-by-step Guide
- Disconnect Power: For safety, unplug your opener or switch off the circuit breaker.
- Locate the Motor Unit: Go to the ceiling-mounted opener.
- Remove the Light Cover: If your opener has a cover, gently slide or lift it off.
- Look for the Colored Button: Find the small, colored button near the LED light. It may be labeled “Learn.”
- Check the Color: Note the color to confirm compatibility.
| Model | Learn Button Color | Location |
|---|---|---|
| Liftmaster 8500 | Yellow | Back panel, near wiring terminals |
| Liftmaster 3280 | Purple | Under light cover, side panel |
| Liftmaster 1265 | Red/Orange | Rear panel, next to LED |
Some units have the button more hidden. If you don’t see it, check your manual or search for your model online.
Credit: www.liftmaster.com
Programming Remotes With The Learn Button
Connecting a new remote is the main use for the Learn button. Here’s how you do it:
Basic Steps To Add A Remote
- Press and Release the Learn Button: Do not hold it down. The LED light will glow.
- Within 30 Seconds, Press the Remote Button: Hold the button you want to program.
- Wait for the Light to Blink or Click: This means the remote is programmed.
- Test the Remote: Press the remote button to open or close the garage door.
It’s important to press the Learn button only once. Holding it too long will erase all codes—a common mistake.
Common Mistakes Beginners Make
- Holding the Learn button too long: This erases all remotes. Only press it once.
- Wrong remote type: The color of your Learn button matters. Yellow buttons need Security+ 2.0 remotes.
- Programming outside the 30-second window: You must program quickly after pressing Learn.
- Standing too far from the opener: Some remotes need to be close for the signal.
| Learn Button Color | Compatible Remote Type | Programming Window |
|---|---|---|
| Yellow | Security+ 2.0 | 30 seconds |
| Purple | Security+ | 30 seconds |
| Red/Orange | Security+ | 30 seconds |
| Green | Basic Security | 30 seconds |
If your remote doesn’t work, check the battery and make sure the remote is the correct type for your opener.
Erasing Codes With The Learn Button
Sometimes you need to erase all remote codes—for example, if you lose a remote or move to a new house. The Learn button makes this simple.
Steps To Erase All Remotes
- Press and Hold the Learn Button: Hold it for 6-10 seconds.
- Watch for the LED Light to Go Out: This means all codes are erased.
- Reprogram Your Remotes: You’ll need to add them again using the steps above.
This process removes all remote and keypad access. It’s a smart move for security, especially if you’re unsure how many remotes are active.
Data And Security Facts
- Most Liftmaster openers can store up to 12 remotes and 2 keypads.
- Erasing codes prevents unauthorized access.
- After code erasure, all devices must be reprogrammed.
Beginners often forget to erase codes when moving into a new home, leaving themselves at risk.

Credit: superconindia.com
Using The Learn Button For Keypads And Accessories
The Learn button is not just for remotes. You can also use it for keypads, wall controls, and even smart home adapters.
Programming A Keypad
- Press and Release the Learn Button: The LED glows.
- Within 30 Seconds, Enter Your Desired PIN on the Keypad: Then press the “Enter” button.
- Look for Blinking or Clicking: This shows the keypad is programmed.
For accessories like MyQ adapters or wireless wall controls, follow the same process. Always check compatibility based on the Learn button color.
Connecting To Smart Home Systems
Newer Liftmaster openers support smart home integration. The Learn button is used to connect Wi-Fi modules or adapters. This lets you control your garage from your phone or voice assistant.
| Accessory | Learn Button Role | Smart Home Compatible? |
|---|---|---|
| Wireless Keypad | Programs PIN | Yes |
| MyQ Adapter | Syncs device | Yes |
| Wall Control | Programs function | No |
Troubleshooting The Learn Button
Sometimes, the Learn button doesn’t seem to work. Here are practical troubleshooting tips:
Quick Fixes
- Check Power: Make sure your opener has power.
- Reset the Opener: Unplug for 1 minute, then plug back in.
- Inspect the Button: Dirt or debris can block the button. Clean gently.
- Check Remote Batteries: Weak batteries cause problems.
- Review Compatibility: Confirm your remote matches the button color.
If the button is stuck or broken, you may need a technician. Some older models have faulty buttons, but newer models are more reliable.
When To Call For Help
- If the Learn button won’t erase codes
- If remotes cannot be programmed
- If the opener shows no LED response
Liftmaster’s support site offers detailed guides. You can also find help from garage door professionals.
Credit: heritagedoor.com
Advanced Uses And Tips
The Learn button offers more than basic programming. Here are some advanced tips:
- Temporary Codes: Some keypads let you set temporary PINs for guests. Program them using the Learn button, then erase later.
- Adding Multiple Remotes: You can program several remotes in sequence. Press Learn, then each remote button within 30 seconds.
- Upgrading Security: If you upgrade your opener, check if your old remotes match the new Learn button color.
- Smart Home Integration: Use the Learn button to connect your opener to systems like Amazon Alexa or Google Home.
Many users miss the benefit of temporary codes for guests or service people. This improves security and flexibility.
Safety And Security Considerations
Liftmaster designed the Learn button with security in mind. Here’s what you should know:
- Rolling Code Technology: Every time you use your remote, the code changes. This prevents hackers from copying your signal.
- Erasing Codes: If you lose a remote, erase all codes to keep your garage secure.
- PIN Protection: For keypads, set strong PINs and change them often.
Never share your PIN or remote with strangers. If you suspect someone has unauthorized access, erase all codes and reprogram.
Frequently Asked Questions
How Do I Know Which Remote Works With My Liftmaster Learn Button?
The color of your Learn button tells you which remote type is compatible. For example, yellow buttons require Security+ 2.0 remotes, while purple and red/orange use Security+. Always check your opener’s manual or look up your model online before buying a remote.
What Happens If I Hold The Learn Button Too Long?
If you hold the Learn button for 6-10 seconds, it erases all programmed remotes and keypads. You’ll need to reprogram every device. If you only want to add a new remote, just press and release the button once.
Can I Program A Remote From Outside The Garage?
Usually, you need to be near the garage door opener when programming a remote. Some remotes require you to be within a few feet to ensure the signal is strong. Programming from outside is not recommended, especially for security reasons.
How Many Remotes Can My Liftmaster Opener Store?
Most Liftmaster openers can store up to 12 remotes and 2 keypads. Some high-end models may allow more. If you reach the limit, you must erase all codes before adding new devices.
Where Can I Find Official Guidance For My Liftmaster Opener?
For detailed instructions, visit the official Liftmaster website: Liftmaster Support. You’ll find manuals, videos, and troubleshooting help for every model.
Understanding the Liftmaster Learn button is key for safe and easy garage access. With the right knowledge, you can program remotes, secure your property, and enjoy smart home convenience. Remember, always check compatibility and follow the correct steps. A little attention to detail goes a long way.