When your Rainbird rain sensor stops working, it can be more than just a small inconvenience. This device is designed to help you save water and keep your garden healthy by stopping irrigation during rainfall. But when it fails, you might see your sprinklers running in the rain, wasting both water and money. Many homeowners face this problem but are unsure how to fix it. Understanding why your rain sensor isn’t working and knowing how to troubleshoot it can help you restore your system’s efficiency quickly.
This guide will walk you through how a Rainbird rain sensor works, common reasons for failure, detailed troubleshooting steps, and best practices for maintenance. Whether you are a beginner or have some experience with irrigation systems, you’ll find practical advice here.
Let’s make sure your rain sensor is helping your garden—and your wallet—again.
How Does A Rainbird Rain Sensor Work?
A Rainbird rain sensor is a small device installed outdoors, usually on a gutter, fence, or roof. Its main job is to detect rainfall and send a signal to your irrigation controller to pause watering. Most Rainbird sensors use either a mechanical disk system or electronic moisture detection.
- Mechanical disk sensors: These use small disks that absorb rain. When they get wet, they expand and trigger a switch to stop irrigation. As they dry, they shrink and allow watering to continue.
- Electronic sensors: These use electrical contacts to sense moisture. When rainwater bridges the contacts, the circuit is completed, and the sensor sends a stop signal.
Once installed and connected to your controller, the sensor helps prevent your sprinklers from running unnecessarily. This not only saves water but can extend the life of your plants and irrigation system.
Common Reasons A Rainbird Rain Sensor Stops Working
Rain sensors are simple devices, but several issues can cause them to fail. Here are some of the most frequent causes:
- Old or worn-out sensor disks: Over time, the absorbent disks in mechanical sensors can degrade and lose their ability to expand.
- Dirt and debris: Leaves, dust, or insects can block the sensor’s mechanism.
- Improper installation: If the sensor is not installed level or is placed in a sheltered area, it may not detect rain properly.
- Wiring issues: Damaged or loose wires can interrupt the signal between the sensor and controller.
- Bypass switch left on: Many controllers have a bypass switch that can disable the sensor. If left on, the sensor will not pause irrigation.
- Battery failure: Some electronic models have batteries that need replacement.
- Controller settings: Incorrect programming on the irrigation controller can override the sensor.
Many of these problems can be prevented with regular checks and maintenance.
Symptoms Of A Failing Rainbird Rain Sensor
Knowing the signs of a faulty rain sensor can help you take action quickly. Look for these symptoms:
- Sprinklers run during or right after rain
- Sensor status light does not change (on electronic models)
- Manual test of the sensor has no effect on the system
- No “rain detected” message on controller display (if supported)
- Visible damage or corrosion on the sensor
If you notice any of these, your rain sensor may not be working as it should.
Step-by-step Troubleshooting Guide
Follow these steps to identify and fix common problems with your Rainbird rain sensor:
Check The Sensor Placement
The sensor must be in an open area to detect rainfall. Make sure it is not blocked by an overhang, gutter, or tree.
- If possible, mount the sensor 4–6 feet above the ground.
- Place it away from sprinkler spray to avoid false readings.
Inspect For Dirt And Obstructions
Look for leaves, spider webs, or debris that may block the sensor.
- Clean the sensor gently with a soft brush or compressed air.
- Do not use water or harsh chemicals.
Test The Sensor Manually
You can simulate rain to check if the sensor responds.
- For mechanical sensors: Press the top of the sensor or pour a small amount of water over it. The disks should swell, and the system should stop watering.
- For electronic sensors: Use a damp cloth to bridge the contacts.
- Watch for a change in the controller status or a light indicator.
If there is no response, move to the next steps.
Check The Bypass Switch
Most Rainbird controllers have a rain sensor bypass switch. If this is set to “bypass” or “off,” the sensor will not control irrigation.
- Make sure the switch is set to “active” or “on.”
Inspect The Wiring
Wiring problems are a common cause of sensor failure.
- Look for loose, cut, or corroded wires at the sensor and controller.
- Gently tug each wire to check for a secure connection.
- If you have a multimeter, test for continuity between the sensor and controller terminals.
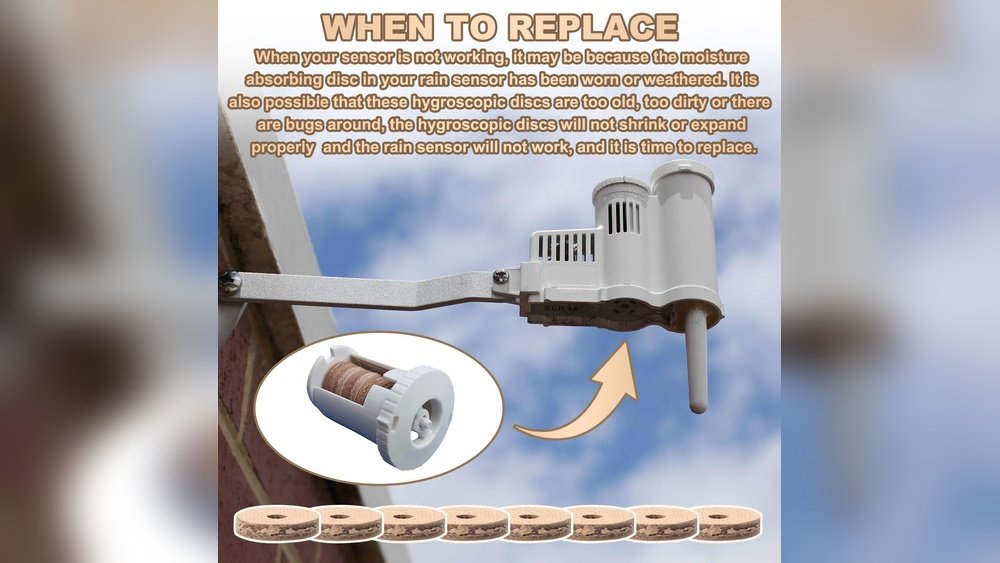
Examine The Sensor Disks Or Battery
- For mechanical models: Remove the cap and check the disks. If they are hard, brittle, or moldy, replace them.
- For electronic models: Replace the battery if present. Most use a standard coin cell.
Check Controller Settings
Review your controller’s program to ensure the rain sensor is enabled.
- Some controllers allow you to turn off the rain sensor function in the software.
- Refer to your user manual for specific instructions.
Replace The Sensor If Needed
If none of the above steps fix the issue, the sensor may be at the end of its lifespan. Rain sensors typically last 3–5 years. If your sensor is older, consider replacing it with a new Rainbird model.
Comparing Rainbird Rain Sensors: Key Features
Different Rainbird models have unique features. Here is a quick comparison of three popular types:
| Model | Detection Type | Typical Lifespan | Battery Required | Mounting Options |
|---|---|---|---|---|
| Rainbird RSD-BEx | Mechanical disk | 3–5 years | No | Gutter, Wall, Roof |
| Rainbird WR2 Wireless | Electronic | 3–5 years | Yes (CR2032) | Gutter, Wall, Roof |
| Rainbird Mini-Clik | Mechanical disk | 3–5 years | No | Gutter, Wall, Roof |
When choosing a replacement, match the sensor type with your system and consider wireless models for easier installation.
Maintenance Tips For Long-lasting Performance
Regular maintenance can extend the life of your rain sensor and keep it accurate. Here are some best practices:
- Clean the sensor every few months to remove dust and debris.
- Check the mounting to ensure the sensor is level and not loose.
- Inspect the wiring for signs of wear or corrosion.
- Test the sensor before the rainy season to confirm it stops irrigation.
- Replace disks or batteries as needed—don’t wait for a failure.
- Cover the sensor during off-season if you live in snowy areas to avoid damage.

Real-world Example: Diagnosing A Persistent Problem
Consider a homeowner in Florida who noticed their Rainbird-controlled sprinklers running during heavy summer rain. On inspection, they found:
- The sensor was mounted under a thick tree branch, which blocked most rainfall.
- The sensor disks were covered in a thin layer of mold.
- The bypass switch on the controller was accidentally left on.
After moving the sensor to a better location, cleaning the disks, and switching off the bypass, the system began working correctly again. This example shows that simple, overlooked issues can cause sensor failure.
When To Call A Professional
While most rain sensor problems can be fixed by homeowners, some situations may need a licensed irrigation technician:
- Complex wiring repairs
- Persistent controller errors
- Integration with smart home systems
A professional can diagnose hidden faults and ensure your system meets local codes.
How A Faulty Sensor Impacts Water Use And Costs
Many people underestimate the cost of a broken rain sensor. According to the Environmental Protection Agency (EPA), outdoor water use accounts for nearly 30% of total household water use in the US. A faulty rain sensor can waste thousands of gallons per year. This not only increases your water bill but can also cause overwatering, leading to root rot and disease in plants.
Consider these numbers:
- Average sprinkler zone uses 15–20 gallons per minute
- Just one unnecessary cycle during rain can waste 300+ gallons
- In areas with water restrictions, this may also lead to fines
Ensuring your rain sensor works properly is a small effort for big savings.
Cost Comparison: Repairing Vs Replacing A Rainbird Rain Sensor
Wondering if you should repair or replace your sensor? Here’s a simple cost comparison:
| Option | Average Cost | Typical Time Required | Pros | Cons |
|---|---|---|---|---|
| Clean/Repair | $0–$15 | 10–30 minutes | Cheap, quick, easy | May not solve all problems |
| Replace Disks/Battery | $5–$20 | 10–20 minutes | Restores function | Not suitable for all issues |
| New Sensor | $25–$65 | 30–60 minutes | Long-term fix, warranty | Higher cost |
For most homeowners, cleaning or replacing parts is enough. But if your sensor is several years old, investing in a new one can be more reliable.

Non-obvious Insights For Better Rainbird Rain Sensor Performance
- Check for wireless interference: If you use a wireless sensor, nearby Wi-Fi routers, cordless phones, or metal structures can sometimes block the signal. Try moving the receiver or adjusting the sensor’s placement if the connection is unreliable.
- Monitor after landscaping changes: If you recently planted new trees or built a structure near the sensor, it may no longer detect rain correctly. Always review the sensor location after major changes.
- Sensor sensitivity matters: Some Rainbird models let you adjust how much rain is needed to trigger the sensor. If your garden needs less frequent watering, set the sensor to react to smaller amounts of rain.

Frequently Asked Questions
Why Does My Rainbird Rain Sensor Stay “active” Even When It’s Dry?
This usually means the sensor disks are still wet or swollen, or the sensor mechanism is stuck. Try removing and drying the disks, and check for dirt or debris that might block movement. In electronic models, check the contacts for corrosion.
Can A Rain Sensor Work With All Rainbird Controllers?
Most Rainbird rain sensors are compatible with their controllers, but always check your controller’s manual. Some older or specialized controllers may need adapters or have limited support for wireless sensors.
How Often Should I Replace The Rain Sensor Disks?
For best performance, check the disks every year and replace them every 2–3 years, or sooner if they appear hard, cracked, or moldy. This keeps the sensor responsive to rain.
What Happens If I Leave The Bypass Switch On?
If the bypass switch is on, your irrigation system will ignore the rain sensor and continue watering as scheduled. This can lead to wasted water and possible damage to your plants during rain.
Where Can I Find Official Installation Or Troubleshooting Guides?
For official guides, visit the Rainbird Support site. They offer product manuals, troubleshooting tips, and videos for all Rainbird irrigation products.
A well-functioning Rainbird rain sensor is a simple yet powerful tool for saving water and keeping your landscape healthy. If yours isn’t working, use these practical steps to solve the problem and enjoy worry-free watering—even when the weather changes.