A Bostitch stapler is a staple of offices, schools, and homes around the world. Known for their durability and reliable performance, these staplers are designed to handle everything from a few sheets of paper to thick stacks. But even the best tools sometimes fail. When your Bostitch stapler stops working, it can bring your workflow to a halt and create a surprising amount of frustration. Whether you use a classic manual desktop model, a heavy-duty booklet stapler, or one of Bostitch’s popular electric staplers, a jam or malfunction can feel like a major headache.
This guide will help you solve common Bostitch stapler problems quickly and confidently. You’ll find step-by-step troubleshooting for different models, practical repair tips, and honest advice about when to fix and when to replace. You’ll also learn about the most common mistakes people make with staplers, why jams happen, and how to keep your device running smoothly for years.
If you’re tired of fighting with your stapler, read on—you’re not alone, and most problems can be fixed in minutes.
Understanding Bostitch Staplers
Before you can fix a problem, it helps to know what kind of Bostitch stapler you have. Bostitch makes several types, each with their own working mechanisms and common issues.
Main Types Of Bostitch Staplers
- Manual desktop staplers: These are the classic push-down staplers found on most desks. They use a spring and lever to drive a staple through paper.
- Heavy-duty staplers: Built for large stacks of paper or booklets. They have longer arms and stronger springs.
- Electric staplers: Powered by batteries or plug-in, these staplers are common in high-volume environments.
- Plier staplers: Handheld, used for packaging or awkward angles.
- Carpet and construction staplers: Used for tough materials, not just paper.
Knowing your model helps you find the right fix. For example, a manual jam is solved differently from an electric motor problem.
Why Do Staplers Fail?
Even high-quality staplers face wear and tear. The main reasons for failure include:
- Staple jams from misaligned staples or overfilling.
- Worn springs or broken levers.
- Incorrect staple sizes.
- Dust and debris inside the mechanism.
- Motor issues in electric models.
Understanding these causes is the first step toward a solution.
Common Problems With Bostitch Staplers
Let’s look at the most common issues, what causes them, and how to spot the symptoms.
Stapler Jammed
A jam is the most frequent problem. Signs include:
- The handle won’t press down fully.
- Staples don’t come out.
- The stapler makes a crunching sound.
Jams are usually caused by bent staples, overloading, or using the wrong size staples.
Staples Not Advancing
Sometimes, you press the stapler, but nothing happens. This means:
- The staple strip is stuck.
- The pusher spring is weak or broken.
- The staples are loaded backward.
Staples Not Bending Properly
If the staple goes through but doesn’t curl under the paper, it may be due to:
- Wrong staple size.
- Worn anvil (the metal plate under the paper).
- Misalignment from a dropped stapler.
Handle Won’t Go Down
If the handle is stuck in the up position:
- There may be a staple jam.
- The internal spring could be broken.
- The stapler is overloaded.
Electric Stapler Not Firing
Signs include:
- No sound or movement when pressing the button.
- The light doesn’t turn on (if your model has one).
- Only partial staple action.
This points to power issues, motor failure, or electronic faults.
Step-by-step Troubleshooting Guide
Fixing a Bostitch stapler usually takes just a few steps. Here’s how to get started, based on the problem.
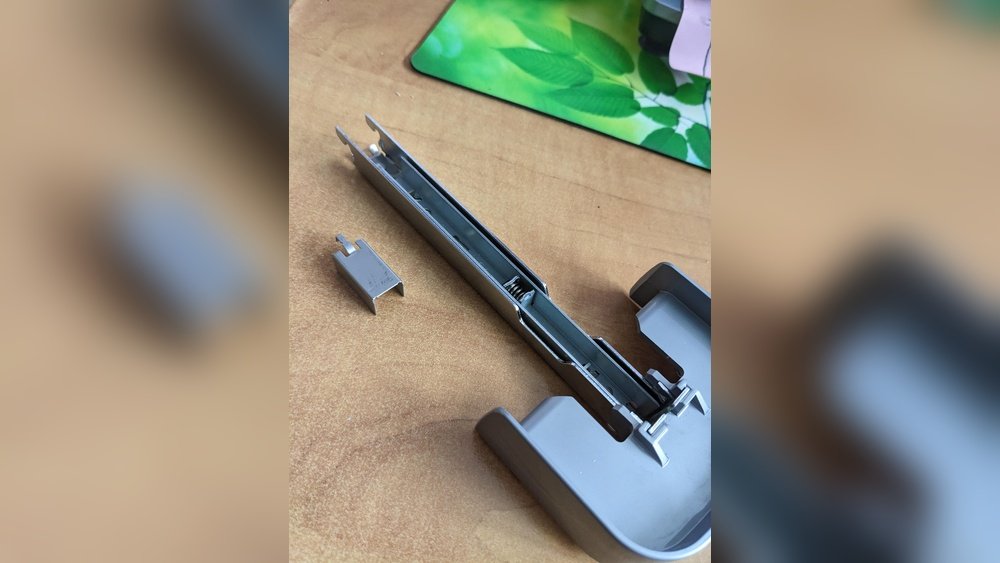
Clearing A Staple Jam (manual And Heavy-duty Models)
- Open the stapler: For most desktop models, pull the top arm up and back.
- Remove the staple strip: Take out any loose staples.
- Find the jammed staple: Look in the channel for bent or stuck staples.
- Use a tool: Gently pry out the jammed staple with a small screwdriver or tweezers.
- Check for damage: Make sure the channel is clear and not bent.
- Reload and test: Insert a fresh strip of the correct staples. Test on a few sheets.
Tip: Avoid using scissors or knives, which can damage the mechanism.
Fixing Staples Not Advancing
- Remove all staples.
- Check the pusher spring: It should push the staple strip forward. If it’s loose or broken, replace it.
- Clean the channel: Dust and paper bits can block the path. Use compressed air or a brush.
- Reload staples correctly: Make sure the staple legs face down, and the strip slides easily.
Addressing Staples Not Bending
- Check staple size: Only use the size recommended for your model.
- Inspect the anvil: The small metal plate should be flat and aligned. If bent, gently push it back.
- Try another surface: Test stapling on a hard, flat surface.
When The Handle Won’t Go Down
- Look for a jam: Follow the jam clearing steps.
- Check spring tension: If the handle feels loose or too stiff, the spring may be out of place or broken.
- Don’t force it: Forcing a stuck handle can break the stapler.
Electric Stapler Issues
- Check power source: Is the stapler plugged in or are batteries fresh?
- Reset: Unplug for 10 seconds and try again.
- Clear jams: Most electric models have a release button or cover.
- Listen for motor: If you hear buzzing but no action, the motor may be blocked.
- Test with a new staple strip: Electric staplers can be sensitive to staple type.
Non-obvious insight: Electric staplers often have a safety switch under the paper guide—if it’s not pressed, the stapler won’t fire. Make sure paper is inserted fully.
Preventing Future Problems
Most stapler issues are preventable with a few simple habits.
Use The Right Staples
Always check the staple size and type listed on your stapler. Using the wrong staples is a top cause of jams.
Don’t Overload
Only insert the number of sheets your model is rated for. Forcing too many papers leads to jams and bent staples.
Regular Cleaning
Every few months, open your stapler and remove dust, bits of paper, and old staples. A quick brush or blow with compressed air prevents buildup.
Store Properly
Keep staplers away from moisture and direct sunlight. Humidity can rust springs and cause parts to stick.
Handle With Care
Dropping a stapler can knock parts out of alignment. Avoid slamming the handle or using excessive force.
Non-obvious tip: Occasionally lubricate moving parts with a drop of light machine oil. This prevents squeaks and stiffness, especially in heavy-duty and electric models.
When To Repair Vs Replace
It’s tempting to throw away a stapler when it stops working. But sometimes, a quick fix is all you need. Here’s how to decide.
Repair If:
- The problem is a simple jam.
- The spring is loose but not broken.
- The anvil is slightly bent.
- The stapler is less than two years old.
Replace If:
- The handle or main body is cracked.
- The internal spring is broken or missing.
- The motor in an electric stapler is dead (out of warranty).
- The cost of repair is more than a new stapler.
Some high-end Bostitch models have spare parts available online. For classic models, check the Bostitch website or office supply stores.
Comparing Bostitch Stapler Models
Choosing the right model makes a big difference in reliability. Here is a comparison of three popular Bostitch staplers:
| Model | Type | Sheet Capacity | Best For | Common Issues |
|---|---|---|---|---|
| Bostitch B8 | Manual Desktop | 20-50 | Offices, Schools | Jams, Misfeeds |
| Bostitch Impulse 25 | Electric | 25 | High Volume | Power Issues, Staple Size |
| Bostitch Antimicrobial | Heavy-Duty Manual | 65 | Booklets, Reports | Handle Stuck, Jammed Staples |
Insight: Many users buy heavy-duty staplers for small stacks, which can actually lead to jams. Match the model to your real needs.
Mistakes To Avoid With Bostitch Staplers
Many common problems can be avoided. Here are some frequent mistakes:
- Using the wrong staples: Always check packaging and model number.
- Ignoring jams: Forcing the stapler when jammed can break it.
- Overloading: Too many sheets will bend staples and damage the mechanism.
- Not cleaning: Dust and bits of paper cause jams over time.
- Slamming the handle: Using extra force doesn’t fix a jam, it makes it worse.
- Improper storage: Humidity and dust shorten stapler life.
- Not replacing worn parts: Springs and anvils can often be replaced cheaply.
Tools And Supplies For Stapler Maintenance
You don’t need special tools to maintain a Bostitch stapler. A few household items are enough.
- Small flathead screwdriver: For removing jammed staples.
- Needle-nose pliers: For tight spaces.
- Compressed air: For cleaning dust and debris.
- Cotton swabs: For applying oil.
- Light machine oil: For lubrication.
- Replacement springs: For common repairs (available online).

How To Clean And Maintain Your Stapler
Regular maintenance extends the life of your stapler. Here’s a simple routine:
- Open the stapler and remove any staples.
- Blow out dust with compressed air.
- Wipe the inside with a dry cotton swab.
- Check moving parts for stiffness.
- Apply a drop of oil to the spring and hinge (wipe off any excess).
- Inspect for rust or bent parts.
- Reload staples and test.
Repeat this every 3-6 months, or if you notice trouble.
Real-world Examples
Let’s look at a few real situations:
Case 1: Jammed Desktop Stapler
Maria in a busy office found her Bostitch B8 handle stuck. She opened the stapler, removed a bent staple with tweezers, cleaned the channel, and reloaded. Problem solved in two minutes.
Case 2: Electric Stapler Not Working
James’s Bostitch Impulse 25 stopped firing. After checking the power outlet and trying new staples, he found a tiny piece of paper blocking the safety sensor. Once removed, the stapler worked perfectly.
Case 3: Heavy-duty Stapler Bending Staples
A teacher, Mr. Lee, noticed his heavy-duty Bostitch stapler was not bending staples under thick reports. He had switched to a cheaper staple brand, which was slightly thinner than recommended. After switching back, the problem disappeared.
Lesson: Always use the correct staples and keep the mechanism clean.

How Bostitch Staplers Compare To Other Brands
Choosing Bostitch is usually a smart decision, but how do they stack up against other brands like Swingline or Rapid?
| Brand | Reliability | Price Range | Staple Compatibility | Common Issues |
|---|---|---|---|---|
| Bostitch | High | $$ | Wide (B8, Standard, Heavy-duty) | Jams, Spring Wear |
| Swingline | Moderate-High | $$$ | Standard Only | Jams, Handle Breaks |
| Rapid | Moderate | $$ | Some Models Only | Jam, Spring Issues |
Bostitch staplers are known for their strong build and wide range of staple compatibility. However, like all brands, they need proper maintenance.
Where To Find Bostitch Stapler Parts And Manuals
If you need spare parts or want the official manual for your model, start at the Bostitch official website. They offer:
- Downloadable manuals
- Lists of compatible staples
- Replacement springs and parts
For older models, try office supply stores or auction sites. Replacement parts are usually affordable, and many repairs can be done at home.
For authoritative product information, see the Bostitch Office official site.
When Professional Repair Is Worth It
Most stapler repairs are simple. However, if you have a high-end electric model, or a stapler used in a business-critical role, professional repair may be worth it if:
- The stapler cost over $50.
- It’s still under warranty.
- You cannot source the needed parts yourself.
Check the Bostitch website for warranty details and authorized service centers.
Upgrading Your Stapler: What To Consider
If your stapler is beyond repair or you’re ready for an upgrade, consider:
- Sheet capacity needed: Buy for your most common task, not the maximum.
- Manual vs electric: Electric is faster, but manual is more reliable for occasional use.
- Staple size: Choose a model with easily available staples.
- Ergonomics: Look for soft-grip handles if you staple often.
- Warranty: Longer warranties show confidence in quality.
Pro tip: Test a few models in-store if possible. The “feel” of a stapler can make a big difference in comfort.
Frequently Asked Questions
Why Does My Bostitch Stapler Keep Jamming?
Most jams are caused by using the wrong size staples, overfilling the stapler, or not loading the staples correctly. Check for bent staples, clean the mechanism, and use the recommended staple size for your model.
Can I Use Any Brand Of Staples In My Bostitch Stapler?
It’s best to use Bostitch-branded staples or those listed as compatible in your manual. Off-brand staples may not fit properly, which can cause jams or weak stapling.
How Do I Fix A Stuck Stapler Handle?
First, open the stapler and look for a staple jam or bent piece inside. If the handle is still stuck, the internal spring may be out of place or broken. Do not force the handle, as this can break the stapler.
Is It Safe To Try Fixing An Electric Bostitch Stapler Myself?
You can try simple fixes like clearing jams, replacing batteries, or checking the power cord. For complex repairs (like motor problems), it’s safer to contact Bostitch support or a professional repair center.
How Often Should I Clean My Stapler?
Clean your stapler every 3-6 months, or whenever you notice dust, jams, or stiffness. Regular cleaning and using the correct staples will keep your stapler working smoothly.
A Bostitch stapler is a reliable tool when properly cared for. Most problems, from jams to weak staples, are easy to fix with a little patience and the right steps. By knowing your model, using proper staples, and doing basic maintenance, you can keep your stapler in top shape for years.
And remember, when in doubt, check the manual or reach out for help—there’s almost always a solution that doesn’t involve buying a new stapler.