When your Nest Doorbell stops working as it should, it can feel frustrating. Maybe it’s not connecting to Wi-Fi, you’re moving to a new home, or you want to give it to someone else. Resetting your Nest Doorbell is often the best solution. But the process isn’t always obvious, especially since there are different models. This guide explains exactly how to reset a Nest Doorbell, step by step, in clear and simple English. You’ll also learn when a reset is needed, what happens during a reset, and how to avoid common mistakes.
Understanding Nest Doorbell Reset
A reset means restoring your Nest Doorbell to its original factory settings. This erases all your data, removes it from your Google account, and deletes video history stored on the device. It’s different from a simple restart, which just turns the device off and back on again. Resetting is a deeper process that prepares your doorbell for a fresh setup.
Resetting is useful if:
- You’re having connection issues that won’t go away
- The doorbell won’t respond to commands
- You want to sell or give away your device
- You’re moving to a new home
However, a reset should be your last option after trying other troubleshooting steps. Many problems can be fixed by restarting the device or checking your internet connection first.
Types Of Nest Doorbell Models
Before you reset, you need to know which model you have. Google has released several types of Nest Doorbells. The process is not exactly the same for all models. Here are the main ones:
| Model Name | Power Source | Release Year | Reset Method |
|---|---|---|---|
| Nest Doorbell (Battery) | Battery | 2021 | Physical button + App |
| Nest Doorbell (Wired, 2nd Gen) | Wired | 2022 | Physical button + App |
| Nest Hello (Wired, 1st Gen) | Wired | 2018 | App only |
Tip: Check the back of your device or the original box for the model name.
What To Do Before Resetting
Resetting deletes all custom settings and video history stored on the device. Take these steps first:
- Download any important video clips from the Nest app or Google Home app. Once reset, this data cannot be recovered.
- Remove the doorbell from your Google account using the app. This helps avoid problems when re-adding or transferring the device.
- Charge your battery-powered Nest Doorbell to at least 50% to avoid power loss during the process.
- Note your Wi-Fi network name and password for setup after the reset.
Skipping these steps is a common mistake that leads to lost data or setup issues later.
How To Reset Nest Doorbell (battery)
The Nest Doorbell (Battery) is Google’s popular wireless model. Here’s how to reset it:
Step-by-step Reset Instructions
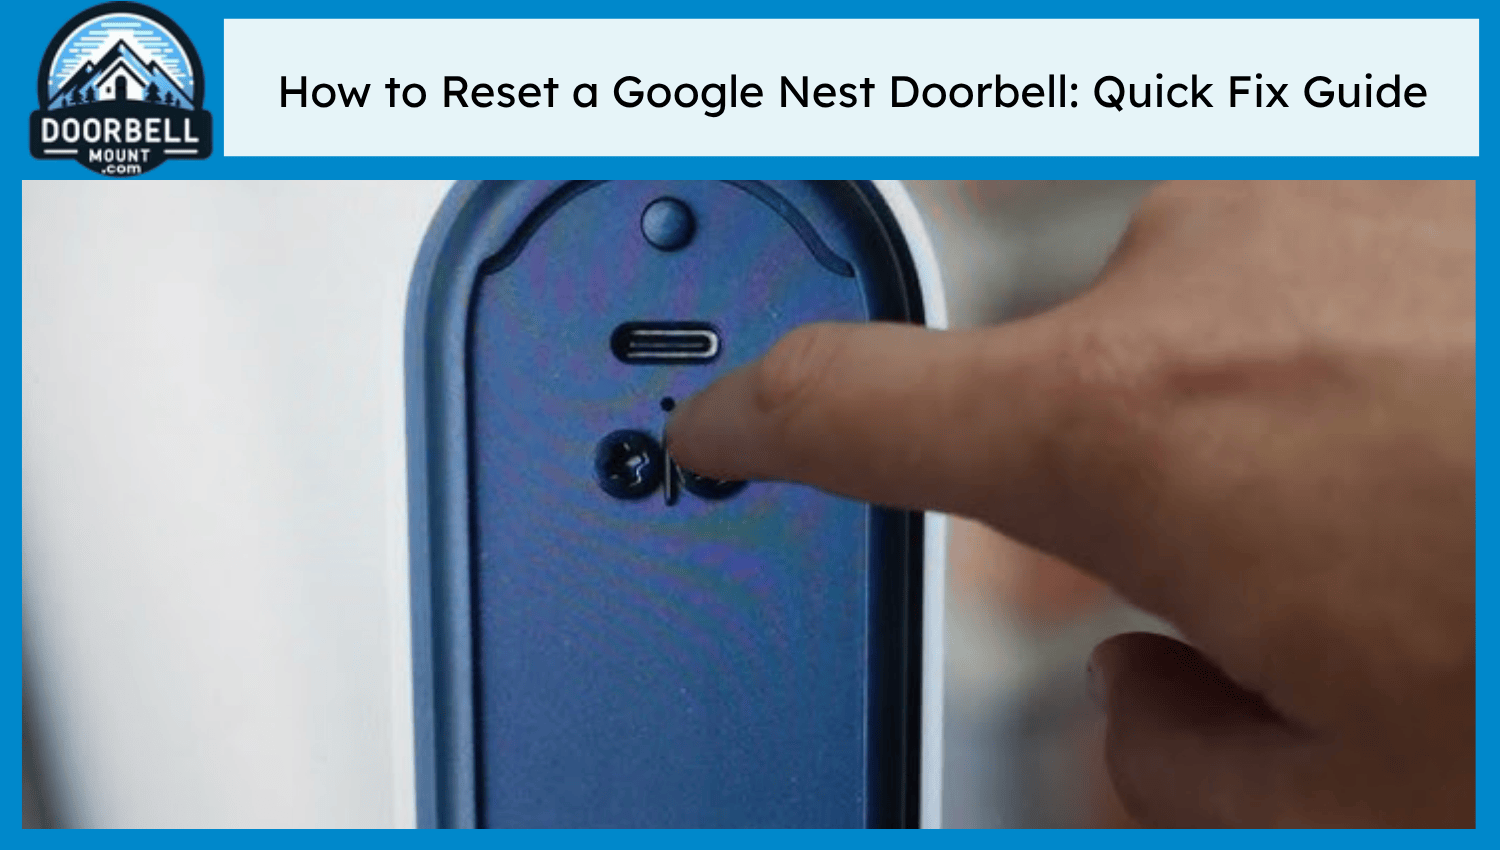
- Remove the doorbell from its mounting bracket. Use the tool that came with your device or a small paperclip to press the release hole at the bottom.
- Locate the reset button on the back of the doorbell. It’s a small, circular button near the charging port.
- Press and hold the reset button. Use your finger or a paperclip.
- Hold the button for about 10 seconds. The status light will turn solid yellow, then begin to pulse yellow.
- Wait for the chime sound and the light to turn white. This means the reset is finished.
- Add the doorbell back to your Google Home app if you want to set it up again.
Practical tip: If the light doesn’t change or the device doesn’t reset, charge it for 30 minutes and try again.
What Happens After Reset
- The doorbell forgets all Wi-Fi and user information.
- Video history stored on the device is erased (cloud history stays with your account).
- Device is ready for new setup.
How To Reset Nest Doorbell (wired, 2nd Gen)
This model looks similar to the battery version but connects directly to your home’s wiring. The reset process is almost the same:
Step-by-step Reset Instructions
- Remove the doorbell from the wall. Use the release tool or a paperclip.
- Find the reset button on the back.
- Press and hold the reset button for about 10 seconds. The status light will turn yellow and then pulse white.
- Release the button when you hear a chime and see the light pulse white.
- Setup the doorbell again in the Google Home app.
Non-obvious insight: The wired version may take a few seconds longer to reset, since it draws power from your home and needs to discharge after removal.
How To Reset Nest Hello (wired, 1st Gen)
The older Nest Hello is a wired-only doorbell. The reset works differently:
Step-by-step Reset Instructions
- Open the Nest app on your smartphone (not Google Home).
- Select your doorbell from the device list.
- Tap Settings (gear icon).
- Scroll to ‘Remove device’ and tap it.
- Confirm removal. The device will reset and disconnect from your account.
Key point: There is no physical reset button on the Nest Hello. Everything is done through the app.
After Reset
- The doorbell is ready to be set up with a new account or on a different Wi-Fi network.
- Old video clips stored in the app may remain, but the device itself is reset.
Credit: www.doorbellmount.com
Resetting Through The Google Home App
For newer models, you can also perform a reset from the Google Home app. Here’s how:
- Open the Google Home app on your phone or tablet.
- Find your Nest Doorbell in the device list.
- Tap and hold the device icon.
- Tap Settings.
- Scroll down and select ‘Remove device.’
- Confirm your choice. The app will remove the device from your account and start the reset process.
Why use the app? If you can’t access the physical button (for example, if the doorbell is mounted high or you don’t have the tool), this method helps.
Common Problems And Solutions
Sometimes, things don’t go as planned during a reset. Here are some common issues and what you can do:
The Doorbell Won’t Reset
- Battery is dead. Charge the device for at least 30 minutes, then try again.
- Button not held long enough. Hold the reset button for the full 10 seconds.
- Wired doorbells may need to be disconnected from power before resetting.
Doorbell Not Detected After Reset
- Wi-Fi issues. Make sure your phone and doorbell are on the same Wi-Fi network.
- App is outdated. Update the Google Home or Nest app.
- Device not removed from old account. Remove it from the previous owner’s Google account before trying again.
Advanced tip: Sometimes, a full power cycle (unplugging for 5 minutes, then plugging back in) helps if the reset does not work at first.

Credit: support.google.com
What Gets Deleted During A Reset
It’s important to understand what data you lose during a factory reset. Here’s a comparison:
| Data | Erased from Device | Erased from Cloud |
|---|---|---|
| Wi-Fi Settings | Yes | No |
| Video Clips (on device) | Yes | No |
| Cloud Video History | No | Yes (if account is deleted) |
| User Settings | Yes | No |
Insight: If you plan to give away your Nest Doorbell, always reset it so the new owner can connect it to their own account without issues.
Setting Up After A Reset
After you reset your Nest Doorbell, you need to set it up again. Here’s how:
- Open the Google Home or Nest app.
- Select ‘Add new device.’
- Follow the on-screen instructions. You’ll need your Wi-Fi network name and password.
- Scan the QR code on the back of the doorbell when prompted.
- Complete setup and test the device.
Pro tip: Place your router closer to the doorbell during setup. Poor Wi-Fi signal is a common cause of setup failure.
Credit: support.google.com
When To Contact Google Support
If you’ve tried everything and your Nest Doorbell still won’t reset, it might be a hardware problem. Contact Google Support if:
- The device does not power on after charging or wiring
- The reset button is stuck or broken
- The device keeps failing during setup, even after multiple resets
Google’s support team can help with warranty replacements or advanced troubleshooting. Their official help page is a good starting point: Google Nest Support.
Safety And Security Tips
Resetting your Nest Doorbell is safe, but here are some tips to protect your privacy and your home:
- Always remove the device from your account before giving it away.
- Don’t share your Wi-Fi password with people you don’t trust.
- Use strong passwords for your Google account to keep your video data secure.
- Update your app and device firmware regularly for the latest security features.
Frequently Asked Questions
How Do I Know If My Nest Doorbell Has Been Reset?
After a reset, the status light on the doorbell will turn solid white or pulse, and the device will ask to be set up again in the app. You’ll no longer see it listed in your Google Home or Nest app.
Will Resetting My Nest Doorbell Delete My Cloud Video History?
Resetting erases only the data stored on the device itself. Cloud video history stays in your Google account unless you manually delete it or remove your account.
Can I Reset My Nest Doorbell Without The App?
Yes, for the newer battery and wired models, you can use the physical reset button on the back. For the original Nest Hello, you must use the Nest app.
What Should I Do If I’m Moving To A New House?
Remove the doorbell from your Google account, perform a factory reset, and set it up again at your new location. This clears all old settings and connects the device to your new Wi-Fi.
My Doorbell Won’t Connect After Reset. What Should I Check?
Make sure your Wi-Fi is working, your app is up to date, and the device has been removed from any previous account. Try moving the router closer or restarting your phone and doorbell.
Resetting your Nest Doorbell isn’t hard if you follow the right steps. Always check your model, back up important video clips, and use the correct method—physical button or app—for your device. If problems continue, Google Support is there to help. With a fresh reset, your doorbell should work like new and keep your home secure.