Setting up a Brother printer to connect with WiFi is not as hard as it may seem. If you’re tired of plugging in cables or moving your laptop closer to the printer, connecting your Brother printer to WiFi will make printing easier and faster.
This guide will help you step by step, so even if you’re not a tech expert, you can get your printer online in less than an hour. You’ll also learn how to fix common problems and avoid mistakes that can waste your time.
Understanding Brother Printer Models
Brother makes many types of printers. Each model may have slightly different steps, but most use similar methods to connect to WiFi. Some popular models are:
- Brother HL-L2350DW
- Brother MFC-J805DW
- Brother DCP-L2540DW
If your printer is older, it may not support WiFi. Always check your manual or the Brother website to make sure your model has wireless capability.
Comparing Brother Printer Features
Here’s a quick comparison of three popular Brother models and their WiFi features:
| Model | WiFi Capability | Display Screen | Setup Method |
|---|---|---|---|
| HL-L2350DW | Yes | No | Button-based |
| MFC-J805DW | Yes | Touchscreen | Menu-based |
| DCP-L2540DW | Yes | Basic LCD | Menu-based |
Knowing your model will help you follow the correct steps. If your printer has a touchscreen, setup is usually easier.
Preparing For Wifi Setup
Before you start, gather these essentials:
- WiFi network name (SSID)
- WiFi password
- Printer manual (optional, but helpful)
- A computer or smartphone
Make sure your WiFi is working. Some printers need to be close to the router during setup. If possible, place your printer near the router for the first connection.
Common Setup Mistakes
Many users face problems because of small errors. Here are some mistakes to avoid:
- Using the wrong WiFi password (double-check spelling and capital letters)
- Not updating printer firmware
- Trying to connect to a 5GHz network (most Brother printers use 2.4GHz)
- Printer placed too far from the router
Connecting Brother Printer To Wifi: Step-by-step
Let’s break down the process. These steps work for most Brother printers.
1. Turn On Your Printer
Plug in your printer and turn it on. Wait until it’s fully ready. If it makes noise or shows a loading screen, let it finish.
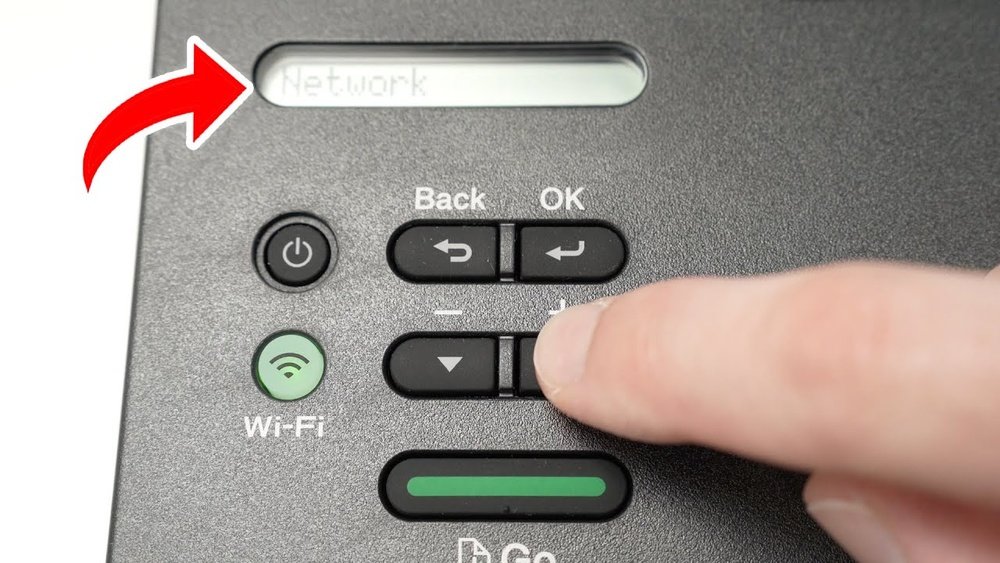
2. Access Wireless Setup Menu
For printers with a touchscreen:
- Tap “Menu” or “Settings”
- Select “Network”
- Choose “Wi-Fi” or “Wireless Setup Wizard”
For printers with buttons:
- Press “Menu” button
- Use arrow keys to find “Network”
- Select “WLAN” (Wireless Local Area Network)
- Choose “Setup Wizard”
3. Select Your Wifi Network
The printer will scan for networks. You’ll see a list. Choose your network (SSID). If you don’t see it, move the printer closer to the router or restart both devices.
4. Enter Wifi Password
Use the touchscreen or buttons to enter your password. Be careful with letters and numbers. If you make a mistake, clear it and start again.
5. Confirm Connection
After entering the password, the printer will try to connect. You may see a spinning icon or “Connecting…” message. If successful, you’ll see “Connected” or a WiFi symbol on the screen.
6. Print A Network Report (optional)
Most Brother printers can print a report showing network details.
- Go to “Menu”
- Find “Print Reports” or “Network Report”
- Print to check if your printer has an IP address
Step-by-step Example: Brother Hl-l2350dw
Let’s look at an example for the HL-L2350DW:
- Press the “Menu” button.
- Use up/down arrows to select “Network” and press “OK.”
- Select “WLAN” and press “OK.”
- Select “Setup Wizard” and press “OK.”
- When “WLAN Enable?” appears, select “Yes.”
- Choose your WiFi network from the list.
- Enter your WiFi password using the arrow keys.
- Press “OK” to confirm.
If successful, the WiFi light will stay on.
Installing Drivers And Software
Connecting to WiFi is only half the job. Your computer must recognize the printer, too. Install drivers for best results.
Where To Get Drivers
Go to the official Brother website. Search for your model and download drivers for your operating system (Windows, MacOS, Linux).
Installing Drivers: Windows Example
- Download the driver package.
- Open the installer.
- Choose “Wireless Network Connection.”
- Follow instructions.
- When prompted, select your printer.
Installing Drivers: Macos Example
- Download the driver.
- Open the file.
- Drag the printer icon to “Applications.”
- Go to “System Preferences” > “Printers & Scanners.”
- Click “+” to add your printer.
If your printer is not found, make sure it’s connected to the same WiFi network.

Credit: www.wikihow.com
Connecting Via Wps (wi-fi Protected Setup)
Some routers and Brother printers support WPS, which is a faster way to connect without entering passwords.
How Wps Works
- Press the WPS button on your router.
- Within 2 minutes, press the WiFi or WPS button on your printer.
- Wait for the connection.
Not all routers and printers support WPS. Check your manual.
Wps Vs Manual Setup
Here’s a comparison:
| Method | Speed | Security | Ease |
|---|---|---|---|
| Manual Setup | Medium | High | More Steps |
| WPS | Fast | Good | Simple |
WPS is quick but not as secure as manual entry. For home use, it’s fine, but for office, manual setup is safer.
Fixing Common Wifi Connection Issues
Sometimes, the printer won’t connect. Here are some troubleshooting tips:
Printer Not Finding Wifi
- Move printer closer to router.
- Restart printer and router.
- Make sure WiFi is set to 2.4GHz.
Wrong Password
- Double-check your password.
- Enter slowly to avoid mistakes.
Printer Connected, But Not Showing On Computer
- Make sure both devices are on the same network.
- Restart your computer.
- Reinstall drivers.
Printer Drops Connection
- Update printer firmware.
- Place printer away from walls or interference.
- Try a static IP address in settings.
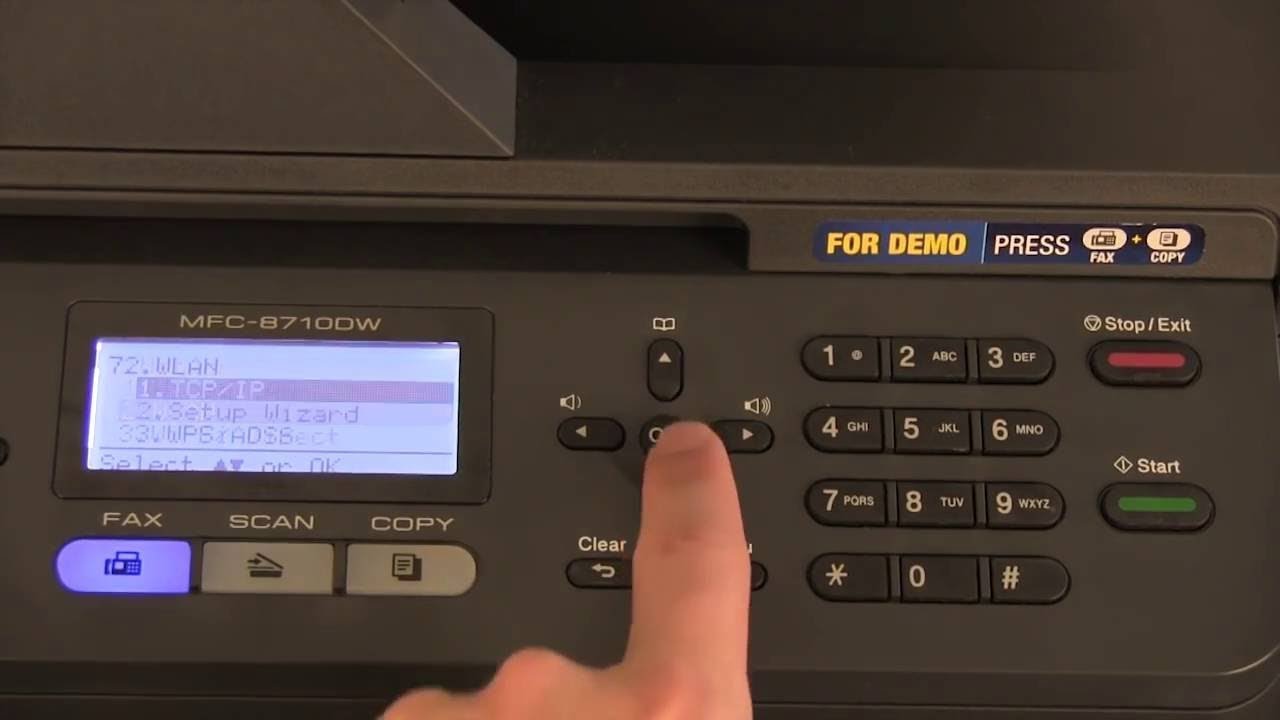
Advanced Troubleshooting Example
If your printer keeps losing connection, try assigning a static IP address. Go to network settings on your printer, choose “TCP/IP,” and enter an IP that matches your router’s range (like 192.168.1.50). This can help keep your printer online.
Credit: www.brother-usa.com
Using Brother Iprint&scan App
Brother offers a free app called iPrint&Scan. It lets you print and scan from your phone or tablet.
How To Use The App
- Download Brother iPrint&Scan from App Store or Google Play.
- Make sure your device is on the same WiFi as your printer.
- Open the app and find your printer.
- Print photos, documents, or scan to your device.
This app is useful if you print from mobile devices often.
Security Tips For Wireless Printing
Many people forget about security when connecting printers to WiFi. Here are some tips:
- Change your WiFi password regularly.
- Keep printer firmware updated.
- Disable WiFi Direct if not needed.
- Use WPA2 security on your router.
If your printer is in an office or shared space, limit who can access it by setting up user permissions.
Credit: www.youtube.com
Benefits Of Wireless Printing
Wireless printing saves time and makes life easier. Here are some benefits:
- Print from anywhere in your home or office.
- No messy cables.
- Multiple devices can use the same printer.
- Easy to share with family or coworkers.
A study by Statista showed that over 60% of home printer users now use wireless printing, compared to just 35% in 2015. This trend is growing fast.
Real-world Example
Maria, a college student, had trouble connecting her Brother printer to WiFi. She checked the manual, followed the steps, but the printer wouldn’t connect. After moving the printer closer to the router and double-checking her password, she got it online.
Installing the drivers made her laptop recognize the printer instantly. Now, she prints assignments from anywhere in her apartment.
Quick Checklist For Success
Before finishing, review these points:
- Printer supports WiFi
- Gather WiFi name and password
- Place printer near router for setup
- Follow correct steps for your model
- Install drivers on your computer
- Test with a network report
- Use troubleshooting tips if needed
If you need more help, check the official Brother support page: Brother Support.
Frequently Asked Questions
How Do I Reset My Brother Printer’s Wifi Settings?
Go to “Menu,” then “Network,” and select “Reset Network. ” This will erase all WiFi settings. After reset, restart the setup process from the beginning.
Can I Connect My Brother Printer To Wifi Without A Computer?
Yes. Most Brother printers let you connect to WiFi using their touchscreen or buttons. You only need your WiFi name and password.
Why Is My Brother Printer Not Connecting To Wifi?
Common reasons include wrong password, printer too far from router, or trying to use a 5GHz network. Restart your devices and check if your router uses 2. 4GHz.
Does My Brother Printer Support Wifi Direct?
Many newer models support WiFi Direct, which lets you connect devices directly to the printer without a router. Check your manual or Brother’s website for details.
Is Wireless Printing Safe?
Wireless printing is safe if you use a strong WiFi password and keep your printer’s firmware updated. For extra security, use WPA2 on your router and disable unused features.
Connecting your Brother printer to WiFi is a smart move. It saves you time, reduces cable clutter, and allows you to print from any device. With careful steps and a little patience, you can finish the setup in less than an hour.
Remember to install the right drivers and keep your printer’s firmware up to date for the best performance. If you run into trouble, use the tips in this guide, and you’ll be printing wirelessly in no time.