If your GE dishwasher isn’t cleaning dishes well or smells bad, the filter may be dirty. Many people don’t realize that the filter needs regular cleaning. A clogged filter can cause cloudy glasses, leftover food bits, and even strange odors. Cleaning the filter is easy, but you must know where to find it and how to do it safely. This guide will show you every step—so your dishwasher stays fresh and your dishes come out spotless.
Why Cleaning The Ge Dishwasher Filter Matters
The filter collects food particles and debris during each wash. If you skip cleaning, the filter gets blocked. This reduces water flow and makes the dishwasher less effective. According to GE Appliances, a dirty filter can increase cycle time and lead to poor cleaning results. Most newer GE dishwashers use a manual filter, which needs regular attention.
A clean filter means:
- Better cleaning performance
- Less odor and bacteria buildup
- Longer dishwasher life
- Lower energy use
Skipping this task can cause your machine to work harder, use more water, and possibly break down sooner. Over time, the buildup can also lead to mold growth inside the filter area, which not only causes bad smells but can affect your indoor air quality.
Regularly cleaning the filter helps prevent this hidden issue and keeps your kitchen smelling fresh.
Another point many users miss: if you live in an area with hard water, mineral deposits can build up on the filter mesh. These deposits block water flow just like food debris does. In such cases, you may need to soak the filter in a solution of water and a bit of vinegar to dissolve the minerals. This simple step can make a big difference in cleaning performance.
How Often Should You Clean The Filter?
For most homes, cleaning every month is enough. But if your dishwasher handles heavy loads or you rarely scrape plates, check every two weeks. You’ll know it’s time if:
- You see bits of food after a cycle
- Dishes feel gritty
- There’s a smell inside
Some GE models have a self-cleaning filter. Even then, a quick check every few months is wise, especially if you notice problems.
If your family cooks a lot of oily or starchy foods, like pasta or casseroles, you may need to check the filter more often. Food residue from these dishes can stick tightly to the filter and cause blockages faster than expected.
Pay close attention after events like big family dinners or holiday meals. Many people forget that a single heavy load can overload the filter, even if you usually clean it on schedule.
For vacation homes or dishwashers that aren’t used often, check the filter before you run the first wash after a long break. Old food in the filter can harden and become much harder to remove, leading to unpleasant surprises.
Locating The Filter In Your Ge Dishwasher
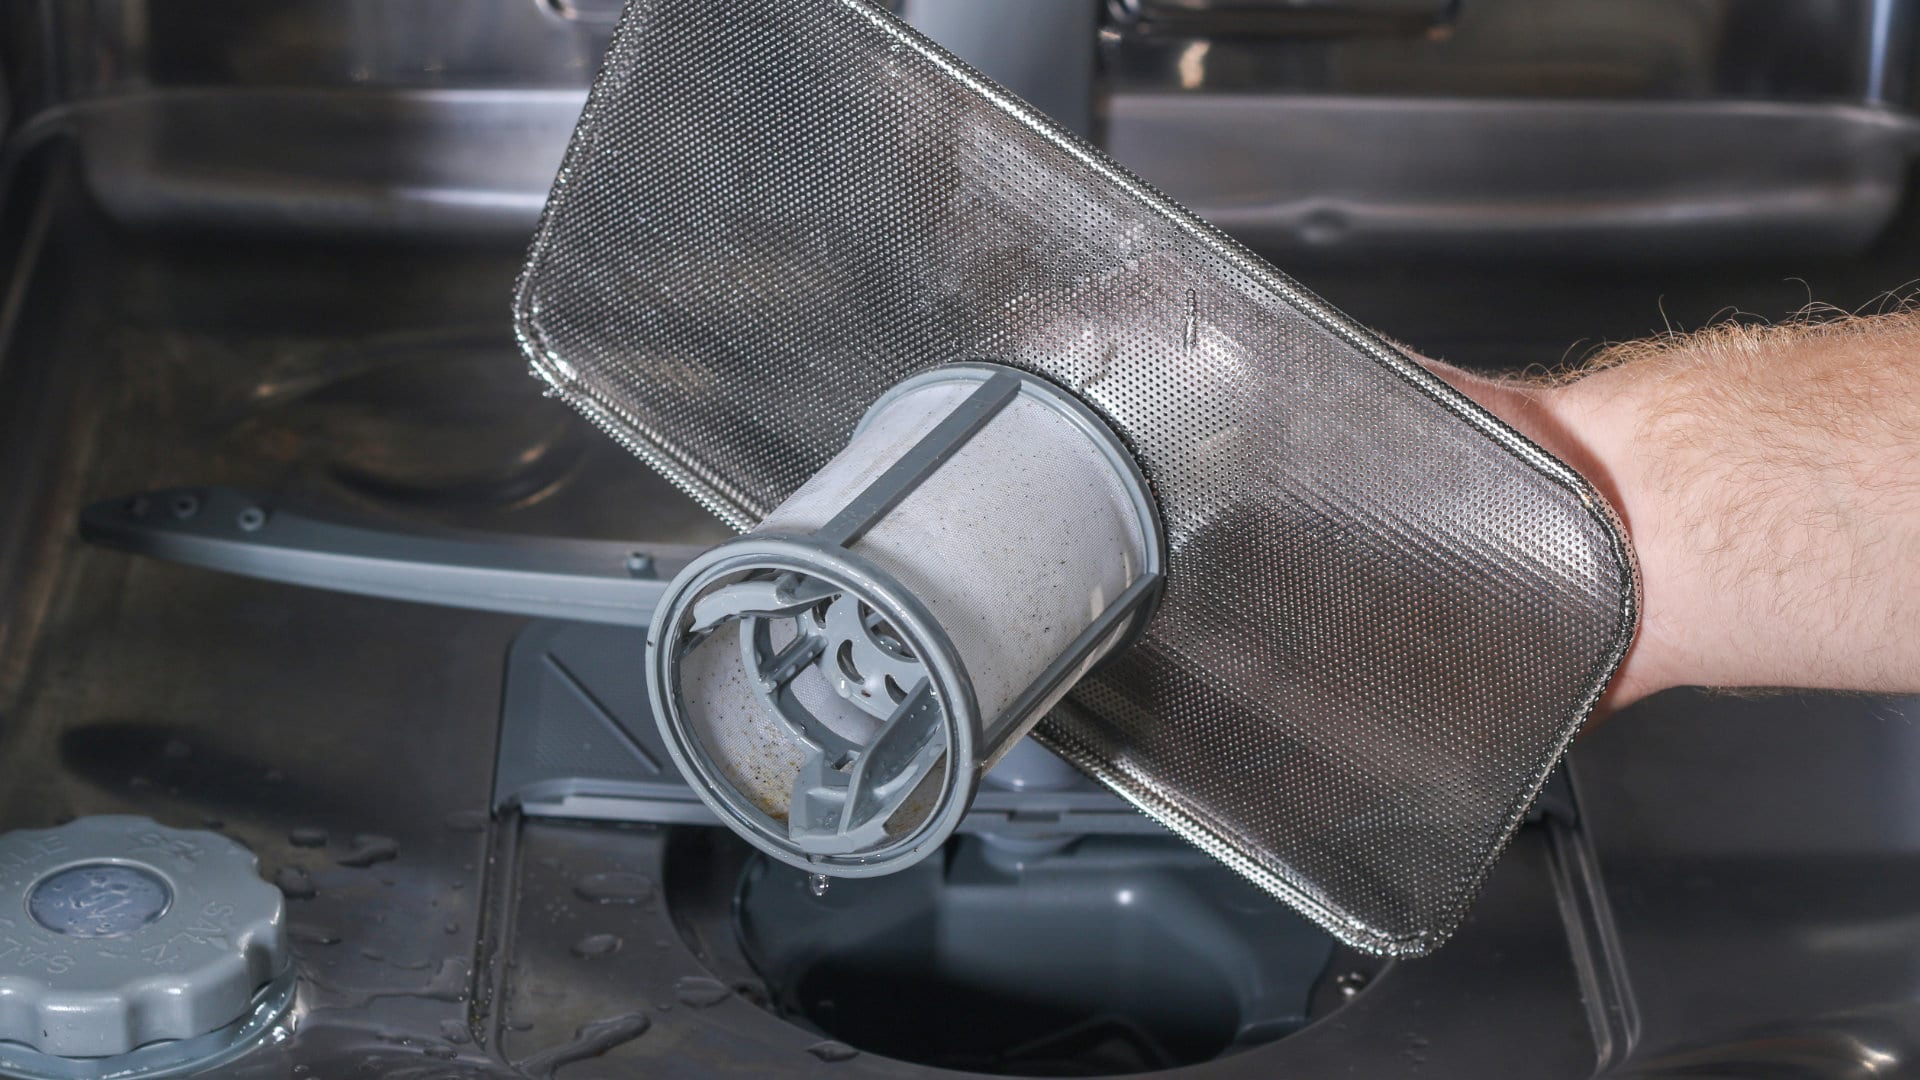
The filter is usually at the bottom of the tub, under the spray arm. In newer GE models, it has a round or cylindrical shape. Older models may have a flat screen.
Here’s how to find it:
- Open the dishwasher door fully.
- Pull out the lower rack.
- Look for a round cover or mesh near the base.
Your GE user manual will show the exact spot. If you don’t have the manual, look for a removable piece at the bottom center.
Sometimes, the filter may be partially hidden by the spray arm or a plastic guard. If you can’t see it right away, gently move the spray arm by hand (do not force it) to check underneath. Some models also have a small tab or latch you need to press before twisting out the filter.
If you’re unsure, many GE manuals are available online—just search for your model number.
| Model Type | Filter Location | Filter Shape |
|---|---|---|
| GE GDF Series | Bottom center, under spray arm | Cylindrical |
| GE Adora Series | Bottom left corner | Round |
| Older GE models | Bottom, flat screen | Rectangular |
Knowing exactly where your filter is saves time and prevents accidental damage to the spray arm or racks.
Step-by-step: Cleaning Your Ge Dishwasher Filter
Gather Supplies
You’ll need:
- Dish gloves (optional, for hygiene)
- Soft brush (an old toothbrush works)
- Mild dish soap
- Warm water
- Microfiber cloth or towel
Avoid abrasive cleaners or steel wool they can damage the filter. A soft sponge can also be useful for cleaning stubborn areas. For tough mineral buildup, a small amount of white vinegar mixed with water can help loosen deposits without harming the plastic.
Remove The Filter
Most GE filters twist out. Follow these steps:
- Push aside any debris on the filter cover.
- Twist the filter counterclockwise (most models) and gently lift it out.
- If there’s a secondary filter, remove that too.
Always be gentle forcing the filter can break the locking tabs. If the filter feels stuck, wiggle it slightly instead of forcing. Some models have a small arrow showing which direction to twist for removal. If the filter won’t budge, check for hidden latches or consult your user manual for guidance.
Inspect The Filter
Check for:
- Food particles
- Grease buildup
- Paper or plastic bits
If the filter is torn or cracked, replace it. A broken filter lets debris reach the pump, risking expensive damage.
Look closely at the mesh or screen. Sometimes, even a thin film of grease can block water flow. Hold the filter up to the light: if you can’t see through parts of it, those areas need extra attention. If you find any foreign objects (like toothpicks or small bones), remove them carefully to prevent future clogs.
Clean The Filter
Use warm, soapy water. Scrub gently with the brush. Pay attention to:
- Mesh screens (food can get stuck)
- Plastic edges (grease may build up)
For stubborn debris, soak the filter for 10–15 minutes. Rinse thoroughly.
If you notice any hard water spots or chalky white buildup, soak the filter in a mixture of equal parts water and vinegar for 10 minutes. Rinse thoroughly before reinstalling. Make sure all soap and vinegar are washed away, as leftover residue can create suds or odors during the next wash.
Clean The Filter Housing
Wipe the area where the filter sits. Remove any food bits or grime. This prevents smells and keeps the filter working well.
A damp microfiber cloth works best for removing sticky residue. For dried-on grime, let a wet cloth sit on the area for a minute before wiping. Avoid letting water drip into the machine’s base electronics. If you see black spots or mold, clean with a mild dish soap solution and dry thoroughly.
6. Reinstall The Filter
Place the filter back in its slot. Twist clockwise until it locks. If your model has a secondary filter or cover, replace those as well.
You should feel or hear a small “click” when the filter is properly locked. If it doesn’t fit smoothly, double check that nothing is blocking the slot and that the filter is correctly aligned. Never force the filter it should fit easily if positioned right.
Test The Dishwasher
Run a short cycle with no dishes. This flushes out remaining debris and ensures the filter is seated correctly.
A rinse-only cycle is usually enough. Listen for unusual noises, which could mean the filter isn’t seated properly. After the cycle, check that no water is left standing at the bottom—this can signal a filter or drain issue.
| Step | Time Needed |
|---|---|
| Remove filter | 2 minutes |
| Clean filter | 5–10 minutes |
| Clean housing | 2 minutes |
| Reinstall filter | 1 minute |
| Test cycle | 15–20 minutes |
If you need to soak the filter, add 10–15 more minutes to the process.
Tips For Keeping Your Filter Clean Longer
- Scrape plates before loading. Large food bits clog the filter faster.
- Use the right detergent. Cheap or wrong detergent can cause buildup.
- Don’t overload the dishwasher. Crowded dishes block water flow and filter efficiency.
- Run hot water before starting. Hot water dissolves grease better.
- Check the filter after washing sticky foods (like oatmeal or rice).
Most users miss the importance of water temperature. Cold water may leave grease on the filter, so always run hot water in your sink before starting the dishwasher.
Another tip: If your dishwasher has a “sanitize” or “high-temp wash” setting, use it once a month. This helps break down grease inside the filter and other parts. Also, keep an eye on your detergent amount using too much can leave a residue that collects on the filter.
If you live with pets, be aware that pet hair on dishes or bowls can collect in the filter. Rinse these items well before loading to help prevent clogs.
Common Mistakes To Avoid
Cleaning the filter is simple, but some errors can cause trouble:
- Forgetting to lock the filter. An unsecured filter lets debris reach the pump.
- Using harsh chemicals. Bleach or strong cleaners can damage plastic.
- Skipping filter checks. Even self-cleaning filters need occasional inspection.
- Ignoring odors. Bad smells often mean a dirty filter or housing.
A frequent beginner mistake is thinking that running the dishwasher often “cleans itself. ” In reality, food bits can build up even if you use the machine daily.
Another common error: Not rinsing the filter well after cleaning. Any leftover soap, vinegar, or debris can create suds, odors, or blockages in future washes. Always rinse thoroughly and inspect the filter before reinstalling.
When To Replace The Filter
Most GE filters last several years if cared for. Replace if you see:
- Cracks or holes
- Warping
- Mesh tearing
A damaged filter can harm your dishwasher’s pump. Genuine GE filters cost $15–$40, depending on model. Always use the correct part for your dishwasher.
Don’t try to patch or glue a damaged filter. Even small cracks can let food through and cause pump failure. If your filter seems loose or doesn’t fit as it used to, this is another sign it needs replacement.
Comparing Ge Filter Types
GE dishwashers use different filter designs. Knowing yours helps with cleaning and replacement.
| Filter Type | Cleaning Frequency | Replacement Cost | Ease of Removal |
|---|---|---|---|
| Manual cylindrical | Monthly | $20–$30 | Easy |
| Flat screen | Every 2–3 months | $15–$25 | Moderate |
| Self-cleaning | Check quarterly | $30–$40 | Difficult |
Self-cleaning filters are convenient but can still get blocked if you regularly wash greasy or starchy foods.
Manual filters usually have clear instructions and are easy to remove. Flat screens may require unscrewing a panel or moving the spray arm. Self-cleaning types often need professional help for deep cleaning or replacement, so check your manual before attempting.

Real-life Example: Fixing Cloudy Dishes
Sarah, a busy mom in Ohio, noticed her glasses were cloudy after every wash. She cleaned the filter and removed a thick layer of grease. After cleaning, her dishes were spotless and the dishwasher smelled fresh again.
Many users don’t realize that even a thin film on the filter can cause cloudy results. If you see this problem, cleaning the filter is often the best solution.
Another real-life insight: John, a college student, kept getting bits of rice stuck on his plates. He found a piece of plastic stuck in the filter, blocking proper drainage. After removing it and cleaning the filter, his dishwasher performed much better. Small objects can easily get lodged in the filter, so check carefully each time.
Saving Time And Money
Keeping your filter clean can save you over $100 per year in repair costs, according to appliance repair experts. It also cuts energy use by up to 15% because the dishwasher doesn’t work as hard.
Regular cleaning also means fewer service calls and less risk of emergency breakdowns. Many warranty claims are denied if the filter is dirty, since manufacturers expect regular maintenance. Taking a few minutes each month not only keeps your machine running smoothly but also protects your investment.
For more detailed guidance and official GE tips, visit GE Appliances Support.

Frequently Asked Questions
How Do I Know If My Ge Dishwasher Filter Needs Cleaning?
If dishes come out dirty or there’s a bad smell, check the filter. Visible debris or greasy buildup means it’s time to clean.
Also, if your dishwasher sounds louder than usual or takes longer to finish a cycle, these can be signs of a blocked filter.
Can I Use Vinegar To Clean The Filter?
Yes, but dilute it with water. Vinegar helps dissolve grease and odors. Avoid pure vinegar—it can damage plastic parts.
Mix one part vinegar to three parts water for soaking. Always rinse well before reinstalling.
What Happens If I Forget To Clean The Filter?
A clogged filter leads to poor cleaning, bad smells, and possible pump damage. Regular cleaning prevents most dishwasher problems.
Eventually, your dishwasher may stop draining or leave standing water at the bottom if the filter is too blocked.
How Long Does Cleaning The Filter Take?
The whole process takes about 15–20 minutes. Soaking for tough buildup may add extra time, but it’s quick overall.
If you’re new to the process, expect the first time to take a bit longer as you learn where everything is.
Is It Safe To Run The Dishwasher Without The Filter?
No. Running without a filter can damage the pump and cause expensive repairs. Always reinstall the filter after cleaning.
Even if you’re only running a rinse cycle, always make sure the filter is in place.
Keeping your GE dishwasher filter clean is simple but essential. With regular care, your machine works better, dishes come out sparkling, and you avoid costly repairs. Take a few minutes each month—your dishwasher will thank you.