If you love making espresso at home, you might depend on your Breville machine’s pressure gauge. This small dial tells you if the water is flowing with the right pressure to make a rich shot. But what if the Breville pressure gauge suddenly stops working or gives odd readings? This can be confusing and sometimes frustrating, especially when you want the best coffee. Don’t worry—pressure gauge problems are common and usually fixable. Let’s explore what causes these issues, how to diagnose them, and what you can do to get your gauge (and your coffee!) back to normal.
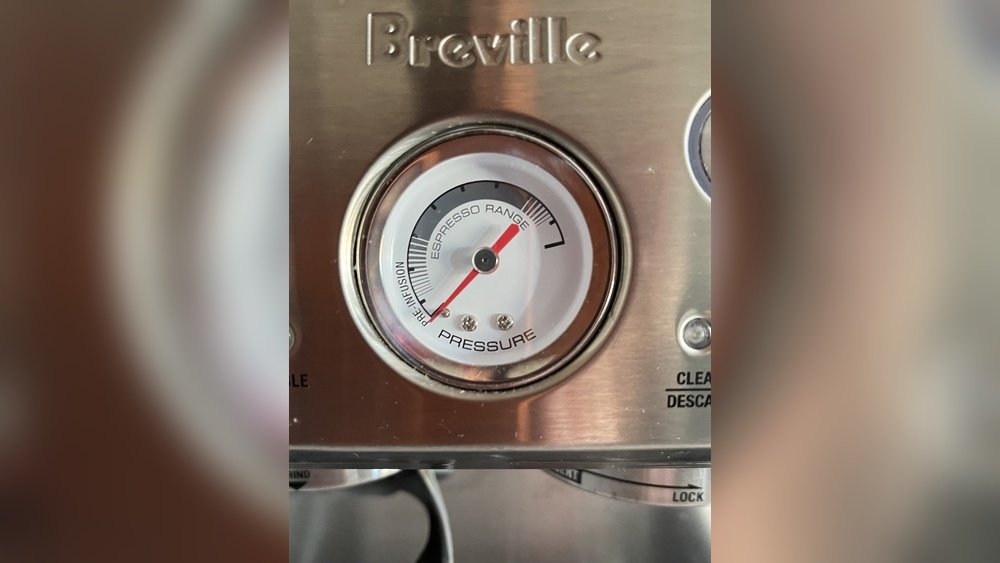
What Does The Breville Pressure Gauge Do?
The pressure gauge on a Breville espresso machine isn’t just for looks. It measures the pressure in the brew head as water is pushed through the coffee grounds. For most espresso, you want around 9 bars of pressure. Too little pressure and your shot will be weak and sour. Too much and it can taste bitter or burnt.
Some Breville models, like the Barista Express or Barista Pro, have a round gauge on the front panel. When you pull a shot, the needle should move smoothly into the “espresso range” (usually marked on the dial). If it doesn’t move, stays stuck, or moves erratically, something is wrong.
Common Signs Of Pressure Gauge Problems
How do you know your Breville pressure gauge isn’t working as it should? Here are some classic signs:
- The needle never moves during brewing
- The needle jumps or moves erratically
- The gauge stays at zero even when water flows
- The gauge stays at max pressure
- The needle sticks even when the machine is off
It’s important to note that the gauge reading is a clue—your espresso quality may also change when the gauge is off.
Why Is The Breville Pressure Gauge Not Working?
There are several reasons your pressure gauge might not show the right reading. Here are the most common causes:
- Clogged or blocked lines – Coffee oils and mineral buildup can block the small tubes that connect to the gauge.
- Faulty gauge – Mechanical failure inside the gauge itself can stop the needle from moving.
- Broken or loose connections – The thin tube or fitting connecting the gauge to the pump may be disconnected or leaking.
- Pump problems – If the pump isn’t working, there may be no pressure to display.
- User error – Using the wrong grind size, tamping too hard or too soft, or not enough coffee can all affect pressure readings.
- Electrical issues – On some models, a bad sensor or circuit can affect the gauge.
Let’s break down these causes in more detail.
Diagnosing The Problem
Before you start taking your machine apart, use these steps to help diagnose the issue:
1. Check The Obvious
- Is the machine heating up and making noise as usual?
- Are you using fresh coffee with the right grind size?
- Is the water tank full and properly seated?
- Are you getting any water from the group head at all?
Sometimes, the problem is as simple as a loose water tank or a blocked portafilter.
2. Watch The Gauge Behavior
Pay attention to when the gauge is acting up:
- Does it move at all when you run water without coffee (just water shot)?
- Does it only act strange with coffee in the portafilter?
- Is it stuck at a certain point, or does it jump around?
This can help you tell if the problem is with the gauge, the coffee, or the machine’s pressure system.
3. Test With Different Coffee
Try pulling a shot with no coffee (just run water through the group head). The gauge should move, but not as much as with coffee. If it works fine, the issue may be with your grind or tamp.
If the gauge still doesn’t move, it’s more likely a machine or gauge problem.
4. Listen For The Pump
A healthy Breville espresso machine will make a steady, humming noise when brewing. If you hear odd sounds (no noise, loud clicking, or a struggling sound), the pump could be the problem.
5. Check For Leaks
Carefully inspect around the pressure gauge and the front panel for any water leaks or signs of moisture. A leak can cause the gauge to stop working properly.

Credit: www.reddit.com
How The Pressure System Works
Understanding the pressure path inside your Breville machine helps you spot problems. Here’s a simple view:
| Component | Role in Pressure System |
|---|---|
| Water tank | Holds water for brewing |
| Pump | Pushes water through the system |
| Boiler/Thermoblock | Heats water to the right temperature |
| Pressure Gauge | Measures brewing pressure |
| Group head | Delivers pressurized water to coffee puck |
If any part fails, the pressure gauge might not work as expected.
Solutions For A Non-working Breville Pressure Gauge
Let’s look at what you can do to fix the problem. Many steps are simple and safe for home users, but a few may require a professional. Start with the easiest solutions and work toward the more advanced.
1. Clean And Descale Your Machine
A blocked line is one of the most common causes of gauge failure. Coffee oils and minerals can clog the tiny pipes inside.
- Run a full descale cycle using Breville’s recommended descaler or a mix of citric acid and water.
- Backflush your machine (if your model allows) with a blind filter and cleaning tablet.
- Clean the portafilter, group head, and any removable parts.
Regular cleaning can prevent most pressure problems. Many users forget to descale often enough, which leads to buildup in the pressure system.
2. Check Your Coffee Prep
Using the wrong coffee grind or tamping incorrectly can give false pressure readings. For example, a very fine grind or over-tamping can block water, causing high pressure or no movement at all.
- Use a medium-fine espresso grind
- Dose the right amount (usually 18-20g for double shot)
- Tamp evenly, with about 30 pounds of pressure
Try a few test shots, adjusting your grind and tamp each time, to see if the gauge responds.
3. Inspect The Pressure Gauge And Connections
If the gauge doesn’t move at all, even with water flow, it might be disconnected or broken. This step is more advanced:
- Unplug the machine and let it cool.
- Remove the front panel (follow your model’s manual or a trusted YouTube guide).
- Check the thin tube from the pump to the gauge. Is it attached securely? Any leaks?
- Look for any obvious cracks or loose fittings.
If you find a disconnected or leaking tube, reconnect or replace it. If the gauge looks damaged (foggy, cracked, or leaking inside), it will need to be replaced.
4. Test The Pump
A failing pump means no pressure and a dead gauge. Pumps can wear out after a few years. Signs include:
- No noise or very weak humming during brewing
- Low or no water flow
- Gauge stays at zero
Replacing the pump is possible for advanced DIYers, but most people should contact a Breville repair center.
5. Replace The Pressure Gauge
If all else fails and the gauge itself is faulty, you’ll need a replacement. Breville gauges can be bought online, but make sure to get the correct part number for your model. Replacement involves:
- Removing the old gauge (unscrewing from the front panel)
- Detaching the connecting tube
- Installing the new gauge and reseating the panel
If you’re unsure, it’s best to have a professional do this, as improper installation can cause leaks.
Comparing Common Causes: Gauge Not Working
Here’s how common pressure gauge issues stack up, based on user reports and repair data:
| Cause | Frequency | Difficulty to Fix |
|---|---|---|
| Clogged lines | Very common | Easy (descale) |
| Faulty gauge | Less common | Medium (replace gauge) |
| Disconnected tube | Somewhat common | Medium (open panel) |
| Pump failure | Rare | Hard (replace pump) |
| User error (coffee prep) | Very common | Easy (adjust prep) |
When To Call For Professional Help
Some pressure gauge problems are simple and can be fixed at home. Others, like electrical issues or a failed pump, are best handled by a pro. Here’s when you should contact Breville support or a repair shop:
- You see water leaking inside the machine or around the gauge
- The machine won’t turn on or is tripping breakers
- The gauge is cracked or leaking fluid inside
- You tried cleaning/descaling, but the problem remains
Attempting complex repairs without the right skills can damage your machine or void your warranty.

Credit: www.reddit.com
Preventing Pressure Gauge Issues
You can avoid most pressure gauge problems with regular care. Here are essential tips:
- Descale every 2-3 months (more often if you have hard water)
- Clean the group head and portafilter after each use
- Use filtered water to prevent mineral buildup
- Check your coffee grind and tamp for consistency
- Store your machine in a dry area to avoid moisture damage
Many espresso enthusiasts overlook the importance of consistent cleaning. Even small amounts of buildup can block the pressure system over time.
Real-world Example
Anna, an espresso fan from Chicago, noticed her Breville Barista Express pressure gauge stopped moving. First, she thought the gauge was broken. But after a quick descale and switching to a slightly coarser grind, the gauge started working again. She realized she had used a new coffee that was much finer than usual, which blocked the flow. This simple change fixed her problem.
Cost Of Repair And Replacement
How much will it cost if you need to fix or replace your Breville pressure gauge? Here’s a rough guide:
| Repair/Part | Estimated Cost (USD) |
|---|---|
| Descaling/cleaning | $0–$20 (DIY) |
| Gauge replacement | $30–$60 (part only) |
| Professional repair | $80–$150 |
| Pump replacement | $60–$120 (part only) |
Always check if your machine is still under warranty before paying for repairs.
Two Beginner Mistakes To Avoid
Many new Breville owners fall into these traps:
- Ignoring regular descaling – Even if the water tastes fine, minerals build up. Skipping descaling is the fastest way to pressure gauge trouble.
- Using pre-ground or supermarket espresso – These are often ground too fine or too coarse. Always use fresh, high-quality beans and grind just before brewing.
External Resource For Further Help
For official repair guides and troubleshooting steps, the Breville support site is an excellent place to start. Visit the Breville Support Center for manuals and service options.
Frequently Asked Questions
Why Does My Breville Pressure Gauge Stay At Zero?
If the gauge stays at zero, it usually means no pressure is reaching the gauge. Check if the pump is running, the water tank is full, and the lines aren’t blocked. Also, try running water without coffee to test the system.
Can I Use My Breville Machine If The Pressure Gauge Isn’t Working?
Yes, you can still brew coffee, but you’ll lose a helpful visual guide for brewing pressure. Pay attention to shot time, taste, and water flow. However, it’s best to fix the gauge for consistent results.
How Often Should I Descale My Breville Espresso Machine?
You should descale every 2–3 months, or more often if you have hard water. Regular descaling prevents mineral buildup, which is a common cause of pressure gauge and pump issues.
Is Replacing The Pressure Gauge A Diy Job?
It depends on your skills. For most users, gauge replacement is a medium-difficulty task that involves opening the machine. If you’re unsure, or if your machine is under warranty, contact an authorized repair center.
What’s The Most Common Cause Of Pressure Gauge Failure?
The most common cause is blockage from coffee oils or minerals. Regular cleaning and using filtered water can prevent this. Less often, the gauge fails due to mechanical or electrical issues.
If you keep your machine clean and use quality beans, your Breville pressure gauge should last for years. A little regular care can save you from bigger headaches—and keep your espresso tasting just right.

Credit: www.youtube.com