Changing a door from inswing to outswing is a project that many homeowners consider for safety, space, or accessibility reasons. Maybe your room feels cramped, or you want to improve emergency exit routes. Switching the swing direction can make a big difference, but the task is not as simple as flipping the hinges. It requires careful planning, the right tools, and attention to building codes. In this article, you’ll discover exactly what is involved, what to watch out for, and practical steps for a successful transformation—even if you’re not a professional carpenter.
Why Change From Inswing To Outswing?
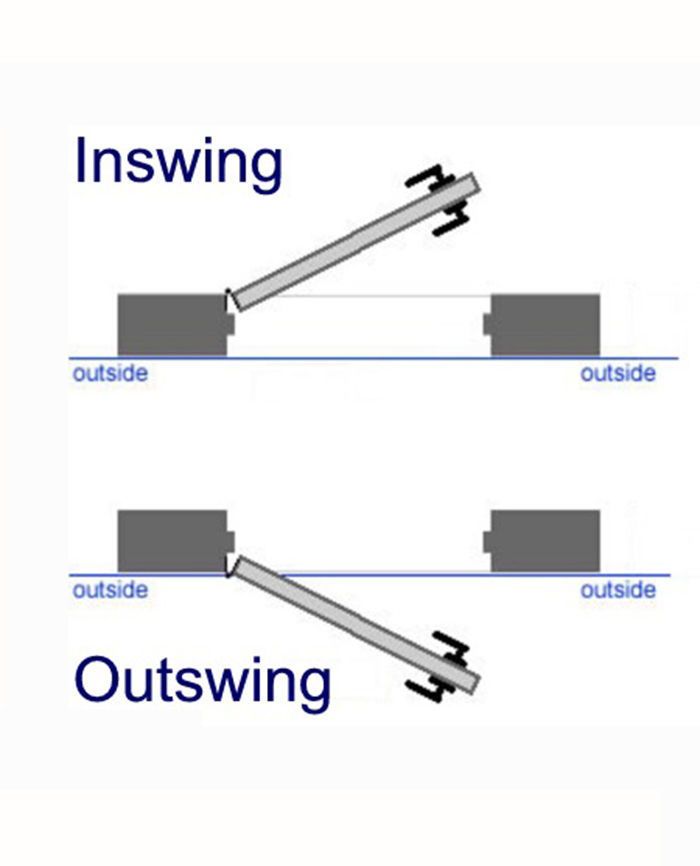
Most homes in the US have inswing doors by default. The door opens into the room, which feels normal and protects the hinges from tampering. But there are valid reasons to switch to outswing doors:
- Space efficiency: Outswing doors free up indoor space.
- Improved access: Outswing doors allow easier movement, especially when carrying large items.
- Safety and emergency: Outswing doors are often safer in emergencies because they don’t block escape routes.
- Weather protection: Outswing doors seal better against wind and rain, making them ideal for exterior doors in storm-prone areas.
- Security concerns: Outswing doors can be more secure if you use tamper-proof hinges.
Many commercial buildings use outswing doors for these reasons. However, making the change in a residential setting brings unique challenges.
What You Need To Know Before Starting
Changing the swing direction is not just about moving hinges. There are several critical points to check before you begin:
- Door frame compatibility: Some frames cannot easily be modified for outswing.
- Hinge and latch placement: Outswing doors require special hardware.
- Threshold and weatherstripping: You need to reseal the door for outswing orientation.
- Building codes: Many local codes restrict outswing doors, especially for bedrooms and bathrooms.
- Security risks: Outswing doors expose hinges, so you must use security hinges.
Consider the following data comparing both types:
| Feature | Inswing Door | Outswing Door |
|---|---|---|
| Space usage | Consumes indoor space | Frees indoor space |
| Weather resistance | Average | Better, seals tighter |
| Security | Hinges protected | Hinges exposed, needs tamper-proof |
| Emergency exit | Can be blocked | Easy exit |
| Building code | Usually allowed | Sometimes restricted |
Non-obvious insight: Many people do not realize that changing to outswing may require replacing the entire door frame, not just the door leaf. This is because the way the frame is built affects how the door will seal and swing.

Credit: www.youtube.com
Planning Your Door Conversion
Before you grab your tools, spend time planning. Rushing this project often leads to mistakes, especially for beginners.
Measure Everything Twice
Check the exact size of your existing door and frame. Outswing doors need clearance outside, so measure the area where the door will open. Consider obstacles like steps, walls, or furniture.
Check Local Codes
Some municipalities do not allow outswing doors in certain rooms for safety reasons. For example, a bathroom outswing door could block the hallway during an emergency. Always check with your local building department.
Choose The Right Hardware
Outswing doors need:
- Security hinges: Hinges with non-removable pins or built-in security tabs.
- Latch upgrades: Outswing doors benefit from deadbolts and reinforced strike plates.
- Weatherstripping: Outswing requires weather seals outside, not inside.
Decide If You Need A New Frame
Older frames often cannot be reversed. If your frame is not symmetrical, you may need to remove the entire frame and install a new one designed for outswing.
| Frame Type | Can Be Modified? | Requires Full Replacement? |
|---|---|---|
| Standard wood frame | Sometimes | Often |
| Metal frame | Rarely | Usually |
| Pre-hung door unit | No | Yes |
Beginner mistake: Many people buy just a new door slab, not realizing that their frame cannot handle outswing conversion.
Step-by-step Guide: Changing Door From Inswing To Outswing
Follow these steps to make the change. If you are new to carpentry, consider asking a friend for help or hiring a professional for the trickier parts.
1. Remove The Old Door And Frame
- Use a screwdriver or drill to remove the hinges and latch hardware.
- Carefully pry out the frame. Use a crowbar and go slow to avoid damaging the wall.
2. Prepare The Opening
- Clean out old caulk and debris.
- Check for rot or damage. Repair as needed.
- Make sure the rough opening is square and level.
3. Install The New Outswing Frame
- Place the new frame in the opening. Use shims to make sure it is plumb (vertical).
- Secure the frame with screws. Double-check alignment—outswing doors must fit tightly for weather protection.
4. Hang The Outswing Door
- Attach security hinges to the door.
- Hang the door on the frame. Test the swing and adjust shims if needed.
- Install latch and deadbolt hardware.
5. Seal And Finish
- Add weatherstripping around the door.
- Install a threshold designed for outswing doors.
- Use exterior caulk to seal gaps.
6. Test Everything
- Open and close the door several times.
- Check for smooth operation, proper seal, and security.
Practical Tips
- Outswing doors can catch wind and slam shut. Consider installing a door closer.
- If the door leads outside, choose a model with a reinforced core for extra security.
- Always use tamper-proof hinges to prevent removal from outside.
Common Challenges And Solutions
Changing door swing direction is not without problems. Here’s what you might face, and how to fix it:
1. Wall Interference
If the door hits a wall or porch furniture, you may need to reposition the opening or move obstacles.
2. Uneven Floor Or Threshold
Outswing doors need a slope away from the house to shed water. If your threshold is level or slopes inward, you might need to rebuild it.
3. Weather Exposure
Outswing doors are more exposed to rain and wind. Choose high-quality weatherstripping and a durable threshold.
4. Security Risks
Hinges on the outside can be attacked. Use security hinges with non-removable pins and install a strong deadbolt.
5. Legal Issues
If your area bans outswing doors for certain rooms, you must follow the law. Violating codes can lead to fines or trouble selling your home.
Non-obvious insight: Outswing conversions often reveal hidden damage in walls or frames. Take the opportunity to inspect and repair everything before installing the new door.
Cost Estimates And Time Required
Changing from inswing to outswing is not free, and costs can vary widely. Here are some typical numbers:
| Item | Low Cost | High Cost |
|---|---|---|
| New door slab | $150 | $600 |
| New frame | $100 | $400 |
| Security hinges | $20 | $60 |
| Weatherstripping | $15 | $50 |
| Labor (optional) | $200 | $700 |
Most DIY conversions take one day for removal and installation, plus extra time for finishing and painting. If you hire a pro, expect the project to take 1–2 days.
Outswing Doors And Accessibility
If you want better accessibility for wheelchairs or mobility devices, outswing doors are often a smart choice. They clear the inside space, so the door does not block movement. But you must make sure the exterior landing is wide and flat. ADA guidelines recommend at least 36 inches of clear space outside the door.
Security Considerations
Security is a top concern with outswing doors. Because the hinges are outside, you must take steps to protect them:
- Use security hinges that cannot be removed easily.
- Reinforce the door frame with longer screws.
- Install a high-quality deadbolt.
Some modern outswing doors have built-in hinge protection. Always check product specifications before buying.
For more on hinge security, see Family Handyman.
Credit: www.finehomebuilding.com
When Should You Not Change To Outswing?
There are cases where changing to outswing is not a good idea:
- Limited outdoor space: If your porch or landing is too small, outswing doors can block movement.
- High-traffic areas: Outswing doors in busy hallways can cause accidents.
- Local code restrictions: Always respect local laws.
- Historic homes: Outswing doors may not match the architectural style.
Real-life Example: A Kitchen Door Conversion
A homeowner in Texas changed her kitchen door from inswing to outswing. She gained extra room for a dining table, improved ventilation, and made it easier to carry groceries inside. However, she needed to rebuild the threshold and add a roof over the door to protect from rain. The project cost about $800 and took two days with help from a handyman.

Credit: www.youtube.com
Frequently Asked Questions
Can Any Door Be Changed From Inswing To Outswing?
Not all doors can be converted. You need a compatible frame, enough exterior space, and the right hardware. Many older frames must be replaced completely.
Is An Outswing Door Safer Than An Inswing Door?
Outswing doors can be safer during emergencies and storms, but they expose hinges. With proper security hinges and locks, outswing doors offer strong protection.
Do I Need A Permit To Change My Door Swing?
In many areas, yes. Changing a door, especially an exterior one, can require a permit. Always check with your local building department before starting.
Will Changing To Outswing Affect My Home’s Value?
Usually, it does not affect value if done correctly. However, poor installation or code violations can lower value and make it harder to sell.
Can I Do The Conversion Myself Or Should I Hire A Pro?
DIY is possible if you have basic carpentry skills and tools. If your frame needs replacement, or you’re unsure about code issues, hiring a pro is safer.
Switching your door from inswing to outswing is a real upgrade for many homes. It can improve space, safety, and accessibility. But it’s a job that needs careful planning, the right tools, and respect for building codes. By following the steps and tips in this guide, you’ll avoid common mistakes and get the most out of your new outswing door.