When your dryer timer stops working, laundry day quickly turns stressful. You load wet clothes, set the timer, and nothing happens—or the dryer keeps running endlessly. Dryer timer issues are common, but many people don’t know why they happen or how to fix them. This guide helps you understand what causes a timer to fail, how to diagnose the problem, and what steps to take. If you know the basics, you can often solve the issue yourself or decide when to call a professional. Let’s look at practical ways to handle a dryer timer not working so you spend less time worrying and more time with fresh laundry.
What Does The Dryer Timer Do?
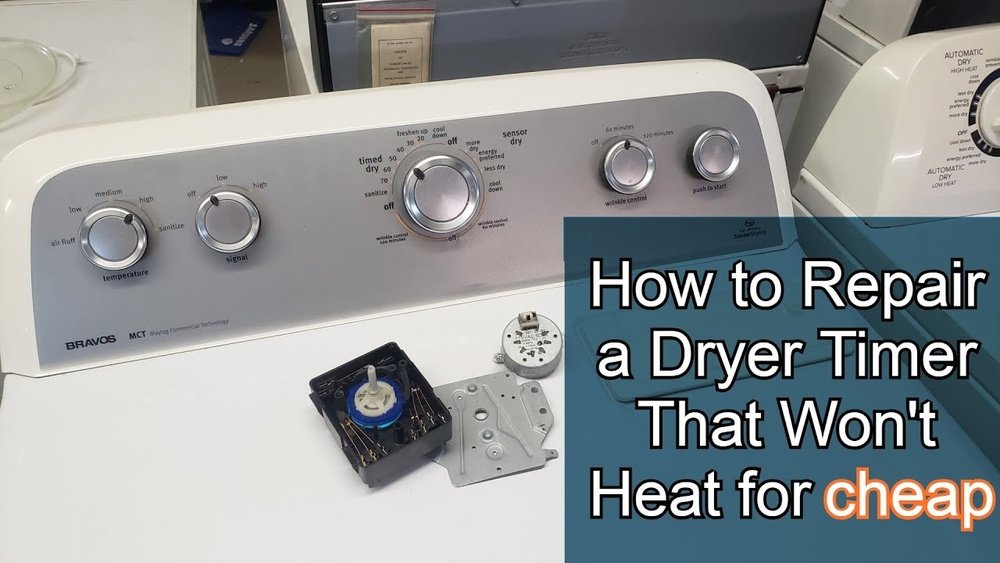
The dryer timer controls how long your dryer runs. It’s usually a knob you turn to select a drying cycle. Inside, there’s a mechanism—either mechanical or electronic—that counts down and signals the dryer to stop. When the timer fails, your dryer might:
- Not start at all
- Run longer than it should
- Stop too soon
- Stay stuck on one cycle
Timers are found in both electric and gas dryers. While modern dryers often use electronic controls, many still rely on mechanical timers. Each type has its own repair needs.
Common Signs Your Dryer Timer Is Faulty
A broken timer shows clear symptoms. Watch for these:
- Dryer won’t start: You turn the knob, but nothing happens.
- Dryer runs endlessly: It never shuts off, even when clothes are dry.
- Dryer stops too early: Timer moves fast or jumps, ending the cycle before clothes are dry.
- Timer doesn’t advance: The knob doesn’t move during the cycle.
- Wrong cycle selection: Timer jumps cycles or doesn’t stay on the one you choose.
Sometimes, these symptoms overlap with other dryer issues. For example, a dryer that won’t start could have a door switch problem. But when the timer is the problem, fixing it is usually straightforward.
Causes Of Dryer Timer Failure
Understanding why timers fail helps you prevent future breakdowns. Here are the main reasons:
Mechanical Wear
Mechanical timers use gears and contacts. Over time, these parts wear out. The contacts inside can burn or become dirty, stopping the timer from working.
Electrical Faults
If a timer’s wiring gets damaged or connections loosen, it may not get power. Sometimes, a power surge burns out the timer’s internal parts.
Moisture And Dirt
Dryers produce heat and moisture. If the timer gets wet or dirty, it can corrode or jam.
Overloading
Running the dryer with heavy loads strains the motor and timer. Over time, this stress causes breakdowns.
Age
Most dryer timers last 8–12 years. After that, failures are more likely.
Diagnosing The Dryer Timer Problem
Before you replace anything, check these steps to confirm the timer is the issue.
1. Inspect The Knob And Shaft
Sometimes, the knob slips or breaks. Turn it and see if the shaft underneath moves. If the shaft is still, but the knob turns freely, the knob needs replacing.
2. Listen For Sounds
A working mechanical timer usually clicks. If you hear nothing and the dryer doesn’t start, the timer may be dead.
3. Check The Timer Movement
Run a cycle and watch the timer knob. If it doesn’t advance, or moves too quickly, there may be a fault.
4. Test Other Functions
See if the dryer heats, tumbles, or blows air. If everything works except the timer, the problem is isolated.
5. Use A Multimeter
If you’re comfortable, unplug the dryer and remove the timer panel. Use a multimeter to test for continuity in the timer contacts. No continuity means the timer is bad.
Comparing Dryer Timer Types
Not all timers are equal. Here’s a quick comparison of mechanical and electronic timers:
| Timer Type | How It Works | Common Issues | Repair Difficulty |
|---|---|---|---|
| Mechanical | Gears & switches | Wear, burn contacts | Medium |
| Electronic | Digital circuits | Faulty board, wiring | Hard |
Most older dryers use mechanical timers, which are easier to fix yourself. Electronic timers often need professional repair.
How To Fix A Dryer Timer Not Working
If you confirm the timer is faulty, you can often fix it yourself. Here are the steps:
Step 1: Safety First
Unplug the dryer from the wall. Never work on appliances with power.
Step 2: Access The Timer
Open the control panel. Usually, you remove screws from the back and lift the panel.
Step 3: Remove The Timer
Take off the timer knob. Unscrew the timer from its mount. Disconnect the wires (take a photo first to remember placement).
Step 4: Install The New Timer
Buy a replacement timer matching your dryer’s model. Install it by connecting the wires and screwing it back into place.
Step 5: Test The Dryer
Plug in the dryer and run a short cycle. Watch the timer. If it advances and stops correctly, you’ve fixed the problem.

Credit: www.asurion.com
Cost And Time Estimates For Repair
Is fixing a dryer timer expensive? Here’s a summary:
| Repair Method | Average Cost | Time Needed | Success Rate |
|---|---|---|---|
| DIY Timer Replacement | $35–$90 | 30–60 minutes | High (if diagnosed correctly) |
| Professional Repair | $130–$250 | 1–2 hours | Very High |
| Full Dryer Replacement | $450–$1,000 | 1–2 hours | Highest (new machine) |
Most people find DIY replacement affordable, especially for mechanical timers. Electronic timers cost more and often require expert help.
Mistakes To Avoid When Repairing Your Dryer Timer
Some beginners make common errors that lead to extra costs or frustration. Here’s what to watch out for:
- Not unplugging the dryer before opening it. This can cause electric shock.
- Mixing up wires when installing the new timer. Always take a photo before disconnecting.
- Ordering the wrong timer. Match your dryer’s model number exactly.
- Ignoring other problems. Sometimes, a broken timer is a symptom of a bigger issue—like a faulty motor or heating element.
- Skipping regular cleaning. Dust and lint buildup can cause timer failure.
Credit: www.selecthomewarranty.com
When To Call A Professional
DIY is great, but some repairs are best left to experts. Call a professional if:
- You have an electronic timer (digital display)
- The dryer still doesn’t work after timer replacement
- You see burned wires or smell burning
- You’re not comfortable with electrical repairs
Professionals have tools and experience. They can diagnose hidden problems and keep your dryer safe.
Preventing Dryer Timer Problems
Simple habits can keep your dryer timer working longer.
- Clean lint filter after every use.
- Don’t overload the dryer; follow capacity guidelines.
- Keep the area around the dryer dry and clean.
- Check the timer knob regularly for cracks or looseness.
- Run the dryer on proper voltage; avoid extension cords.
A surprising tip: Many people forget to check their home’s voltage. If your outlet doesn’t deliver the right power, the timer can fail faster.

Credit: www.youtube.com
Real-life Examples: Dryer Timer Failures
Let’s look at how timer failures happen in real homes.
Case 1: Anna’s dryer ran for hours and never stopped. She found the timer knob was cracked and slipping. Replacing the knob fixed her problem.
Case 2: John’s dryer stopped after 5 minutes. The timer advanced too quickly. He opened the panel and saw burned contacts on the mechanical timer. A $45 replacement solved it.
Case 3: Maria’s newer dryer had a digital timer. It wouldn’t start, and the display flashed error codes. She called a technician, who replaced the control board for $180.
These stories show how simple fixes can solve timer issues, but sometimes expert help is needed.
Comparing Dryer Brands: Timer Reliability
Some dryer brands are known for timer reliability. Here’s a comparison:
| Brand | Timer Type | Average Lifespan | Common Issues |
|---|---|---|---|
| Whirlpool | Mechanical/Electronic | 10 years | Knob cracks |
| LG | Electronic | 8 years | Board failure |
| Maytag | Mechanical | 12 years | Worn gears |
Choosing a reliable brand helps reduce timer problems, but regular maintenance is just as important.
Frequently Asked Questions
Why Does My Dryer Timer Stop Moving During A Cycle?
A timer that stops moving is usually caused by mechanical failure or burned contacts inside the timer. Sometimes, a faulty wiring connection can also cause this. Check the timer and wiring for damage. If you’re unsure, replace the timer or call a technician.
Can I Fix A Dryer Timer Myself?
Yes, most mechanical timers can be replaced by homeowners. Always unplug the dryer first. Electronic timers are harder to fix and usually require a professional. If you follow steps carefully, DIY repair is safe and affordable.
How Much Does A New Dryer Timer Cost?
A replacement mechanical timer costs $35–$90. Electronic timers or control boards are more expensive, often $100–$200. Always match the timer to your dryer’s model number.
What If My Dryer Still Doesn’t Work After Replacing The Timer?
If the dryer doesn’t work after a new timer, the problem might be elsewhere—like the motor, heating element, or door switch. Double-check wiring and connections. If you can’t find the issue, call a professional for diagnosis.
Where Can I Find Reliable Dryer Timer Parts?
Buy parts from official brand stores or trusted appliance retailers. One reputable source is AppliancePartsPros. Avoid generic or mismatched parts, as they may not fit or last long.
A dryer timer not working is annoying, but with the right knowledge, it’s easy to fix or prevent. Save money and time by knowing what to look for and how to act. Regular care keeps your dryer running smoothly for years.