Every drop of water counts. For homeowners looking to save on water bills and help the environment, flow restrictors in shower heads are a common solution. These small devices limit how much water comes out. But sometimes, the flow feels weak, or you just want a stronger shower. Removing the flow restrictor can make a big difference. The process may seem tricky, but with the right tools and steps, anyone can do it. This guide will show you exactly how to remove a shower head flow restrictor safely, with tips to avoid mistakes and keep your plumbing in good shape.
What Is A Shower Head Flow Restrictor?
A flow restrictor is a small plastic disc or insert inside most modern shower heads. Its job is to limit water flow, usually to 2.5 gallons per minute (GPM) or less. This helps meet US regulations, like the EPA’s WaterSense standards, and saves thousands of gallons every year. According to the EPA, a family could save up to 2,700 gallons annually with a water-efficient shower head. But if your water pressure is low or you want a more powerful shower, the restrictor can feel like a problem.
Why Manufacturers Use Flow Restrictors
- Conservation: Reduces water and energy usage.
- Compliance: Meets federal and state regulations.
- Cost Savings: Lowers utility bills.
- Environmental Impact: Less water use means less stress on local resources.
However, not all homes have the same water pressure. If your shower feels weak, removing the restrictor can help, but it’s important to do it correctly.
Tools And Supplies You’ll Need
Getting ready is half the battle. Gather these tools before you start:
- Adjustable wrench (or pliers)
- Teflon tape (plumber’s tape)
- Small flathead screwdriver
- Needle-nose pliers
- Old toothbrush (for cleaning)
- Soft cloth or towel
- Bucket (optional, for catching water)
- Step stool (if your shower head is high)
Make sure your tools are clean and in good shape. A damaged wrench can scratch your shower head, and dirty tools can introduce debris.
Step-by-step Guide: Removing The Flow Restrictor
Follow these steps carefully for best results. If you rush, you might damage the shower head or leave leaks.
Turn Off The Water Supply
Most homes do not have a separate shut-off for the shower, but turning off the bathroom water is smart. This reduces mess and prevents accidental spray.
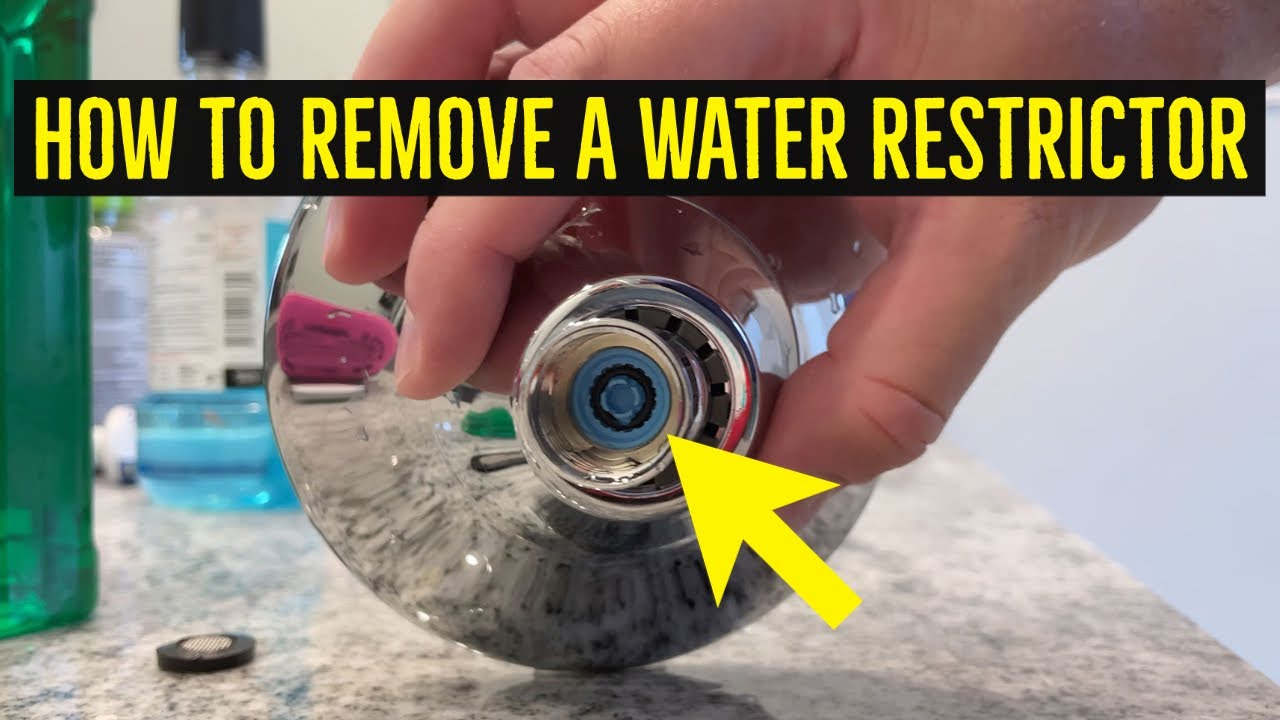
Remove The Shower Head
- Use your adjustable wrench or pliers to loosen the shower head. Turn counterclockwise.
- Protect the finish by wrapping a soft cloth around the connection.
- Gently twist and pull off the shower head.
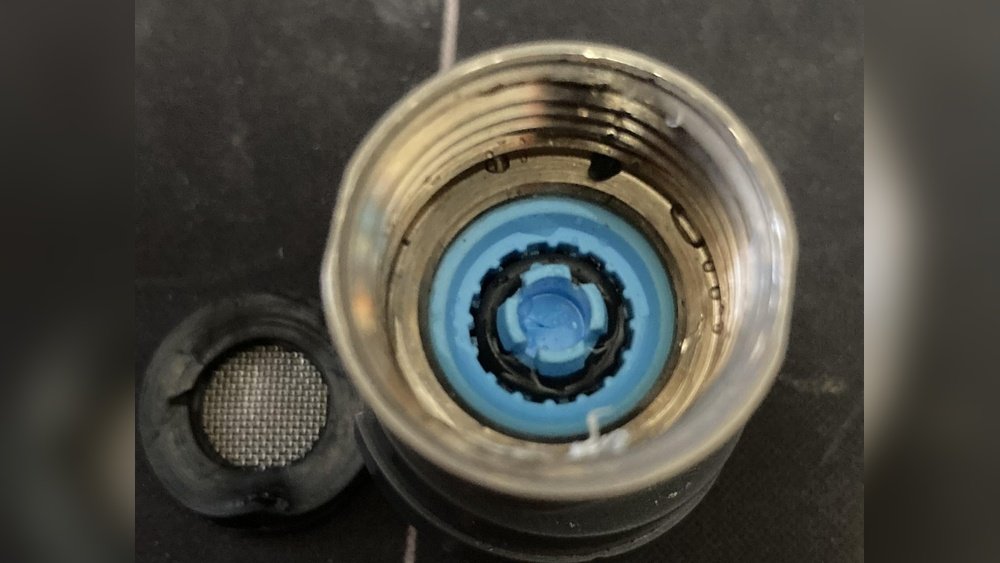
Locate The Flow Restrictor
Look inside the shower head’s inlet. The restrictor is usually:
- A flat plastic disc with small holes
- Sometimes colored (green, blue, or white)
- Located behind a rubber washer
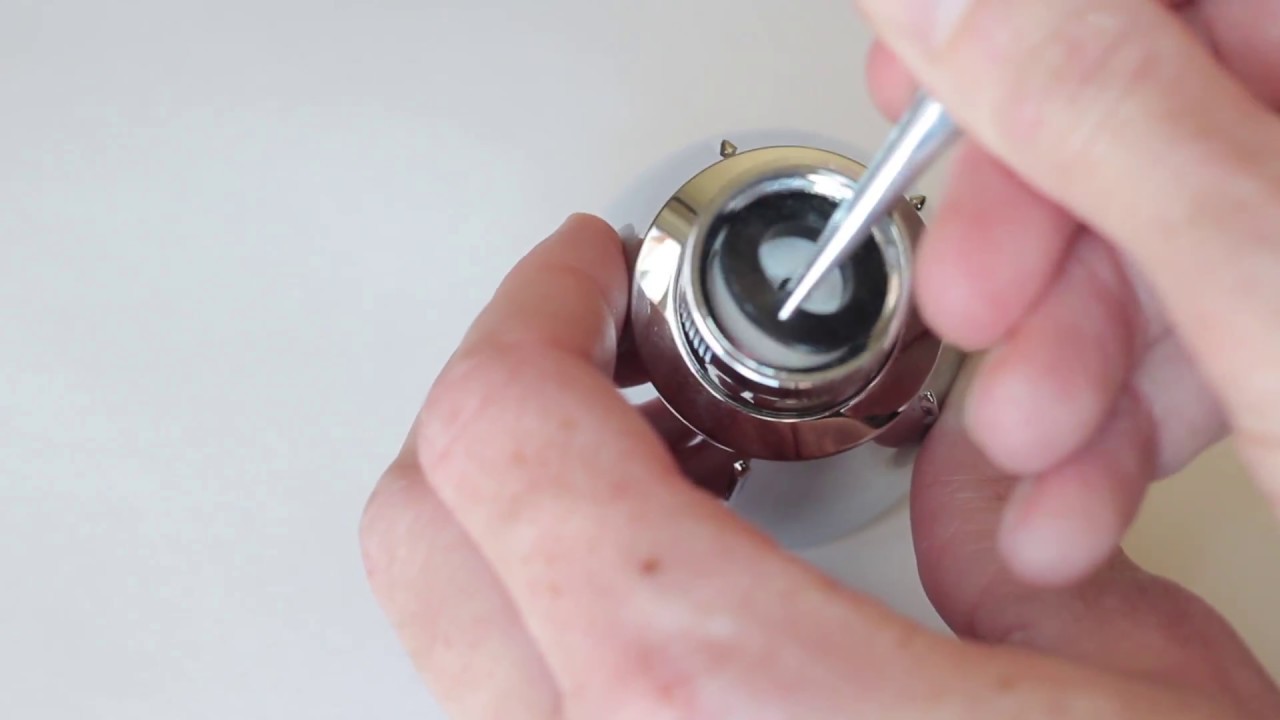
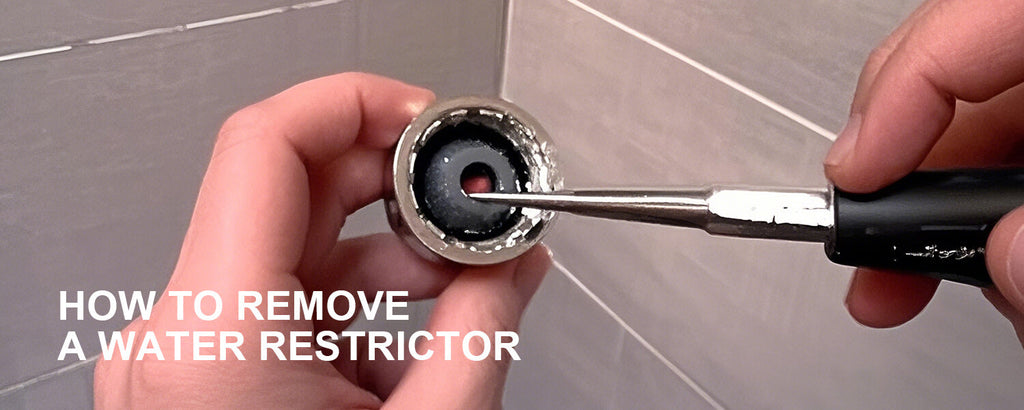
Remove The Washer
- Use your flathead screwdriver to gently lift out the washer.
- Set it aside safely.
Extract The Flow Restrictor
- With the washer out, you’ll see the restrictor.
- Use the needle-nose pliers or screwdriver to pry it out.
- Be patient. If it’s stuck, wiggle gently but don’t force.
Clean The Shower Head
Now is a good time to clean out mineral deposits:
- Scrub inside with the old toothbrush
- Rinse with water
- Dry with a towel
Reassemble And Reinstall
- Replace the washer
- Wrap the shower arm threads with Teflon tape (about 2-3 wraps)
- Screw the shower head back on by hand
- Tighten gently with the wrench (don’t overtighten)
Test For Leaks
Turn the water back on and check for leaks. If you see drips, tighten a bit more or add extra Teflon tape.
Comparing Water Flow: With And Without Restrictor
Here’s a simple comparison showing how removing the restrictor affects flow rates:
| Condition | Typical Flow (GPM) | Shower Experience |
|---|---|---|
| With Restrictor | 2.0 – 2.5 | Softer, saves water |
| Without Restrictor | 3.0 – 5.0 | Stronger, more satisfying |
Removing the restrictor can increase water flow by up to 100%. But this also means higher water bills and more energy use if your water is heated.
Risks And Considerations
Before you remove the restrictor, think about these points:
- Legal rules: Some states require flow restrictors by law.
- Water bills: Higher flow equals higher cost.
- Environmental impact: More water used, more strain on resources.
- Plumbing stress: Older pipes may not handle higher flow well.
Common Mistakes To Avoid
- Forcing parts: This can break the shower head or strip threads.
- Losing washers: Missing washers cause leaks.
- Skipping Teflon tape: Leads to water leaks at the joint.
- Not cleaning: Debris can block flow or cause uneven spray.
Tips For Safe And Effective Removal
- Work slowly. Rushing increases risk of damage.
- Keep parts organized. Use a small bowl for washers and restrictors.
- Check local laws. Some areas (like California) require low-flow fixtures.
- Consider replacement. If your shower head is old or clogged, buying a new one may be easier.
- Test pressure. If your water pressure is naturally low, removing the restrictor may not help much.
When To Replace Instead Of Remove
Sometimes, removing the restrictor is not enough. If your shower head is:
- Over 5 years old
- Clogged with minerals
- Cracked or leaking
Consider buying a new shower head. Modern designs offer both high pressure and water-saving features.
Comparison: Removing Restrictor Vs. Buying New Shower Head
| Option | Cost | Effort | Long-term Benefit |
|---|---|---|---|
| Remove Restrictor | $0 (DIY) | 15–30 min | Stronger flow, higher bills |
| Buy New Head | $20–$100 | 20–40 min | Better design, possible warranty |
Real-life Example
Sarah lives in a house built in the 1980s. Her shower head was weak, making it hard to rinse shampoo. After removing the flow restrictor, her shower felt much stronger. She also saw her water bill go up by $7 per month.
Sarah decided to use the restrictor during summer and remove it in winter when she wanted warmer, heavier showers.
Maintenance After Removal
A shower head without a restrictor can get clogged faster. More water means more minerals passing through. Clean your shower head every 2–3 months:
- Remove shower head
- Soak in vinegar for 1 hour
- Scrub with toothbrush
- Rinse and reinstall
This keeps the flow strong and prevents buildup.
Energy And Water Usage Data
The average American shower uses about 17 gallons in 8 minutes, according to the USGS. Removing the restrictor can push that number to 30 gallons or more. If you pay $0.01 per gallon for water and $0.02 per gallon for heating, this adds up quickly.
Alternatives To Removing The Restrictor
If you want a stronger shower but don’t want higher bills, try these ideas:
- Install a high-pressure shower head: Designed for low water pressure homes.
- Clean out mineral buildup: Sometimes, clogs are the real problem.
- Check your home’s water pressure: A plumber can raise pressure safely.
Environmental Impact
Removing restrictors increases water use. In drought-prone areas, this can be a problem. According to EPA WaterSense, low-flow shower heads can save enough water to fill 11,000 bathtubs in a year for one household. Think about the bigger picture before you decide.
Frequently Asked Questions
What Does A Flow Restrictor Look Like?
A flow restrictor is usually a small, flat plastic disc with tiny holes. It’s often colored green, blue, or white. It sits inside the shower head, just behind the rubber washer.
Is It Legal To Remove The Flow Restrictor?
In some states, removing the restrictor breaks water conservation rules. Always check local laws. In California and New York, for example, low-flow standards are enforced.
Will Removing The Restrictor Damage My Shower Head?
If you follow the steps carefully and use the right tools, you shouldn’t damage the shower head. However, forcing parts or skipping washers can cause leaks or cracks.
How Much More Water Will I Use?
On average, removing the restrictor increases flow from 2.5 GPM to 4–5 GPM. For an 8-minute shower, that’s about 15–20 more gallons per shower.
Can I Put The Restrictor Back After Removal?
Yes, if you save the restrictor and washers, you can reinstall them anytime. Just reverse the removal steps.
Making your shower stronger is possible, but it comes with trade-offs. Removing the flow restrictor is a simple project, and most people can do it in under 30 minutes. Think about your needs, local rules, and the impact on your wallet and the environment before you decide.
With the right approach, you’ll enjoy showers that fit your lifestyle, without unnecessary risks.