
A smooth presentation often depends on the smallest details, and one of these is getting your text formatting just right. When you try to create a hanging indent in Microsoft PowerPoint and it doesn’t work, frustration quickly follows. Maybe your bullets won’t align. Maybe your references look messy. Or perhaps you simply can’t get the text to “hang” the way it does in Word. If you’ve ever faced this, you’re not alone.
Many presenters, from students to business professionals, struggle with hanging indents in PowerPoint. The process is not as intuitive as in other Microsoft Office programs, and sometimes, the typical methods just refuse to work. This article will guide you through understanding what a hanging indent is, why it matters, and—most importantly—how to fix it when it stops working.
You’ll also discover hidden pitfalls, advanced tricks, and answers to questions even experienced users overlook.
Whether you’re prepping an academic reference slide, a professional report, or just want cleaner bullets, this guide will help you master hanging indents in PowerPoint, quickly and confidently.
What Is A Hanging Indent And Why Does It Matter?

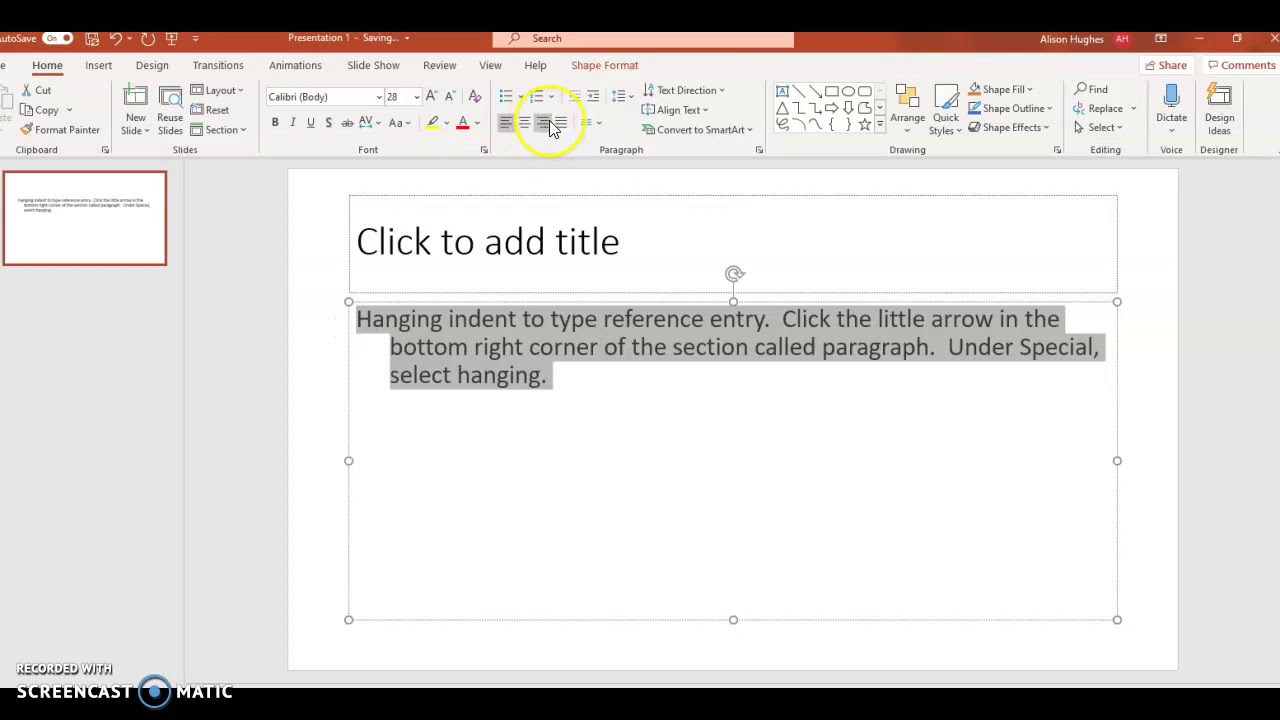
A hanging indent is when the first line of a paragraph starts at the margin, and all following lines are indented. This style is common for bibliographies, bullet points, and lists in academic or professional presentations.
Why Use Hanging Indents In Powerpoint?
- Clarity: Hanging indents make long references or bullets easier to read.
- Consistency: They match academic or corporate style guides.
- Professional Look: Presentations appear neater and more organized.
- Visual Flow: Audience members can scan information faster.
For example, a proper reference entry:
Smith, J. (2020). The Art of Slides. Presentation Press.
Will look tidy, even if the citation is long, because the second and subsequent lines align neatly under the first word.
Common Reasons Hanging Indent Is Not Working In Powerpoint
Many users expect PowerPoint to behave like Microsoft Word, but there are key differences. Understanding the main causes helps you fix the problem faster.
1. Wrong Text Box Or Placeholder Type
There are two main ways to add text in PowerPoint: text boxes and placeholders. Hanging indents often fail if you use the wrong one. For example, some content placeholders (like those for titles or subtitles) treat indents differently.
2. Incorrect Ruler Or Indent Marker Usage
The ruler in PowerPoint controls indents, but the markers are small and easy to misplace. If you drag the wrong marker (e.g., the left indent instead of the hanging indent), you won’t get the effect you want.
3. Bullet And Numbering Conflicts
Bulleted lists use their own formatting rules. Sometimes, a hanging indent setting conflicts with bullet spacing, causing PowerPoint to ignore your changes.
4. Copy-pasting From Other Programs
Pasting text from Word or a web page can bring hidden formatting. This can “lock” the paragraph style, making indents behave strangely.
5. Slide Master Overrides
If your presentation uses a slide master or custom template, the master’s formatting can override manual indent changes.
6. Outdated Powerpoint Version
Old PowerPoint versions (before 2016) have more indent bugs. If you’re using an older version, features might be limited or broken.
Non-obvious insight: Many users do not realize that indent behavior differs between slide layouts, even on the same slide. Always check the type of placeholder or text box you’re editing.
Step-by-step Fixes For Hanging Indent Problems
Let’s solve the problem using reliable methods. Try these steps in order. If one doesn’t work, move to the next.
Method 1: Using The Ruler
- Enable the Ruler
- Go to the “View” tab and check the “Ruler” box.
- Highlight the Paragraph
- Select all lines you want to format.
- Adjust Indent Markers
- On the ruler, find three markers:
- The top triangle: First Line Indent
- The bottom triangle: Hanging Indent
- The rectangle: Left Indent
- Drag the bottom triangle (hanging indent) to the right (e.g., 0.5 inches).
- Move the rectangle so the top triangle stays at the left margin (0).
- Check Result
- The first line should stay at the margin. The rest should move right.
Practical tip: If the markers move together, you’re dragging the rectangle, not the triangle.
Method 2: Paragraph Dialog Box
- Select Your Text
- Highlight the paragraph.
- Open Paragraph Settings
- Right-click and choose “Paragraph,” or go to the “Home” tab, then click the small arrow in the “Paragraph” group.
- Set Indentation
- Under “Indentation,” find “Special.” Choose Hanging.
- Set the “By” value (e.g., 0.5 inches).
- Click OK
- Your text should now show a hanging indent.
Method 3: Remove Bullets And Reapply
Sometimes, existing bullets disrupt indents.
- Highlight the problem text.
- Click the “Bullets” button to turn bullets off.
- Apply your hanging indent using the ruler or dialog box.
- Turn bullets back on.
This resets the paragraph’s formatting, often fixing stubborn issues.
Method 4: Clear Formatting
Hidden formatting is a common culprit.
- Select the paragraph.
- Go to the “Home” tab.
- Click “Clear All Formatting” (eraser icon).
- Reapply your hanging indent.
Method 5: Create A New Text Box
Sometimes, the old text box is corrupted.
- Insert a new text box (“Insert” > “Text Box”).
- Type or paste your text (use “Paste Special” > “Unformatted Text” to avoid hidden formatting).
- Set your hanging indent.
Method 6: Check Slide Master Settings
If none of the above work, check if the slide master is forcing a style.
- Go to “View” > “Slide Master.”
- Select the layout in use.
- Adjust indents in the master text box.
- Close master view and check your slide.
Non-obvious insight: Slide master changes affect all slides using that layout—even ones you made before the change.
Method 7: Upgrade Powerpoint Or Repair Installation
If you’re using an old version or suspect a bug:
- Update PowerPoint to the latest version.
- Run a repair from the Microsoft Office installer.
Sometimes, software glitches cause persistent indent issues.
Comparing Hanging Indent Behavior: Powerpoint Vs. Word Vs. Google Slides
Understanding how hanging indents work in different programs can help you avoid mistakes when moving content between tools.
| Feature | PowerPoint | Word | Google Slides |
|---|---|---|---|
| Ruler Adjustment | Manual, tricky with bullets | Easy, intuitive | Limited, not always visible |
| Paragraph Dialog | Available, less obvious | Easy to find | Missing for some features |
| Bullet Interaction | Can conflict | Rarely conflicts | Often buggy |
| Copy-Paste Issues | Frequent | Rare | Frequent |
| Slide Master Control | Strong, can override | N/A | Limited |
Summary: PowerPoint’s handling of hanging indents is more manual and sometimes less reliable than Word. Google Slides offers even fewer options, so advanced formatting is harder.

Credit: www.youtube.com
Advanced Tips For Perfect Hanging Indents In Powerpoint
Once you’ve fixed basic problems, these advanced tips can help you create professional, consistent formatting.
Align Indents Across All Slides
Presentations often use multiple slides for references or bullet lists. To keep formatting identical:
- Set up your preferred hanging indent in one text box.
- Right-click and select “Copy Formatting” (Format Painter).
- Click on other text boxes to apply the style.
Use Custom Bullet Spacing
If bullets are causing trouble:
- Go to the “Home” tab.
- Click the arrow next to “Bullets.”
- Choose “Bullets and Numbering.”
- Under “Indent at,” adjust the value to match your hanging indent.
This ensures bullets and text line up perfectly.
Use Slide Master For Global Changes
If you want all slides (for example, all references) to use the same hanging indent:
- Open the Slide Master view.
- Set the hanging indent in the master text box.
- All slides using that layout will update.
This changes all slides using the master layout. Review slides to avoid unwanted changes.
Avoid Copy-paste Formatting Traps
When moving text from Word or the web:
- Use “Paste Special” and choose “Unformatted Text.”
- This removes hidden styles that break indents.
Use Shortcuts For Faster Editing
- Ctrl + T opens the Paragraph dialog in PowerPoint (on some versions).
- Ctrl + Shift + M increases indent.
- Ctrl + Shift + N removes all indents.
These shortcuts can speed up fixing multiple slides.
Real-world Scenarios And Solutions
Let’s look at some common cases where hanging indents stop working and how to solve them.
Academic References Slide
You paste a list of references from Word, but all the text is left-aligned.
Solution: Clear formatting, then use the ruler or paragraph dialog to set the hanging indent.
Multi-level Bulleted List
You want sub-bullets with different indent levels, but the text is jumbled.
Solution: Set each level’s indent separately using the ruler. Adjust bullet spacing in “Bullets and Numbering.”
Text Box From An Imported Template
A template from the internet uses locked formatting.
Solution: Insert a new text box. Paste text as unformatted. Set indent manually.
Grouped Objects
You grouped a text box with shapes. Indents won’t change.
Solution: Ungroup. Edit the text box. Regroup after formatting.
Old Powerpoint File
A. ppt file from 2010 shows indent bugs in newer PowerPoint.
Solution: Save as a new .pptx file. Reapply indents.

Troubleshooting Hanging Indent Problems By Platform
PowerPoint behaves differently on Windows, Mac, and web versions. Here’s what you need to know.
| Problem | Windows | Mac | PowerPoint Online |
|---|---|---|---|
| Ruler visible by default | Yes | No, must enable | No |
| Paragraph dialog available | Yes | Yes | No/limited |
| Master Slide indent control | Full | Full | Limited |
| Copy formatting tool | Yes | Yes | No |
Key point: If you’re using PowerPoint Online, your options are more limited. For complex formatting, use the desktop app.
Common Mistakes To Avoid
Even with the right tools, mistakes happen. Here are errors to watch for:
- Dragging the wrong indent marker: Moving the left indent instead of the hanging indent results in the whole paragraph shifting.
- Forgetting to select all lines: Indents only apply to highlighted text. Select the full paragraph or list.
- Mixing formatted and unformatted text: Mixing styles in one text box can cause unpredictable results.
- Relying on templates: Some templates lock formatting, blocking manual indents.
- Ignoring Slide Master: Changes in the master can override your slide-level edits.
After fixing indents, test your presentation in Slide Show mode. Sometimes, formatting looks different during live presentation.
Credit: www.youtube.com
Hanging Indent Alternatives In Powerpoint
If you still can’t get a hanging indent to work, there are creative workarounds.
Manual Line Breaks And Spaces
For very short lists, you can insert a line break (Shift + Enter) and manually add spaces to mimic a hanging indent. This is not ideal for long text but works in a pinch.
Use Tables For Alignment
Create a one-column table, then use the table cell’s indent features. This forces consistent alignment, even if PowerPoint’s text tools fail.
Insert An Image
If you must display a complex reference list, create it in Word, take a screenshot, and insert it as an image. This is not editable, but guarantees perfect formatting.
Only use these as a last resort. True hanging indents are better for accessibility and editing.
When To Seek Extra Help
If you’ve tried all fixes and nothing works, there may be a deeper issue. Here’s when to get more help:
- Corrupted file: Try copying slides to a new presentation.
- Glitches after update: Repair your Office installation.
- Company templates: Contact your IT or design team; they may have locked styles.
- Advanced needs: For custom layouts, consider using Word for reference slides, then linking or embedding in PowerPoint.
For more technical details, Microsoft’s official PowerPoint support pages are a reliable resource. Check Microsoft PowerPoint Support for the latest troubleshooting steps.
Pro Tips For Power Users
If you work with PowerPoint often, these tips will save time and prevent future headaches.
- Build a reference slide template with your preferred hanging indent settings. Reuse it in all presentations.
- Lock text boxes after formatting to prevent accidental changes (right-click > “Lock” in newer versions).
- Standardize font size and spacing before adding indents to avoid shifting lines.
- Test on multiple devices—sometimes indents shift on Mac vs. Windows.
- Keep PowerPoint updated for the latest bug fixes.
Frequently Asked Questions
Why Doesn’t My Hanging Indent Work With Bullets?
When you use bullets, PowerPoint adds extra formatting for bullet size and spacing. This can override your hanging indent settings. To fix this, adjust bullet spacing in the “Bullets and Numbering” dialog, then set your hanging indent using the ruler or paragraph dialog.
Can I Create A Hanging Indent In Powerpoint Online?
PowerPoint Online has limited formatting options. You can try using the ruler if available, but advanced indent settings are often missing. For full control, use the desktop app.
How Do I Make A Hanging Indent For References?
Highlight your reference list, open the “Paragraph” dialog, and set “Special” to “Hanging. ” If bullets are present, turn them off first. If problems persist, clear all formatting and try again.
Why Do Indents Look Different On Another Computer?
Font rendering and PowerPoint versions can affect indent display. A presentation made in PowerPoint 2016 may look different in 2019 or Mac versions. Save in the latest. pptx format and standardize fonts for best results.
What’s The Best Way To Keep Indents Consistent Across A Large Presentation?
Set your preferred hanging indent in the Slide Master. Use Format Painter to copy the style to other text boxes. Always check formatting on all slides before presenting.
Final Thoughts
Fixing a hanging indent not working in PowerPoint can be tricky, but with the right steps, you can achieve clean, professional results. Understanding the root causes, from bullet conflicts to template overrides, lets you solve problems quickly. Remember to use the ruler and paragraph dialog, clear formatting when needed, and apply changes using Slide Master for consistency.
If you hit a wall, creative workarounds like tables or images are available, but true hanging indents are best for editing and accessibility. With these tips, you’ll never have to settle for messy references or misaligned bullets again. Your audience may not notice perfect indents, but they will notice a polished, easy-to-read presentation—setting you apart every time.