
When your shower suddenly starts to drip, lose pressure, or gives inconsistent water temperature, it’s easy to blame the whole plumbing system. But often, the real issue is inside a small part: the Delta shower cartridge. This cartridge controls how water flows and mixes in your shower. If it’s not working right, your whole shower experience suffers.
Learning how to troubleshoot a Delta shower cartridge can save you time, money, and frustration. With the right approach, you can often fix common problems yourself, without calling a plumber. This guide will explain the main symptoms, steps for diagnosis, and practical repair tips.
You’ll also learn how to avoid common mistakes and decide when a replacement is needed.
What Is A Delta Shower Cartridge?
The shower cartridge is a core part of your Delta faucet. It sits inside the valve body, behind the handle. Its main job is to control the mix of hot and cold water, as well as the flow rate. When you turn or lift the handle, the cartridge moves to mix water to your desired temperature.
Delta uses several cartridge designs. The most common are the single-function and dual-function cartridges. Single-function models only control temperature, while dual-function ones control both volume and temperature. Knowing your cartridge type helps you troubleshoot and find the right replacement.
Common Signs Of Cartridge Problems
Before you start, it’s important to know the main warning signs that point to a cartridge issue. Here are the most frequent symptoms:
- Dripping showerhead: Even when the handle is off, water drips from the head.
- Stiff or stuck handle: The shower handle is hard to turn or won’t move at all.
- Inconsistent temperature: Water goes from hot to cold suddenly, or won’t get hot enough.
- Low water pressure: The flow is weaker than before, even with the handle fully open.
- Strange noises: Squealing, whistling, or knocking sounds when you use the shower.
Sometimes these problems seem minor, but they often get worse if ignored. Fixing them early can prevent bigger plumbing headaches.
Tools And Materials You’ll Need
Troubleshooting a Delta shower cartridge doesn’t require advanced tools, but having the right basics will make the process smoother. Here’s what you’ll need:
- Adjustable wrench or channel-lock pliers
- Phillips and flathead screwdrivers
- Allen wrench (often 1/8” or 3/32” for handle set screws)
- Needle-nose pliers
- Plumber’s grease
- Replacement cartridge (if needed)
- Old towel or rag
- Bucket (for catching water drips)
Before you start, make sure to turn off the water supply to avoid accidental leaks.
Diagnosing The Problem
Accurate diagnosis saves time and helps avoid unnecessary repairs. Here’s a step-by-step approach:
Step 1: Identify The Cartridge Model
Delta has used many cartridge designs over the years. Look for a model number on the faucet trim or handle. If you can’t find one, compare your cartridge to images on the official Delta Faucet website. The three most common types are:
- RP19804: Used in older single-handle showers.
- RP46074: Common in newer models.
- RP32104: For dual-function showers.
Step 2: Inspect For Leaks And Handle Movement
Remove the handle by loosening the set screw (usually under a cap or at the base). Gently pull off the trim and escutcheon plate. With the cartridge exposed, look for water stains or mineral buildup.
Move the cartridge stem by hand. If it’s hard to turn or sticks, that’s a sign of internal wear or debris. If you see corrosion or rust, replacement is likely needed.
Step 3: Check Water Flow And Temperature
With the cartridge still in place (and water turned back on), test the shower. Is the flow weak? Does the temperature respond quickly, or lag behind handle movements? Use these answers to narrow down the problem.
Step 4: Remove And Examine The Cartridge
Turn off water again. Pull the cartridge out with pliers (some models require a special removal tool). Inspect the O-rings and rubber seals. If they’re cracked, flattened, or missing, leaks are likely. Mineral deposits or white scale indicate hard water buildup, which can block flow.
How To Fix Common Cartridge Issues
Once you’ve found the source of trouble, here’s how to address the most frequent problems.
Dripping Or Leaking Showerhead
A dripping showerhead usually means the cartridge’s internal seals are worn. Sometimes, debris caught in the seals or valve body can also cause leaks.
- Remove the cartridge and clean it with vinegar to dissolve mineral deposits.
- Inspect O-rings and seals. If damaged, replace the cartridge.
- Lubricate seals with plumber’s grease before reinstalling.
Stiff Or Stuck Handle
A stiff handle is often due to mineral deposits or worn cartridge parts.
- Soak the cartridge in vinegar for 30 minutes to loosen scale.
- If the handle is still hard to turn, replace the cartridge.
- Lubricate moving parts before reassembly.
Inconsistent Temperature
When water temperature jumps or won’t reach hot, the pressure balance spool (inside some cartridges) may be stuck.
- Remove the cartridge and shake gently. If you hear rattling, the spool may be loose.
- If stuck, try soaking in vinegar. If not fixed, replace the cartridge.
- Check your water heater is set properly; sometimes the issue is not with the cartridge.
Low Water Pressure
Low pressure is often due to clogged ports inside the cartridge.
- Flush the valve body by turning the water on briefly with the cartridge out (cover with a towel to avoid splashing).
- Clean the cartridge screens and ports with vinegar and a toothbrush.
- Replace if cleaning doesn’t restore normal pressure.
When To Repair Vs. Replace
A key decision is whether to clean and repair the cartridge or replace it completely. Here’s a quick comparison:
| Situation | Repair | Replace |
|---|---|---|
| Minor leaks | ✔️ | |
| Stiff handle (after cleaning) | ✔️ | |
| Cracked or damaged seals | ✔️ | |
| Cartridge is over 7 years old | ✔️ | |
| No improvement after cleaning | ✔️ |
Insight: Many people try to fix the same cartridge multiple times. If it’s more than seven years old, replacement is usually more reliable and cost-effective.
Step-by-step: Replacing A Delta Shower Cartridge
If you decide on replacement, follow these steps for best results:
- Turn off the water supply at the shower or main valve.
- Remove the handle using an Allen wrench.
- Take off the escutcheon plate (the decorative cover).
- Pull out the old cartridge using pliers or a cartridge puller.
- Clean the valve body to remove debris or mineral deposits.
- Lubricate the new cartridge O-rings with plumber’s grease.
- Insert the new cartridge, aligning it with the valve notches.
- Reassemble the handle and trim.
- Turn on water and test for leaks and proper function.
Take a photo of the cartridge orientation before removal. This ensures you install the new one correctly.
Preventing Future Cartridge Problems
Proper care keeps your shower running smoothly for years. Here’s what you can do:
- Flush the lines every 1–2 years to remove sediment.
- Check for hard water; install a softener if buildup is common.
- Fix leaks early to prevent wear on cartridge seals.
- Use plumber’s grease during maintenance to keep parts moving smoothly.
A little preventive action saves a lot of repair work later.
Comparing Delta Cartridges With Other Brands
If you’re wondering how Delta stacks up, here’s a quick look at how their cartridges compare to other leading brands.
| Brand | Typical Lifespan | Ease of Replacement | Common Problems |
|---|---|---|---|
| Delta | 7–10 years | Easy | Seal wear, mineral buildup |
| Moen | 8–12 years | Moderate | Stuck cartridge, leaks |
| Kohler | 8–10 years | Moderate | Handle stiffness |
Non-obvious insight: Delta cartridges are among the easiest to replace, thanks to their simple clip-in design. Moen and Kohler often require more tools and care during reassembly.
Mistakes To Avoid
Even experienced DIYers can make small errors that lead to big frustrations. Watch out for these common mistakes:
- Forcing the handle: If it doesn’t move easily, forcing it can break the stem.
- Skipping lubrication: Dry O-rings wear out faster and cause leaks.
- Not turning off water supply: This can cause sudden leaks or even flooding.
- Mixing parts: Always keep track of screws and trim pieces to prevent confusion during reassembly.
- Using the wrong cartridge: Even a small mismatch can cause leaks or handle problems.
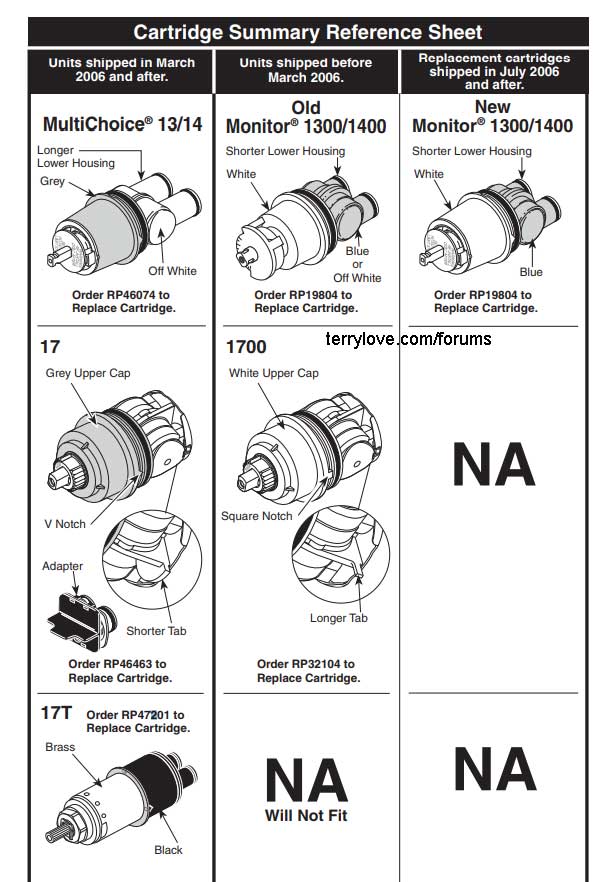
How To Find The Right Replacement Cartridge
Delta shower cartridges are not universal. Using the wrong model can lead to leaks, poor temperature control, or even damage to the valve. Here’s how to get the right one:
- Look for a model number on the faucet or original paperwork.
- Match the cartridge shape and size to your old one.
- If unsure, bring the old cartridge to a hardware store for comparison.
- Use the Delta Faucet official site or call customer support for guidance.
Many Delta cartridges have a color code or unique shape on the stem. Take clear photos before heading to the store.
When To Call A Professional
DIY fixes work for most cartridge problems, but some situations need expert help:
- Deep leaks: Water behind the wall or through the ceiling can mean bigger plumbing issues.
- Multiple failed repairs: If problems return quickly, the valve body itself may be damaged.
- Unusual noises or vibrations: These might signal high pressure or loose plumbing, not just cartridge problems.
For peace of mind, a licensed plumber can diagnose complex issues and perform repairs safely.

Frequently Asked Questions
Why Does My Delta Shower Still Drip After Replacing The Cartridge?
A new cartridge usually fixes leaks, but sometimes the valve body is damaged or has debris inside. Make sure you cleaned the valve well before installing the new part. If the drip continues, the issue may be with the valve seat or improper installation.
How Often Should I Replace My Delta Shower Cartridge?
Most Delta cartridges last 7–10 years with normal use. If you have hard water or use the shower often, you may need to replace it sooner. Regular maintenance and cleaning can extend lifespan.
Can I Use Any Brand Of Shower Cartridge In A Delta Faucet?
No. Delta cartridges are not universal. Using a cartridge from another brand (like Moen or Kohler) will not fit and can damage your faucet. Always use Delta-approved parts for best results.
Is It Safe To Clean A Cartridge With Vinegar?
Yes. White vinegar is safe for removing mineral deposits from Delta cartridges. Avoid strong acids or wire brushes, as these can damage seals and surfaces. Rinse well and dry before reinstalling.
Where Can I Find More Help Or Official Delta Cartridge Diagrams?
The official Delta Faucet Service Parts page provides diagrams, model numbers, and step-by-step guides for most shower systems.
Fixing a Delta shower cartridge is a practical, rewarding task for any homeowner. With the right tools, careful diagnosis, and a few simple steps, you can restore your shower to full performance. Remember: don’t rush the process, and always choose the correct replacement parts. Addressing small issues now will help you avoid bigger plumbing problems in the future.