
A Whirlpool Cabrio dryer not heating is a frustrating problem for any household. Clothes remain damp, laundry piles up, and it’s easy to feel overwhelmed by where to begin troubleshooting. The good news is that most heating issues with these dryers can be solved with the right approach and a little patience.
In this guide, you’ll learn about the most common reasons your Whirlpool Cabrio dryer isn’t heating, how to diagnose the problem, and what steps you can take to fix it—without needing to be a technical expert.
Understanding How A Whirlpool Cabrio Dryer Heats
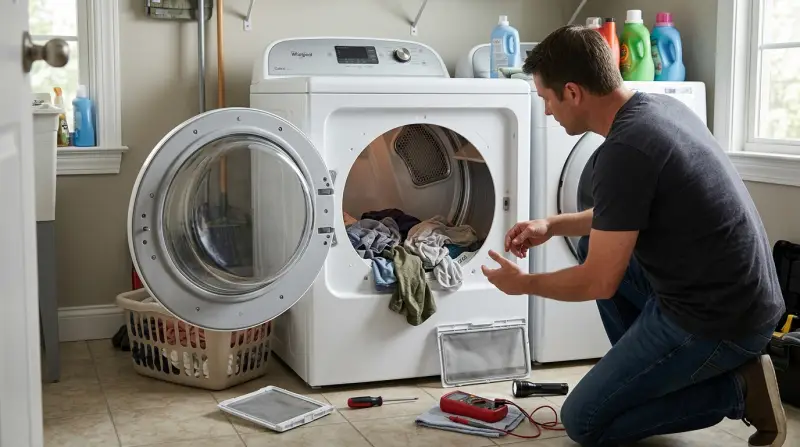
Before jumping into fixes, it helps to know how the heating process works. The Whirlpool Cabrio dryer uses either an electric heating element or a gas burner to create heat. A thermostat or sensor regulates the temperature. Air is pulled through the drum, warmed by the heat source, and then vented outside. If any part of this process fails, the dryer may not heat up.
Here’s a simple breakdown:
- Electric models: Use a heating element that glows red-hot.
- Gas models: Use an igniter and gas valve to create a flame.
- Thermostats and sensors: Monitor and control the heat.
- Fuses and relays: Provide safety and power management.
Knowing these basics makes it easier to understand why heating might stop.
Common Reasons Your Whirlpool Cabrio Dryer Is Not Heating
When your dryer stops heating, several culprits could be at play. Let’s look at the most common causes:
1. Blown Thermal Fuse
The thermal fuse is a small safety device that cuts power to the heating system if the dryer overheats. If it blows, the dryer may run, but won’t produce heat. This is one of the most frequent causes of “no heat” complaints.
Signs of a blown thermal fuse:
- Dryer runs but clothes stay wet
- No warmth inside drum after several minutes
2. Faulty Heating Element (electric Models)
For electric models, the heating element is the main source of heat. Over time, it can burn out or break.
Symptoms:
- Dryer runs but only blows cool air
- Visual inspection may show a broken coil
3. Broken Igniter Or Gas Valve (gas Models)
Gas dryers use an igniter to light the burner. If the igniter fails, or the gas valve solenoids are faulty, the dryer won’t heat.
Symptoms:
- No flame visible
- Clicking sound but no ignition
4. Defective High-limit Thermostat
The high-limit thermostat prevents the dryer from overheating. If it breaks, it can shut off the heat permanently.
Signs:
- Dryer stops heating after a short time
- Thermostat fails continuity test
5. Malfunctioning Cycling Thermostat
This thermostat cycles the heat on and off to keep the temperature steady. If it fails, the dryer may not heat at all.
6. Clogged Dryer Vent
A blocked vent is easy to overlook, but it can cause the dryer to overheat and shut down the heat source for safety.
Clues:
- Long drying times
- Hot dryer exterior
- Lint buildup around vent
7. Power Supply Issues
Electric dryers need 240 volts (two breakers), while gas dryers need just 120 volts. If only one breaker trips, the dryer may spin but not heat.
8. Control Board Or Timer Failure
Less common but possible, the control board or timer can fail, stopping the dryer from sending power to the heater.

Quick Comparison: Main Causes And Symptoms
Here’s a comparison of main causes and how they typically show up:
| Cause | Applies to | Common Symptoms |
|---|---|---|
| Blown thermal fuse | All models | Drum spins, no heat |
| Faulty heating element | Electric | No heat, visible break |
| Broken igniter/gas valve | Gas | No flame, clicking sound |
| Clogged vent | All models | Long dry times, hot exterior |
| Power supply issue | Electric | Runs but no heat |
Step-by-step Troubleshooting Guide
Let’s walk through the steps to find the cause and fix your Cabrio dryer’s heating problem.
1. Check The Power Supply
- For electric models, make sure both circuit breakers are ON.
- Plug a lamp into the outlet to check power.
- If possible, use a voltage tester (should show 240V for electric dryers).
2. Inspect The Dryer Vent
- Unplug the dryer first.
- Disconnect and clean the vent hose and wall duct.
- Remove any lint or obstructions.
- Run the dryer with the vent disconnected briefly—if it heats, the vent is the issue.
3. Test The Thermal Fuse
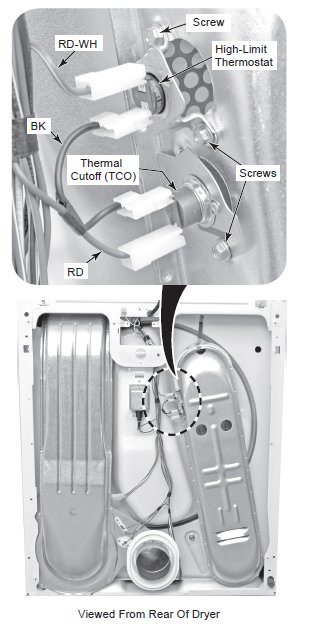
- Locate the thermal fuse (usually on the blower housing).
- Use a multimeter to test for continuity.
- If open (no continuity), replace the fuse.
- Remember: A blown fuse often signals a blocked vent.
4. Examine The Heating Element (electric Models)
- Unplug the dryer.
- Find the heating element (usually behind the rear panel).
- Look for visible breaks or burns.
- Test with a multimeter: No continuity means it’s bad.
5. Check The Igniter And Gas Components (gas Models)
- Remove the lower front panel.
- Watch the igniter while the dryer starts—should glow, then ignite gas.
- If the igniter glows but no flame, suspect bad gas valve coils.
- No glow at all? Igniter may be faulty.
6. Test Thermostats And Sensors
- Use a multimeter to check the high-limit and cycling thermostats.
- Replace any that fail the continuity test.
7. Examine The Control Board Or Timer
- If all other parts check out, the control board or timer may be faulty.
- Look for burned spots or damaged connectors.
- These are harder to test without technical skills, so consider calling a pro.
Data Table: Common Whirlpool Cabrio Dryer Faults & Fix Rates
To understand how often these parts cause heating problems, see below:
| Faulty Part | Estimated % of Cases | DIY Fix Difficulty (1=Easy, 5=Hard) |
|---|---|---|
| Thermal fuse | 40% | 2 |
| Heating element | 25% | 3 |
| Gas igniter/valve | 15% | 3 |
| Thermostats | 10% | 2 |
| Control board/timer | 5% | 4 |
| Other (wiring, sensors) | 5% | 4 |
How To Fix A Whirlpool Cabrio Dryer Not Heating
Once you find the faulty part, here’s how to make the repair:
Replacing The Thermal Fuse
- Unplug the dryer.
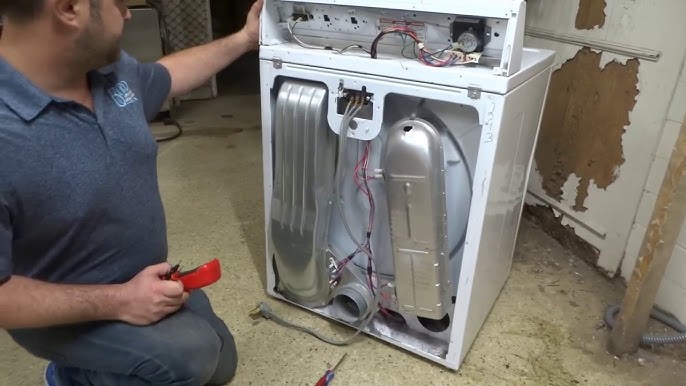
- Remove the back panel.
- Disconnect wires from the fuse.
- Unscrew and replace the fuse.
- Reconnect wires and reassemble.
Always fix the cause of overheating, often a clogged vent.
Installing A New Heating Element
- Unplug the dryer and remove the back.
- Disconnect the element’s wires.
- Unscrew and remove the old element.
- Install the new one, reconnect wires, and reassemble.
Replacing The Igniter Or Gas Valve Coils
- Unplug and shut off gas supply.
- Remove the lower front panel.
- Locate and replace faulty igniter or valve coils.
- Reconnect and test.
Changing A Thermostat
- Unplug the dryer.
- Locate the thermostat (check manual for location).
- Disconnect wires and remove screws.
- Swap in the new thermostat, reconnect, and reassemble.
When To Call A Professional
If after these steps your dryer still doesn’t heat, or if you’re unsure about electrical or gas repairs, call a qualified technician. Handling gas lines or advanced electronics can be risky without proper training.
Maintenance Tips To Prevent Heating Problems
Regular care can stop most heating issues before they start.
- Clean the lint filter after every load.
- Check and clean the vent hose every 3-6 months.
- Inspect the dryer drum for blockages.
- Listen for unusual noises that could signal worn parts.
- Don’t overload the dryer, as this strains the motor and heater.
Two insights that many beginners miss:
- A clogged vent, not a faulty part, causes many heating failures. Always check airflow before replacing expensive components.
- Power supply issues are easy to overlook. Just because the drum turns doesn’t mean the dryer is getting full power. Double-check both breakers.
Table: Diy Vs Professional Repair Cost (typical Us Averages)
To help decide whether to fix the dryer yourself or hire a pro, see these estimated costs:
| Repair Type | DIY Part Cost | Professional Total Cost |
|---|---|---|
| Thermal fuse | $10–$25 | $100–$180 |
| Heating element | $30–$80 | $180–$300 |
| Igniter/valve coils | $15–$50 | $120–$220 |
| Thermostats | $15–$40 | $120–$180 |
| Control board/timer | $80–$200 | $250–$400 |
DIY repairs often save hundreds of dollars, but only if you’re comfortable and safe with basic tools.
When To Replace Instead Of Repair
Sometimes, repairing an old dryer isn’t worth the cost. Consider a replacement if:
- Your dryer is over 10 years old.
- Multiple parts are failing.
- The repair cost is more than half the price of a new dryer.
- Energy bills are rising due to poor efficiency.
The latest models offer better energy savings and improved safety features. For more about appliance reliability and repair advice, check resources like the Consumer Reports Dryer Buying Guide.
Frequently Asked Questions
Why Does My Whirlpool Cabrio Dryer Run But Not Heat?
This usually means there is a problem with the thermal fuse, heating element, or a power supply issue. Check those first. If those parts are fine, look at thermostats or the control board.
Can A Clogged Lint Filter Cause Heating Problems?
Yes. If the lint filter or vent is blocked, airflow drops, which can cause the dryer to overheat and the thermal fuse to blow. Always clean the lint filter after each load and check the vent regularly.
How Do I Test If The Heating Element Is Bad?
Unplug the dryer and remove the back panel. Use a multimeter to check the heating element for continuity. If there is no continuity, the element needs replacement.
Is It Safe To Repair A Dryer Myself?
Many repairs, like changing a thermal fuse or heating element, are safe if you unplug the machine and follow instructions. Avoid gas line repairs or electrical work if you’re unsure—call a professional in those cases.
What Is The Average Life Span Of A Whirlpool Cabrio Dryer?
Most Whirlpool Cabrio dryers last 10–13 years with regular maintenance. Keeping vents clean and avoiding overloading helps them last longer.
A Whirlpool Cabrio dryer not heating can usually be fixed with some basic checks and common tools. By understanding how your dryer works and following a step-by-step approach, you can often solve the problem yourself—saving time and money. Remember, regular maintenance is the best way to avoid future heating issues.
If the problem feels too complex or involves gas or advanced electronics, don’t hesitate to bring in a professional. Happy drying!