When your fan hums but doesn’t turn, it’s more than just an annoying sound. It signals a deeper problem that can affect your comfort, safety, and wallet. Maybe you’re trying to cool your room on a hot day, or ventilate your kitchen, and your fan refuses to spin.
The gentle humming noise suggests power is reaching the fan, but something is stopping the blades from moving. If you’re not a technical expert, this situation can feel confusing. But understanding why a fan hums without turning—and what you can do about it—will help you fix the issue or decide if you need a professional.
This article explains the reasons behind a humming fan that won’t turn, how to diagnose the fault, and practical ways to repair it. Whether it’s a ceiling fan, pedestal fan, or exhaust fan, the steps are similar. You’ll also learn how to prevent future problems, what tools you might need, and when to call for help.
We’ll use simple language, real-life examples, and clear tables to help you understand and take action.
Why Does A Fan Hum But Not Turn?
When a fan hums, it means electricity is reaching the motor. The hum is the sound of the motor trying to work, but something is stopping the blades from spinning. Here are the most common reasons:
- Faulty Capacitor: The capacitor is a small component that helps the motor start and run smoothly. If the capacitor fails, the fan may hum but not turn. Capacitors wear out with age or can fail suddenly, especially after a power surge. You might notice the fan tries to move, but it can’t get going.
- Stuck Or Jammed Blades: Dust, dirt, or objects can get stuck in the blade mechanism. This stops the blades from moving, even though the motor tries to run. Sometimes, children’s toys, insects, or even a loose screw can block the blade path. In exhaust fans, grease build-up is a common cause.
- Seized Bearings: Bearings help the fan spin easily. If they dry out or rust, the motor struggles and only produces a hum. This is especially common in fans used in kitchens, bathrooms, or humid climates. Over time, lack of lubrication or exposure to moisture makes the bearings stick.
- Motor Windings Issue: If the internal windings of the motor are damaged, the motor may hum but not have enough power to turn the blades. This usually happens after years of use or due to overheating. A weak or broken winding means the motor can’t produce the force needed to turn.
- Electrical Supply Problems: Low voltage or faulty wiring can cause the fan to hum instead of turn. Sometimes, the fan is fine but the power from your wall socket is not enough. This happens in homes with unstable electricity, or if the fan shares a circuit with many other appliances.
- Overheating And Safety Cut-off: Some fans have safety features that cut off movement if they overheat. The motor may try to start, causing a hum, but the blades won’t move. Safety cut-off switches protect your house from fires, but they can also fail or trigger if airflow is blocked.
- Loose Connections: Loose wires or terminals in the fan’s internal parts can cause incomplete circuits. This can result in a humming sound but no movement. This often happens after moving the fan, or if vibrations over time loosen internal screws.
Quick Diagnosis: Identifying The Cause
Before you start fixing, you need to know what’s wrong. Here’s a step-by-step guide for troubleshooting:
- Observe The Fan: Is it a ceiling fan, pedestal fan, or wall-mounted fan? Each has slightly different parts. Ceiling fans often have more complicated wiring, while pedestal fans are simpler.
- Listen Closely: Is the hum steady, loud, or faint? A loud hum can mean a jammed blade or seized bearing. A faint hum often points to electrical issues. Sometimes, you may hear a clicking noise, which can mean a loose part inside.
- Try Moving The Blades: Turn off the power. Gently push the blades. If they move freely, the problem is likely electrical. If they are stuck, the issue is mechanical. Be careful not to force the blades, as you could damage the motor.
- Check For Visible Obstructions: Look for dust, dirt, or objects blocking the blades. In pedestal fans, check the safety grill and shaft for hair or thread wrapped around them.
- Inspect The Capacitor: If you’re comfortable, open the fan housing and look at the capacitor. Is it swollen, leaking, or burned? These are signs it needs replacing. Some capacitors have ratings written on them—compare with the replacement part to avoid mistakes.
- Test The Power Supply: Use a voltage tester to check if the fan is getting proper electricity. An unstable or low supply can make the motor hum but not turn.
- Smell For Burning Odor: A burning smell means the motor or capacitor might be damaged. Unplug the fan immediately if you notice this; continued use can cause fire.
- Consult The User Manual: Fan manuals often have troubleshooting guides. They may also show the wiring diagram, which helps if you need to reconnect parts.
Common Diagnostic Outcomes
Here is a simple table showing different symptoms and their likely causes:
| Symptom | Likely Cause | Action |
|---|---|---|
| Hum, blades easy to spin | Capacitor failure | Replace capacitor |
| Loud hum, blades stuck | Blade jam or seized bearing | Clean or lubricate |
| Hum, no movement, burning smell | Motor winding damage | Repair or replace motor |
| Hum, intermittent movement | Loose connection | Tighten connections |
If your fan’s behavior matches more than one symptom, start with the simplest fix (like cleaning) before moving to complex repairs.

Fixing The Problem: Step-by-step Solutions
Once you’ve identified the cause, you can start fixing. Here’s how to tackle the most common issues:
Replacing A Faulty Capacitor
Most fans use a capacitor to start and keep running. If the capacitor is bad, the fan will hum but not turn.
Steps:
- Turn off power at the switch and breaker. Never skip this step for safety.
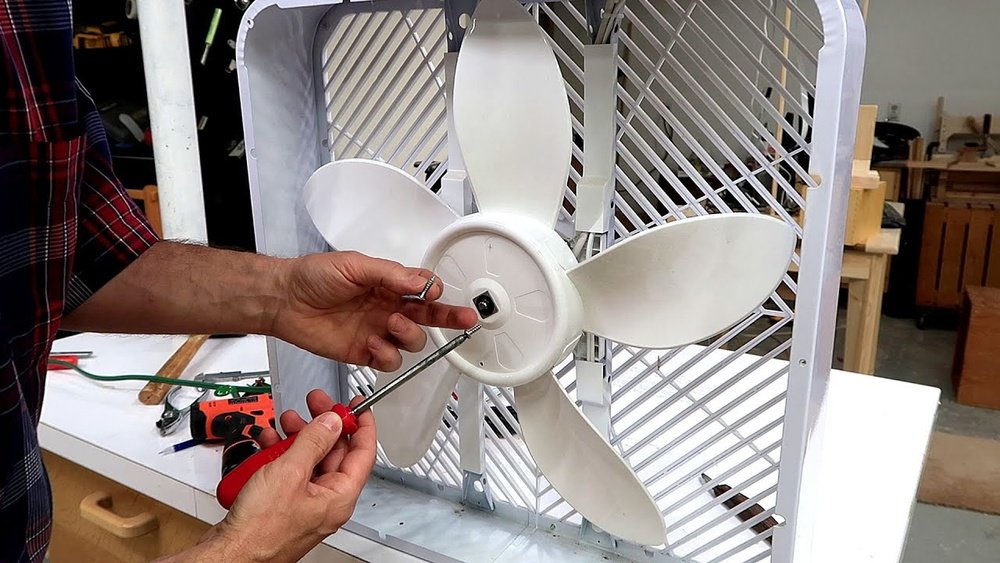
- Open the fan housing (use a screwdriver). Ceiling fans may need you to remove the light kit or cover first.
- Locate the capacitor (cylinder-shaped, often black or silver).
- Take a photo of the wiring for reference, even if you think you’ll remember.
- Unscrew or unclip the capacitor.
- Buy a replacement with the same voltage and microfarad rating. Using the wrong rating can cause poor performance or new faults.
- Install the new capacitor following your photo.
- Close the housing and restore power.
- Test the fan.
Tip: Capacitors are cheap ($5–$15) and easy to replace. If you’re unsure, ask a local technician to help. Some stores will test the old capacitor for you.
Clearing Blade Jams
Dust, insects, or debris can block the blades. Even a small object can stop the fan.
Steps:
- Switch off power.
- Clean the blades with a soft cloth or brush. In exhaust fans, use a degreaser for oily dirt.
- Remove any visible dirt or stuck objects. Don’t forget to check behind the safety grill.
- Lubricate the blade shaft if needed.
- Spin the blades by hand to check for smooth movement.
Tip: Regular cleaning prevents blade jams. A tiny object, like a piece of packaging, can sometimes block the blades.
Lubricating Seized Bearings
Bearings need oil to move smoothly. Dry or rusty bearings cause friction and stop the fan.
Steps:
- Turn off power and open the fan housing.
- Locate the bearing area (usually at the base of the blade shaft or inside the motor casing).
- Apply a few drops of light machine oil. For ceiling fans, some models have a small oil port.
- Spin the blades gently to distribute the oil.
- Close the housing and restore power.
Tip: Use only recommended lubricants. Avoid thick grease. If the bearing is badly rusted, it may need replacement.
Repairing Motor Windings
If the motor windings are damaged, the fan won’t turn. This repair is more complex.
Steps:
- Open the fan housing and locate the motor.
- Look for burn marks or smell for burning odor.
- If windings are damaged, consider replacing the motor.
- For minor faults, a technician may rewind the motor.
Tip: Motor replacement costs $30–$80 for basic fans. For expensive fans, rewinding might be cost-effective. Always check warranty before replacing a motor.
Fixing Electrical Supply Issues
Low voltage or bad wiring can cause the fan to hum. This is usually a home electrical issue.
Steps:
- Use a voltage tester to check power at the fan’s connection.
- If voltage is low, check the circuit breaker and wiring.
- Tighten loose connections.
- If you’re not comfortable, call an electrician.
Tip: Don’t attempt electrical repairs unless you know what you’re doing. Poor repairs can cause shock or fire.
Resolving Safety Cut-off Problems
Some fans have safety switches that cut off power if overheated.
Steps:
- Let the fan cool for 30–60 minutes.
- Reset the safety switch (if available).
- Check for blocked vents or excess dust.
- Clean and test the fan.
Tip: Avoid running fans continuously for long periods. If your fan shuts off often, improve ventilation in the room.
Tightening Loose Connections
Loose wires inside the fan can cause the humming sound.
Steps:
- Turn off power.
- Open the housing.
- Check all wire terminals.
- Tighten any loose screws or connectors.
- Close the housing and test.
Tip: Wear rubber gloves for safety. Loose connections can spark and damage the fan over time.
Preventing Future Fan Problems
Taking care of your fan reduces breakdowns and increases its lifespan. Here are some practical tips:
- Clean Blades Regularly: Dust and dirt cause jams and imbalance. Even ceiling fans collect dust that can throw off their balance and make them noisy.
- Lubricate Bearings: Apply oil every 6–12 months for smooth movement. For fans in kitchens or bathrooms, oil more often due to humidity.
- Check Connections: Inspect wires and terminals yearly. Look for signs of corrosion or looseness.
- Replace Capacitors Early: If your fan is 3–5 years old, consider replacing the capacitor before it fails. Some fans give a warning, like slow starting or needing a push to start.
- Monitor Power Supply: Ensure your home voltage is stable. Use a voltage stabilizer if you live in an area with frequent surges.
- Avoid Overloading: Don’t connect too many fans to one circuit. This helps prevent overheating and voltage drops.
- Let Fans Rest: Give fans breaks after several hours of use. This keeps the motor from overheating and extends its life.
- Install Surge Protectors: Protect your fan from electrical spikes. Surges can damage the capacitor and motor quickly.
Maintenance Comparison Table
Here’s a quick look at common maintenance tasks and their impact:
| Task | Frequency | Effect on Fan Life |
|---|---|---|
| Cleaning blades | Monthly | Prevents jams, improves airflow |
| Lubricating bearings | Every 6 months | Reduces friction, extends motor life |
| Checking connections | Yearly | Prevents electrical faults |
| Replacing capacitor | Every 3–5 years | Ensures smooth start |
A little regular care can add years to your fan’s working life and save you money on repairs.
Tools And Materials You Might Need
To fix a humming fan, you’ll need some basic tools and materials:
- Screwdrivers (flat and Phillips): For opening housings and covers.
- Voltage tester: To check if the fan is getting power.
- Replacement capacitor: Match microfarad and voltage ratings.
- Light machine oil: For lubricating bearings and shafts.
- Soft cloth or brush: For cleaning blades and grills.
- Wire stripper: If you need to repair or replace wires.
- Rubber gloves: For safety when handling electrical parts.
- User manual: For wiring diagrams and specific instructions.
Having these on hand makes repairs easier and safer. If you don’t have a voltage tester, buy one—they are inexpensive and useful for many home electrical jobs.
When To Call A Professional
Some repairs are simple. But others need expert help. Call a professional if:
- You see burn marks or smell burning
- The fan still won’t turn after basic fixes
- The motor is making grinding noises
- You’re not comfortable with electrical work
- The fan is under warranty
Expert technicians can diagnose and repair issues quickly. They can also spot hidden problems beginners might miss. Sometimes, what looks like a small fault is actually a sign of bigger damage inside the motor or control board.

Real-life Examples: Fan Humming Cases
Let’s look at real stories to understand how these problems appear:
Case 1: Ceiling Fan in a Bedroom
A homeowner notices the ceiling fan hums but doesn’t turn. After checking, the blades move freely by hand. The capacitor is swollen. Replacing the capacitor solves the problem, and the fan spins normally. This is the most common fix for ceiling fans.
Case 2: Kitchen Exhaust Fan
The exhaust fan hums loudly and doesn’t move. The blades are covered in grease and dust. Cleaning and oiling the shaft fix the issue. In kitchens, fans often get dirty quickly, and regular cleaning is essential.
Case 3: Pedestal Fan in Office
The fan hums, and there’s a burning smell. The motor winding is damaged. A technician replaces the motor, and the fan works again. Burnt windings often happen if the fan is left running for too long or if it’s very old.
In some cases, fans have more than one problem—like a jammed blade and a weak capacitor. Fixing one may reveal the other.
Common Mistakes Beginners Make
Trying to fix a humming fan can lead to mistakes. Here are some to avoid:
- Ignoring Safety: Never work on a fan with power on. Always switch off at the breaker. Some people only turn off the fan’s switch, but the wires can still be live.
- Using Wrong Capacitor: Capacitors have specific ratings. Using the wrong type can damage the motor. Always match both voltage and microfarad values.
- Forgetting To Take Photos: Before removing wires, take photos. This helps you reconnect correctly. Many fans have several wires that look similar.
- Applying Too Much Oil: Excess oil can drip onto electrical parts and cause faults. Use only a few drops on bearings or shaft.
- Skipping Cleaning: Dirt is often the main cause. Always clean before repairing. Neglecting cleaning means the problem may return quickly.
- Not Testing After Each Step: Test the fan after each fix to see if the problem is solved. If you do several repairs at once, you might not know what worked.
Ceiling Fans Vs. Pedestal Fans: Key Differences
While the basics are similar, ceiling fans and pedestal fans have unique parts.
| Feature | Ceiling Fan | Pedestal Fan |
|---|---|---|
| Motor Type | Usually permanent split capacitor (PSC) | Often shaded pole or PSC |
| Blade Mounting | Fixed to ceiling | Attached to stand |
| Maintenance | Needs ladder for access | Easy to reach and clean |
| Common Issues | Capacitor, bearings | Blade jam, motor windings |
Ceiling fans often have more complex wiring, while pedestal fans are easier to take apart. Knowing these differences helps you troubleshoot faster and avoid errors.
Non-obvious Insights: What Most People Miss
Here are two important points that beginners often overlook:
- Capacitor Quality Matters: Cheap, low-quality capacitors can fail early. Always buy capacitors from trusted brands. Sometimes, fans repaired with low-grade parts fail again quickly.
- Humidity Accelerates Bearing Problems: Fans used in humid rooms (bathrooms, kitchens) often develop bearing issues faster. Lubricate these fans more often. If you live in a rainy or coastal area, check your fans every few months.
- Another insight: If your fan is slow to start or needs a push, the capacitor is likely weak, even if the fan still turns.
Cost Of Repair Vs. Replacement
Sometimes, fixing a fan isn’t worth the cost. Here’s how to decide:
- Capacitor replacement: $5–$15
- Motor replacement: $30–$80
- Professional repair: $20–$50 labor
If your fan is more than 7–10 years old or needs frequent repairs, it may be smarter to buy a new one. New fans are often more energy-efficient and quieter.
If you have a designer or expensive fan, repairing can be worth it. But for basic models, compare repair costs with the price of a new unit.

Environmental Impact
Fixing your fan instead of replacing it reduces waste. Fans contain metals, plastics, and chemicals that can harm the environment if not recycled. Repairing is good for your wallet and the planet. When you do need to dispose of an old fan, try to recycle it at an electronics recycling center.
Helpful Online Resources
For more detailed guides and parts, visit trusted sites like Wikipedia. They offer diagrams, maintenance tips, and safety advice. Some manufacturer websites also provide part numbers and repair videos.
Frequently Asked Questions
Why Does My Ceiling Fan Hum But Not Turn?
A ceiling fan hums without turning mainly because of a bad capacitor or seized bearings. If the blades move freely, replace the capacitor. If they are stuck, clean and oil the shaft.
How Do I Know If My Fan’s Capacitor Is Faulty?
Look for signs like swelling, leaking, or burn marks on the capacitor. If your fan hums but doesn’t start, and the blades move easily by hand, the capacitor is likely bad.
Is It Dangerous To Use A Fan That Hums But Doesn’t Turn?
Yes, it can be unsafe. The motor may overheat, or the wiring could fail. Turn off the fan and fix the issue before using it again.
Can I Fix A Humming Fan Myself?
Most simple issues, like cleaning blades or replacing a capacitor, can be fixed at home. For motor repairs or electrical faults, call a professional.
How Can I Prevent My Fan From Humming And Not Turning In The Future?
Regular cleaning, lubrication, and early capacitor replacement will prevent most problems. Also, ensure stable power supply and avoid overloading circuits.
Fixing a humming fan that won’t turn is easier than it seems. With basic tools, careful diagnosis, and safe methods, you can solve most problems yourself. Keep your fan clean and well-maintained, and enjoy smooth, quiet airflow every day.