
A washing machine leak is never a welcome surprise, especially when water appears under your GE washer. Leaks from the bottom can leave your laundry room wet, damage your floors, and even cause mold if ignored. If you’re facing this issue, you probably want answers—and a solution—fast. This article will help you understand why a GE washer leaks from the bottom, what to do about it, and how to prevent future leaks. Whether you’re a DIY enthusiast or just want to know what to expect before calling a technician, you’ll find practical tips and expert guidance here.
Common Causes Of Ge Washer Leaking From Bottom
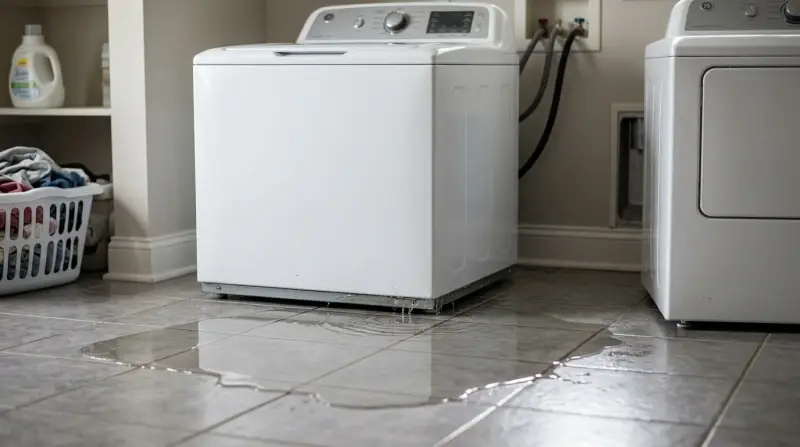
When water pools beneath your GE washer, several parts could be to blame. Knowing the likely causes can save time and money.
1. Faulty Drain Pump
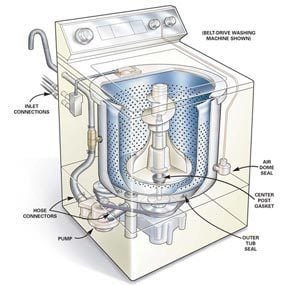
The drain pump is one of the most common reasons for leaks. If it develops a crack or its seals wear out, water can escape during the drain cycle. Sometimes, a small object like a coin or button can damage the pump or block its path.
2. Worn Door Boot Seal (front-load Models)
Front-load washers use a rubber door boot seal to keep water inside. Over time, this rubber can tear, crack, or become loose, letting water drip to the floor. Detergent buildup and sharp objects left in pockets can shorten its lifespan.
3. Loose Or Damaged Hoses
Both top- and front-load washers have hoses for water supply and drainage. A loose hose clamp, cracked hose, or poor connection can cause leaks. Hoses behind the machine are often overlooked during installation or cleaning.
4. Clogged Or Disconnected Drain Hose
A clogged drain hose can force water back into the washer or onto the floor. If the hose becomes detached or is not secured properly, water will leak directly out.
5. Faulty Tub Seal
The tub seal prevents water from escaping where the tub meets the transmission. If this seal fails, water will leak out the bottom, often during the wash or spin cycles. This repair is complex and usually requires professional help.
6. Overuse Of Detergent
Using too much or the wrong type of detergent can create excess suds. This may cause water to overflow from the washer, especially in high-efficiency models that use less water.
7. Cracked Outer Tub
A cracked tub is rare but possible, usually due to an impact or manufacturing flaw. Water escaping from a cracked tub will always leak to the bottom.
8. Faulty Water Inlet Valve
If the water inlet valve is cracked or its seal fails, water can leak during the fill cycle. This is often seen as a slow leak that appears even when the washer is not running.
How To Diagnose The Source Of The Leak
Finding the exact cause of a washer leak might feel daunting, but a few practical steps can make the process easier and safer.
- Unplug the Washer: Always disconnect the power before inspecting or repairing any appliance.
- Pull the Washer Forward: Carefully move the washer away from the wall to access the back and sides.
- Dry the Area: Wipe up any water so you can spot new leaks as they appear.
- Run a Short Cycle: With the machine empty, run a rinse or spin cycle and observe where water starts to appear.
- Check Underneath: Use a flashlight to look for drips or streams coming from specific parts.
- Inspect Hoses and Connections: Tighten or reattach any loose hoses.
- Examine the Pump and Tub: Look for visible cracks, corrosion, or water trails.
| Component | Leak Pattern | Common Signs |
|---|---|---|
| Drain Pump | Leaking during drain cycle | Water under front center, noise during draining |
| Door Boot Seal | Leaking during wash cycle (front-load) | Water under door, visible tears in rubber |
| Hoses | Leaking any time | Drips from hose ends, puddles behind washer |
| Tub Seal | Leaking during agitation or spin | Water under center, rust spots under washer |
| Detergent Overuse | Leaking during wash | Lots of suds, water from drawer or door |

Credit: www.youtube.com
Step-by-step Solutions For Fixing A Ge Washer Leak
Many leaks can be fixed without a professional, especially if you catch them early. Here are the most effective methods:
1. Fixing A Leaking Drain Pump
- Disconnect power and water supply.
- Remove the front or rear access panel (check your manual for location).
- Inspect the pump for cracks or water trails.
- Replace the pump if damaged. Replacement parts cost $30–$80.
- Reattach hoses securely.
2. Replacing The Door Boot Seal
- Open the door and inspect the rubber seal for holes or wear.
- Remove the retaining band and old seal.
- Install the new seal, ensuring it sits flat and is not twisted.
- Secure the retaining band and test for leaks.
3. Securing Or Replacing Hoses
- Check both ends of each hose for tightness.
- Replace any hose with visible cracks or bulges.
- Use new hose clamps if old ones are rusty or loose.
4. Clearing A Clogged Drain Hose
- Detach the drain hose from the back of the washer and the drain pipe.
- Use a flexible brush or plumber’s snake to clear blockages.
- Reattach the hose securely.
5. Fixing A Faulty Tub Seal
- This repair is complex. If you see water leaking from the tub center, call a qualified technician.
- The washer may need to be disassembled, and the transmission removed.
6. Adjusting Detergent Use
- Check your detergent label and washer manual for the right amount.
- Use high-efficiency (HE) detergent for HE washers.
- Run a cleaning cycle to remove excess suds.
7. Addressing A Cracked Tub
- If the outer tub is cracked, replacement is usually required.
- This is a major repair; most choose professional service or replacement of the washer.
8. Repairing Water Inlet Valve Leaks
- Disconnect and inspect the valve for visible leaks.
- Replace if cracked or corroded.
- Ensure hoses are attached tightly.
How To Prevent Future Leaks
Prevention saves stress and money. Many leaks are avoidable with simple habits.
- Check hoses every 6 months for cracks, bulges, or loose connections.
- Clean the drain pump filter regularly to avoid blockages.
- Use the right detergent and measure carefully to prevent excess suds.
- Empty pockets before washing to avoid damaging seals and pumps.
- Do not overload the washer, which can strain seals and parts.
- Schedule annual maintenance or a professional inspection if your washer is more than 5 years old.
| Prevention Tip | Frequency | Why It Matters |
|---|---|---|
| Inspect hoses | Every 6 months | Prevents sudden bursts and leaks |
| Clean pump filter | Monthly | Reduces chance of blockages |
| Use correct detergent | Every load | Prevents oversudsing and overflow |
| Empty pockets | Every load | Protects seals and the pump |
| Annual maintenance | Yearly | Catches early wear or damage |
:max_bytes(150000):strip_icc()/why-is-my-washing-machine-leaking-2147313-FINAL-5bbfa6cd46e0fb0026ddeeea.png)
Credit: www.thespruce.com
When To Call A Professional
While many leaks are easy to fix, some require technical skill:
- If the leak is coming from the tub seal or outer tub, professional service is recommended.
- If you smell burning, see sparks, or notice water near electrical parts, unplug the washer and call for help.
- For persistent leaks that don’t respond to simple fixes, a service call can prevent bigger problems.
Most GE washers are built to last, but as with all appliances, parts wear out. Investing in proper repairs can extend your washer’s life by several years.
Real-life Example
Consider this: A homeowner noticed a small puddle under their GE front-load washer after every cycle. After checking hoses and finding no issues, they discovered a small tear in the door boot seal likely from a forgotten coin in a pocket. Replacing the seal ($45 part, 30 minutes of labor) fixed the problem completely. This repair was much cheaper and easier than calling a technician or buying a new washer.
Cost Of Repair Vs Replacement
Understanding the costs can help you decide whether to repair or replace a leaking washer. Here’s a quick comparison:
| Part/Repair | Average DIY Cost | Professional Cost | When to Replace Washer |
|---|---|---|---|
| Drain pump | $30–$80 | $150–$250 | If repairs exceed 50% of new washer price |
| Door boot seal | $40–$70 | $120–$180 | If tub or motor is also damaged |
| Hoses | $10–$30 | $80–$120 | If washer is over 10 years old |
| Tub seal | N/A (complex) | $200–$400 | If multiple major parts are failing |
Non-obvious insight: Many people forget to check for leaks after moving their washer, but even a slight shift can loosen hoses or connections. Always inspect your washer after any move or maintenance.
Another tip: If your washer is on a pedestal or stand, leaks may drip further away from the machine, making the source harder to spot. Check under and around the pedestal for clues.
Frequently Asked Questions
Why Is My Ge Washer Leaking Only During The Spin Cycle?
A leak during the spin cycle often points to a tub seal problem or a loose drain hose. Spinning creates more pressure, which can force water out through even a small gap or crack.
Can I Use Regular Detergent In My High-efficiency Ge Washer?
No. High-efficiency (HE) washers need HE detergent. Regular detergent creates too many suds, which can lead to leaking and even damage the washer over time.
How Do I Know If My Washer’s Drain Pump Is Bad?
Signs include loud noises during draining, water left in the tub, or a visible leak from the pump area. Remove the lower access panel to check for moisture or corrosion around the pump.
Is It Safe To Keep Using My Washer If It Leaks A Little?
No. Even a small leak can worsen quickly. Water can damage floors, cause mold, or reach electrical parts, creating a fire risk. Always fix leaks promptly.
Where Can I Find Official Parts Or Service Manuals For My Ge Washer?
You can get genuine parts and manuals from the official GE Appliances website or through trusted retailers. For more technical support, visit GE Appliances Support.
Fixing a GE washer leaking from the bottom is possible for many homeowners with some patience and attention to detail. Regular maintenance, quick responses to leaks, and knowing when to call a pro will keep your laundry room dry and your washer running smoothly for years.
1 thought on “Ge Washer Leaking from Bottom: Causes and Quick Fixes”