A sloping concrete floor can cause real headaches. Furniture doesn’t sit level, doors may not close right, and installing new flooring becomes tricky. Whether you’re renovating a basement, prepping a garage, or fixing a room in your house, learning how to level a concrete floor that slopes is a smart skill.
Good news this is a job a careful homeowner can handle with the right knowledge, materials, and patience. Let’s walk through the steps, tools, and important details you need to succeed.
Why Concrete Floors Slope
Most concrete floors were designed to be level, but over time, things can change. Houses settle, moisture enters, or the initial pour was not perfect. Sometimes, a slope is intentional (for drainage in garages), but in living spaces, this is a problem.
Even a slope of 1/8 inch per foot can cause visible issues. Before fixing, it’s key to know *why* your floor slopes. If you see large cracks, sudden changes, or water damage, structural issues might be present. In these cases, consult a professional before you try to level anything.
Assessing The Slope
Start by measuring the slope. You need to know how uneven your floor is and where the low spots are. Here’s a reliable way to check:
- Use a 4-foot level or longer. Place it flat on the floor in different directions.
- If one end lifts off the ground, measure the gap with a tape measure or ruler.
- Mark the highest and lowest spots with chalk.
For larger rooms, a laser level or a long, straight 2×4 and a level will help you map the slope across the whole floor. Write down your measurements. This information will guide your choice of leveling method.
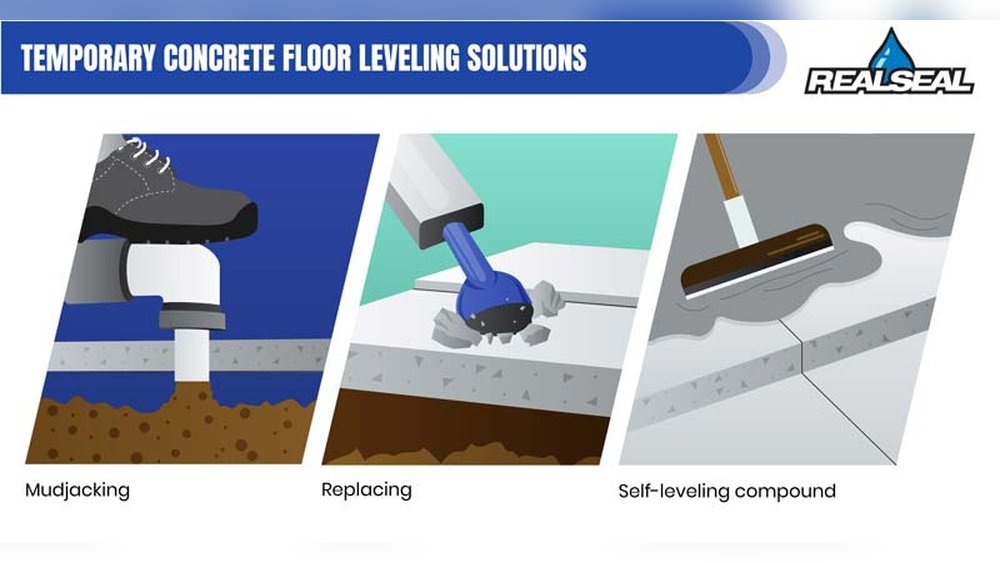
Common Slope Sizes And Fix Methods
| Slope Height | Best Leveling Method | DIY Difficulty |
|---|---|---|
| Up to 1/2 inch | Self-leveling compound | Easy |
| 1/2 to 2 inches | Self-leveling or screed with mortar | Moderate |
| More than 2 inches | New concrete topping | Hard |
Most homeowners can handle slopes up to 2 inches with careful prep and the right materials.
Tools And Materials Needed
Before you begin, gather the essentials. Having everything on hand will save time and prevent mistakes.
Tools:
- Long spirit level (4 feet or longer)
- Laser level (optional, for large rooms)
- Chalk or marker
- 5-gallon buckets
- Drill with mixing paddle
- Trowel or floor squeegee
- Broom and vacuum
- Knee pads
Materials:
- Self-leveling underlayment (compound)
- Bonding primer (recommended by underlayment brand)
- Water (for mixing)
- Sand (for deep spots, if needed)
- Duct tape and plastic (to seal off vents and doors)
Pro tip: Always read the manufacturer’s directions for your chosen underlayment. They’re not all the same, and mixing ratios really matter.
Preparing The Floor
A strong, lasting result starts with prep. Here’s how to get your floor ready:
- Clear the space. Move all furniture, rugs, and baseboards.
- Clean thoroughly. Sweep, vacuum, and scrub the floor to remove dust, grease, and debris. Leveling compound sticks best to clean surfaces.
- Seal gaps. Use silicone caulk or foam to block holes, cracks, and the edges where compound might leak (especially at doors).
- Prime the floor. Most self-leveling compounds need a bonding primer for best adhesion. Roll or brush it on and let it dry as directed.
Missing the cleaning or priming step is a common mistake. Dust or oil can make the new layer lift later—so take your time here.
Choosing The Right Leveling Method
Not all slopes are equal, and not all fixes are the same. Here’s a comparison of main options:
| Method | Best For | Cost | Set Time |
|---|---|---|---|
| Self-leveling compound | Thin slopes, <2 inches | $$ | 4–24 hours |
| Mortar screed | Deeper slopes | $ | 1–2 days |
| New concrete topping | Major repairs, >2 inches | $$$ | 2–7 days |
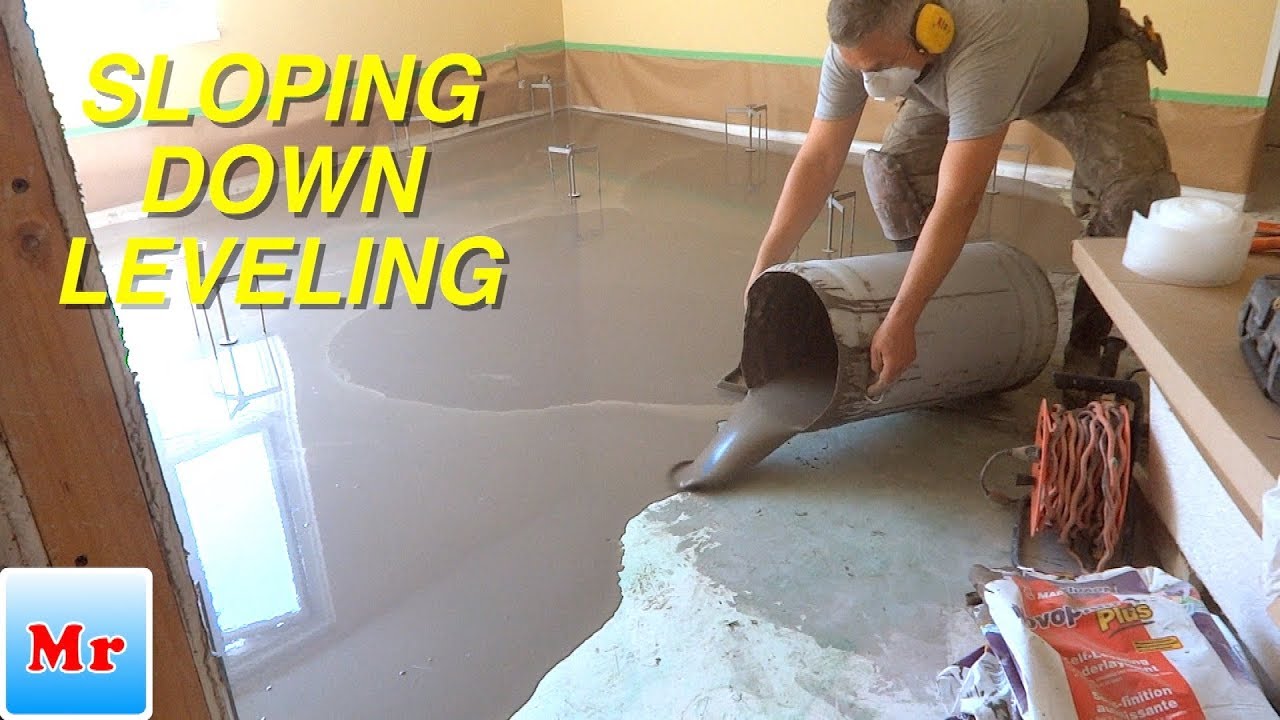
Self-leveling compound is the best choice for most homeowners because it’s fast, smooth, and easy to use. It flows into low spots and hardens quickly.
Step-by-step: Leveling A Sloped Concrete Floor
Let’s get practical. Here’s how to use a self-leveling compound to fix a sloping concrete floor.
Double-check Floor Prep
Make sure the floor is clean, dry, and primed. Check that all cracks and edges are sealed.
Plan Your Pour
Self-leveling compound sets quickly—often in 10-30 minutes. Work in sections if the room is large. Figure out your exit path so you don’t get trapped in a corner.
Mix The Compound
Follow the manufacturer’s directions. Usually, you’ll:
- Pour water into a clean bucket
- Add the powder
- Mix with a drill and paddle for 2-3 minutes until smooth
- Let it rest briefly (as directed)
Do not over-mix or add extra water. It can weaken the final surface.
Pour And Spread
Start at the lowest area. Pour the compound and let it flow toward the high spots. Use a squeegee or trowel to help guide it. Work quickly, as it begins to set fast.
If you need to build up more than 2 inches, apply in layers. Let each layer dry fully before adding the next.
Feather The Edges
Use a trowel to smooth the edges and blend the new surface into the old floor. This will help prevent visible ridges under new flooring.
Let It Cure
Most self-leveling compounds cure enough for foot traffic in 4-8 hours, but don’t install flooring or heavy items for at least 24 hours (check your product’s instructions).
Non-obvious insight: Temperature and humidity matter. Self-leveling compounds set faster in warm, dry conditions. If you’re working in a hot room, mix smaller batches to avoid waste.
When To Use A Mortar Screed
For slopes more than 2 inches, or when you need to build up only part of a floor, a mortar screed may be better. This is a mix of sand, cement, and water, spread and leveled with a screed board.
- Mark the desired level on walls.
- Mix mortar to a stiff, workable consistency.
- Spread the mortar and use a long, straight board (screed) to drag it level, using your wall marks as a guide.
- Let it set 24–48 hours before walking on it.
This method takes more skill, but it’s cheaper for thick fills. The downside: the finish is rougher and may need a thin self-leveling layer on top for smooth flooring.
Dealing With Major Slopes Or Structural Issues
Sometimes, a sloping floor is a sign of bigger problems foundation settling or water damage. If the slope is more than 2 inches over a short distance, or if there are wide cracks, contact a structural engineer. Fixing the surface alone won’t solve the real issue.

Tips For A Professional Result
- Work in good light so you can see the wet compound as it spreads.
- Use a spiked roller (available at hardware stores) to pop air bubbles in the compound for a smoother finish.
- Check the floor’s flatness with a long level or straightedge after curing—before laying new flooring.
- Don’t rush the drying time. Heavy flooring (like tile or hardwood) needs a fully cured surface.
Beginner mistake: Not calculating how much compound you need. Most bags cover about 20-25 square feet at 1/4 inch thick. Measure your area and depth to buy enough—running out mid-pour is a recipe for a lumpy floor.
How Self-leveling Compound Compares To Other Methods
To help you decide, here’s a quick comparison:
| Feature | Self-Leveling Compound | Mortar Screed | Plywood Overlayment |
|---|---|---|---|
| Best for | Minor to moderate slopes | Major slopes, thick fill | Temporary leveling |
| Skill needed | Low to moderate | Moderate to high | Low |
| Finish quality | Very smooth | Needs topping | Not for tile or stone |
| Time to complete | 1 day | 2–3 days | 1 day |

Installing Flooring After Leveling
Once your floor is level and fully cured, you can install most types of flooring: tile, laminate, hardwood, vinyl, or carpet. Always check the manufacturer’s requirements for subfloor flatness. Some materials (like luxury vinyl planks) need a floor that’s flat to within 1/8 inch over 6 feet.
Before laying flooring, sweep and vacuum again to remove any dust or grit. For glue-down floors, make sure the surface is dry and free of primer residue.
Pro tip: Keep a photo or measurements of your floor before and after. It may help with future home sales or repairs.
Cost And Time Estimates
Leveling a sloping concrete floor isn’t free, but it’s usually cheaper than tearing out and pouring new concrete.
- Self-leveling compound: $35–$50 per bag (covers 20–25 sq ft at 1/4 inch thick)
- Bonding primer: $20–$30 per gallon
- Tools (if you need to buy): $40–$100
For a 200 sq ft room with a 1/2 inch slope, expect to spend $300–$600 in materials.
Total time: 1–2 days, including drying.
Non-obvious insight: If you’re leveling a basement, check for moisture first. Self-leveling compounds can fail if water comes up through the slab. Use a sheet of plastic taped to the floor for 24 hours if you see condensation, address moisture issues first.
Where To Learn More
For more details on concrete floor leveling and foundation problems, visit Family Handyman, a trusted source for DIY projects.
Frequently Asked Questions
How Do I Know If My Floor Slope Is A Structural Problem?
If the slope appeared suddenly, is more than 2 inches, or is combined with cracks wider than 1/4 inch, it may be a sign of foundation movement. In this case, call a structural engineer for an inspection before leveling.
Can I Use Self-leveling Compound On All Types Of Concrete?
Most self-leveling compounds work on clean, sound concrete. However, they may not bond well to painted, sealed, or oily surfaces. Always clean and prime the floor as directed for best results.
How Soon Can I Install Flooring After Leveling?
Wait at least 24 hours after using self-leveling compound, but check the product instructions. Some allow installation after 4–6 hours; others need more time, especially for thick layers.
Is It Possible To Level A Floor With Just Plywood?
Plywood can be used as a temporary solution for small slopes, especially under carpet. However, it’s not suitable for tile or stone, and won’t fix major structural issues.
What If The Floor Still Isn’t Perfectly Level?
Small dips (under 1/8 inch) are usually fine for most flooring. For larger low spots, you can add a second, thin layer of leveling compound. Always check with a long level before laying your finished floor.
Leveling a concrete floor that slopes is a project that pays off for years. With the right tools, careful prep, and a little patience, you can create a solid, flat surface ready for any type of flooring. Remember: Take your time, follow instructions, and don’t rush the drying process. A smooth floor means a happy home.