If your Whirlpool dryer isn’t spinning but the motor still runs, a broken belt is often the cause. It’s a common issue that leaves clothes damp and the laundry routine interrupted. The good news? Replacing a Whirlpool dryer belt is a repair you can do at home with some patience and basic tools.
Doing it yourself can save on repair costs and help you understand your appliance better. This guide walks you through every step, highlights important safety tips, and shares practical advice based on real-world experience. Whether you’re new to appliance repair or just want to get it right, you’ll find the answers here.
Understanding The Dryer Belt And Its Role
The dryer belt is a looped, rubber-like part that wraps around the drum and the motor pulley. When the motor turns, the belt spins the drum, tumbling your clothes for even drying. Over time, belts can stretch, crack, or snap due to heat and wear. If your dryer drum isn’t moving but you hear the motor running, the belt is likely broken.
Why does the belt break?
- Age: Most belts last 5–8 years with regular use.
- Heavy loads: Overloading puts extra strain on the belt.
- Heat cycles: Constant heating and cooling weakens the material.
Ignoring a faulty belt can damage the dryer motor or other parts. Acting quickly prevents bigger problems.
Signs Your Whirlpool Dryer Belt Needs Replacement
Knowing when to change the belt can save you time and money. Look for these signs:
- Drum won’t turn, but motor runs
- Squealing or thumping noises from inside the dryer
- Burning rubber smell during use
- Dryer stops mid-cycle
If you notice any of these, unplug your dryer and inspect the belt before further use.
Tools And Materials Needed
Being prepared speeds up the repair and avoids frustration. Gather these before starting:
- Replacement Whirlpool dryer belt (model-specific)
- Phillips and flathead screwdrivers
- 1/4-inch nut driver or socket wrench
- Putty knife or flat scraper
- Work gloves
- Vacuum or brush for cleaning lint
- Flashlight
- Small container for screws
Optional but helpful:
- Smartphone for taking step-by-step photos
- Knee pads or mat for comfort
Having the right tools on hand makes the process much smoother.
Choosing The Right Replacement Belt
Whirlpool dryers use different belts based on the model. Using the wrong belt can cause noise, poor performance, or rapid wear. Check your dryer’s model number (usually found on a sticker inside the door or behind the lint trap) and match it to the correct belt. Most standard Whirlpool dryers use belt part number 341241, but always double-check.
Here’s a quick comparison of common Whirlpool dryer belt types:
| Belt Part Number | Compatible Models | Length (inches) | Width (inches) |
|---|---|---|---|
| 341241 | Most standard Whirlpool & Kenmore | 92 1/4 | 1/4 |
| 661570V | Whirlpool Duet, Maytag | 93 1/2 | 3/8 |
| 8547157 | Whirlpool Cabrio | 92 1/4 | 1/4 |
Tip: If you’re unsure, bring the old belt to the store or check the appliance’s manual. Using the exact match is key to a smooth repair.
Credit: www.davesrepair.com
Safety First: Preparing For The Repair
Safety is essential when working with any appliance. Here are important steps before you start:
- Unplug the dryer from the wall outlet. Never work on a dryer with power connected.
- If your dryer is gas-powered, shut off the gas supply and disconnect the line.
- Move the dryer away from the wall for easy access to the back and sides.
- Remove lint and dust from around the dryer area. Excess lint is a fire risk.
- Keep children and pets away from the work area.
Taking these steps avoids injuries and prevents accidental damage.
Step-by-step Guide: How To Replace A Whirlpool Dryer Belt
Replacing the dryer belt involves opening the machine, removing the old belt, and installing the new one. Here’s a breakdown:
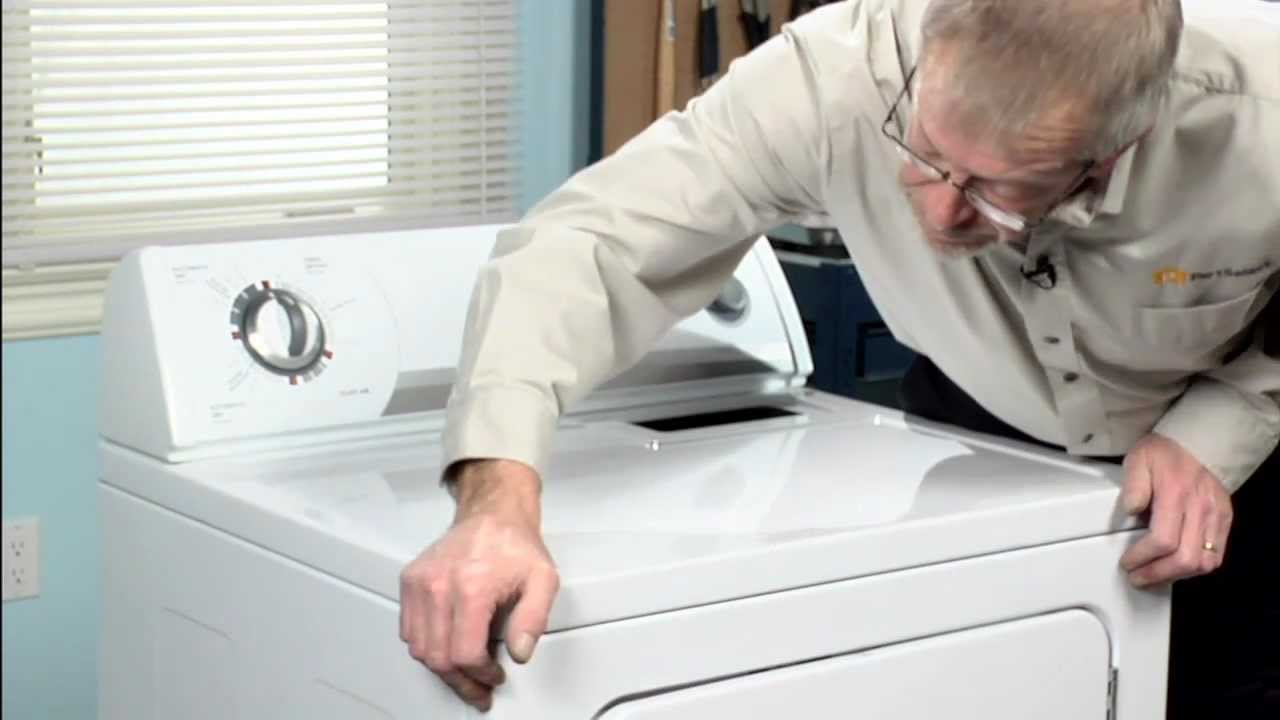
1. Access The Dryer Cabinet
- Remove the lint screen from the top panel.
- Use a Phillips screwdriver to unscrew the two screws under the lint screen opening.
- Insert a putty knife under the corners of the dryer’s top panel. Push to release the spring clips (usually near the front corners).
- Lift the top panel and prop it open.
2. Remove The Front Panel
- Locate and unscrew the two screws holding the front panel in place (inside the upper corners).
- Carefully pull the front panel toward you. Some dryers have door switch wires—disconnect these gently and remember their positions.
- Set the front panel aside.
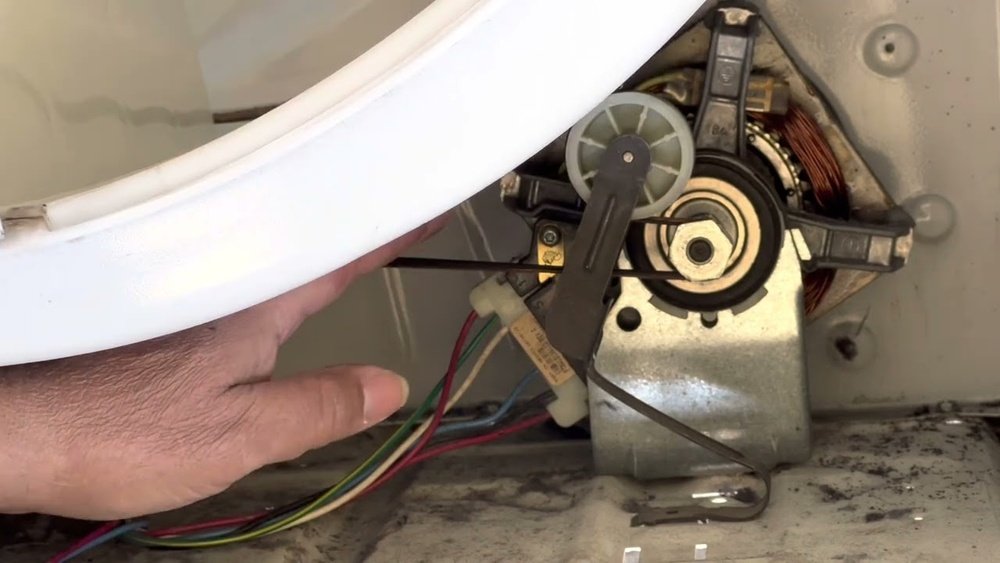
3. Locate And Remove The Old Belt
- The drum is now visible. If the belt is broken, you may find it at the bottom of the cabinet.
- If the belt is still looped around the drum, note its path (take a photo if needed).
- Release tension from the belt by reaching under the drum and pushing the idler pulley to one side.
- Slip the old belt off the motor pulley and idler pulley, then slide it off the drum.
4. Clean Inside The Dryer
Now is the perfect time to clean out lint, dust, and debris from the cabinet. Use a vacuum or soft brush. Excess lint can cause fires and reduce dryer efficiency.
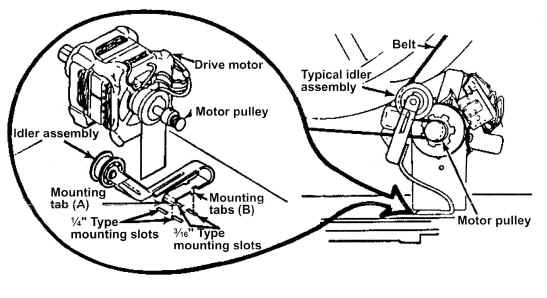
5. Install The New Belt
- Slip the new belt around the drum, placing the ribbed side against the drum surface.
- Align the belt in the same position as the old one—usually about 1 inch from the back edge of the drum.
- Loop the belt under the idler pulley and then around the motor pulley. The idler pulley should create tension on the belt.
Here’s a helpful layout for a standard Whirlpool dryer belt routing:
| Component | Description |
|---|---|
| Drum | Belt wraps around drum (ribbed side touching) |
| Idler Pulley | Belt passes under pulley to create tension |
| Motor Pulley | Belt loops around for power transfer |
Non-obvious tip: Make sure the belt isn’t twisted and lines up straight. A twisted belt will wear out quickly and cause noise.
6. Reassemble The Dryer
- Reconnect the door switch wires if you unplugged them.
- Carefully fit the front panel back onto the dryer, aligning tabs and securing screws.
- Lower the top panel and snap it back into place.
- Replace the screws under the lint screen opening.
- Slide the lint filter back in.
7. Test Your Repair
- Plug the dryer back in (reconnect gas if needed).
- Run the dryer empty for 2–3 minutes. Listen for smooth operation—there should be no squealing or scraping.
- If the drum spins and the dryer is quiet, you’ve succeeded.
If you hear odd noises or the drum doesn’t spin, unplug the dryer and double-check the belt routing.
Common Mistakes To Avoid
Even handy people can make errors during this repair. Watch out for these:
- Using the wrong belt type: Can lead to slipping or rapid wear.
- Skipping the lint cleaning step: Reduces efficiency and raises fire risk.
- Forgetting to reconnect door switch wires: Dryer won’t start without this.
- Not releasing belt tension: Belt will be too loose and slip off.
- Twisting the belt: Causes noise and shortens belt life.
Taking your time and double-checking each step helps avoid these issues.
Costs And Savings
Let’s look at the typical costs:
| Item | DIY Cost | Professional Repair Cost |
|---|---|---|
| Whirlpool Dryer Belt | $10–$25 | Included |
| Service Call/Labor | $0 | $120–$200 |
| Total | $10–$25 | $130–$225 |
Replacing the belt yourself saves most of the repair bill. Even if you buy a few basic tools, the total cost is much lower than hiring a professional.

Credit: www.wikihow.com
Extra Tips For A Successful Repair
- Photograph each step as you disassemble. It’s much easier to put things back together this way.
- Label screws and parts in a small container. Don’t lose small pieces—some are model-specific.
- Check the idler pulley: If it’s noisy or wobbly, replace it while you have the dryer open.
- Inspect drum rollers and glides: Worn rollers can cause thumping. If you hear odd noises, consider replacing these as well.
- Don’t rush: Give yourself at least 45–60 minutes if it’s your first time.
Many beginners forget to check other parts while the dryer is open. A little extra effort now can prevent a second repair later.
When To Call A Professional
While replacing a dryer belt is a straightforward repair, it’s okay to seek help if:
- You have a high-end or stacked dryer with tough access
- The dryer is gas-powered and you’re unsure about handling the gas line
- You’re not comfortable with electrical components
Professional help is also wise if, after replacing the belt, your dryer still won’t spin or makes loud grinding noises. There may be a deeper issue with the motor or drum rollers.
For more detailed diagrams and troubleshooting, Whirlpool’s official site offers valuable guidance: Whirlpool Dryer Support.
Credit: www.youtube.com
Frequently Asked Questions
How Long Does It Take To Replace A Whirlpool Dryer Belt?
Most people can complete the job in 45–90 minutes. If you’re new to appliance repair, allow extra time for careful disassembly and cleaning.
Can I Use A Universal Dryer Belt For My Whirlpool Model?
It’s best to use a model-specific belt. Universal belts may not fit properly, causing noise or early failure. Always check your model number and buy the correct part.
Do I Need To Lubricate The New Belt Or Any Pulleys?
No lubrication is needed for the belt. If you notice a squeaky idler pulley, replace it instead of lubricating. Oil can attract lint and cause problems.
Is It Safe To Repair A Gas Dryer Myself?
If you follow safety steps and shut off the gas supply, it’s safe for most people. However, if you’re unsure or uncomfortable, call a professional to avoid risks with gas connections.
What If My Dryer Still Doesn’t Spin After Replacing The Belt?
Double-check the belt routing, door switch connections, and the idler pulley. If the problem remains, the issue may be with the motor or drum rollers, which may need further repair.
Replacing a Whirlpool dryer belt is a practical skill that saves money and keeps your laundry routine running smoothly. Take your time, stay safe, and enjoy the satisfaction of a job well done.