
If your ceiling fan remote suddenly stops working, it can be frustrating and confusing. Sometimes, the fix is as easy as resetting the remote. Many homeowners don’t realize how quick and simple this can be, and they end up replacing remotes or even calling electricians unnecessarily.
But with a little guidance, you can reset your ceiling fan remote yourself and get your fan spinning smoothly again. In this guide, you’ll learn step-by-step how to reset your ceiling fan remote, when it’s necessary, and what to do if things don’t go as planned.
You’ll also discover a few lesser-known tips that even experienced DIYers sometimes overlook.
Understanding Ceiling Fan Remotes
Ceiling fan remotes are designed to make controlling your fan and its lights more convenient. Instead of pulling chains or flipping wall switches, you can adjust speed, direction, and lighting with a single button press. But these remotes depend on wireless signals and need to be synced with your fan’s receiver. Sometimes, they lose connection due to power surges, dead batteries, or interference from other devices.
There are two main types of ceiling fan remote systems:
| Type | How It Works | Common Brands |
|---|---|---|
| RF (Radio Frequency) | Uses radio waves to communicate between remote and fan receiver. | Hunter, Hampton Bay, Harbor Breeze |
| IR (Infrared) | Sends signals like a TV remote; line of sight needed. | Some older models, budget brands |
Most modern fans use RF remotes, which don’t require direct line-of-sight. This makes them more user-friendly, but sometimes also harder to troubleshoot.
When Should You Reset Your Ceiling Fan Remote?
Resetting your ceiling fan remote isn’t always the answer. However, it’s a good first step when you face these issues:
- The fan doesn’t respond to the remote at all.
- Only some buttons work (for example, the light turns on, but the fan doesn’t spin).
- The fan operates on its own or responds to other remotes in the house.
- The remote works, but only when you are very close to the fan.
- You replaced the remote or receiver recently.
Sometimes, homeowners forget that a simple battery swap or power cycle can fix the issue. But when these don’t work, a reset is often needed.
How To Reset Your Ceiling Fan Remote: Step-by-step
Resetting your ceiling fan remote is usually a quick process, but the exact steps can vary depending on your fan’s brand and model. Most remotes and receivers are designed for easy syncing, but you must follow the right sequence.
Gather The Necessary Tools
You usually won’t need many tools, but having these ready helps:
- Fresh batteries (usually AA or AAA)
- A screwdriver (to open the battery compartment or access the fan canopy)
- A small ladder (if the fan is high up)
- Your fan’s manual, if available
Turn Off Power To The Fan
For safety, always turn off the fan at the wall switch or circuit breaker before you begin. This step protects you and helps reset the receiver inside the fan.
Remove The Remote’s Batteries
Take out the batteries from the remote and wait at least 10 seconds. This clears any temporary memory in the remote.
Reset The Receiver
The receiver is a small electronic box usually hidden inside the fan’s canopy (the cover at the ceiling). In most fans, you don’t need to remove the canopy unless you need to access DIP switches (more on these soon).
For many models, simply cutting power to the fan for 30 seconds resets the receiver. Some brands, like Hunter or Hampton Bay, recommend leaving power off for up to a minute.
Replace Batteries And Power On
Put fresh batteries in the remote. Turn the power back on at the breaker or wall switch.
Pair The Remote To The Receiver
Most remotes will automatically try to sync with the receiver when powered on. But some require a pairing process:
- Press and hold the “Fan” or “Sync” button (usually for 5-10 seconds)
- Some remotes require you to press a combination (like “High” and “Light” together)
- You may hear a beep or see the fan blades jog (move slightly) when the connection is made
Always check your manual for the exact sequence. If you lost your manual, many manufacturers post them online.
Test All Functions
Check if the fan speeds, light controls, and reverse functions (if available) all work from the remote. Try from different distances to make sure the signal is strong.
Adjust Dip Switches (if Needed)
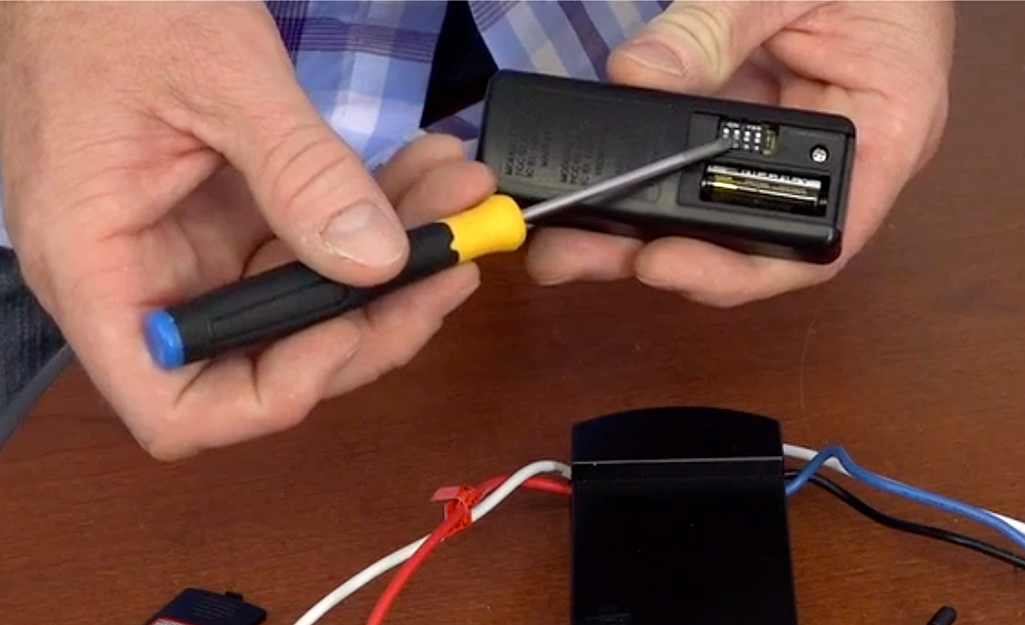
Some ceiling fan remotes and receivers use DIP switches to set a unique frequency. This prevents interference from other remotes in your home. DIP switches are tiny toggles found inside the battery compartment of the remote and sometimes on the receiver.
If your fan operates on its own or you have multiple fans/remotes causing confusion, change the DIP switch settings. Make sure the remote and receiver switches match exactly.
Here’s a quick look at DIP switch setup:
| Switch Position | Remote | Receiver | Effect |
|---|---|---|---|
| 1: ON, 2: OFF, 3: ON, 4: OFF | Set | Set | Unique code, avoids interference |
| 1: OFF, 2: ON, 3: OFF, 4: ON | Set | Set | Different code, must match both |
Remember: mismatched DIP switches are a common reason resets fail.
Common Mistakes To Avoid
Many people make simple errors when trying to reset their ceiling fan remote. Here’s what to watch out for:
- Forgetting to cut power: Reset won’t work if the fan still has electricity.
- Not matching DIP switches: Even one switch out of place can cause problems.
- Using old batteries: Weak batteries may not allow the remote to sync.
- Rushing the process: Some receivers need a full minute without power to reset.
- Assuming all remotes are the same: Steps may vary by brand and model.
A less obvious mistake is not checking for signal interference. Devices like wireless routers, Bluetooth speakers, or even other remotes can disrupt your fan’s signal. If you have many electronics nearby, try turning them off briefly during the reset.
Troubleshooting After A Reset
If your remote still isn’t working after following the reset steps, try these troubleshooting tips:
- Check the batteries again. Sometimes new batteries are faulty or not inserted correctly.
- Make sure the receiver is getting power. A loose wire inside the canopy can cut off electricity.
- Try resetting again, but wait longer before turning the power back on.
- Look for a reset button on the remote or receiver. Some newer models have this feature.
- Test the remote’s signal using a smartphone camera—infrared remotes will show a flashing light on the camera screen when you press a button.
- Replace the remote or receiver if you suspect hardware failure.
A surprising fix some people miss: check if your fan has a wall control that overrides the remote. If so, the wall control might be set to “off” or “low,” blocking remote commands.
When To Call A Professional
Most ceiling fan remote problems are easy to fix at home. But call a licensed electrician if:
- You smell burning or see scorch marks near the fan
- The fan or lights flicker after reset
- There are exposed wires or loose connections inside the canopy
- The receiver makes unusual noises
Electrical issues can be dangerous. If you’re unsure, it’s always safer to get help.

How Different Brands Handle Resets
Popular ceiling fan brands each have their own approach to remote resets. Here’s a quick comparison:
| Brand | Reset Method | Notes |
|---|---|---|
| Hunter | Power off 1 min, power on, hold “Fan” button | Fan may beep when reset |
| Hampton Bay | Power cycle, hold “Learn” button | Remote LED flashes when synced |
| Harbor Breeze | Press “Learn” button within 30 sec of power | Requires quick timing |
| Westinghouse | Match DIP switches, power cycle | Older models only use DIP switches |
If you’re unsure about your fan’s brand or model, look for a sticker on the fan motor or inside the canopy.
Two Insights Most Beginners Miss
- Power cycling is more important than you think. Many people just flip the wall switch, but the safest method is to turn off the breaker. This ensures the receiver fully resets.
- Remote and receiver must “see” each other during pairing. While RF doesn’t need line of sight, being too far away or having thick walls between them during reset can cause pairing to fail.
Tips For Keeping Your Remote Working Smoothly
- Change batteries at least once a year.
- Keep the remote away from moisture and direct sunlight.
- Don’t drop the remote—internal parts can loosen.
- Label remotes if you have multiple fans to avoid confusion.
- Keep your fan’s manual in a safe place for future troubleshooting.
If you’re interested in learning more about how ceiling fan remotes work, the Wikipedia page on ceiling fans offers a good overview of their technology and history.
Frequently Asked Questions
Why Did My Ceiling Fan Remote Stop Working Suddenly?
The most common reasons are dead batteries, power interruptions, or signal interference. Sometimes, the receiver inside the fan loses its memory and needs to be reset.
How Do I Know If The Problem Is The Remote Or The Receiver?
Try using a different remote (if available) or test your remote’s signal with a smartphone camera if it’s an infrared model. If the fan still doesn’t respond, the issue is likely with the receiver.
Can I Use A Universal Remote With My Ceiling Fan?
Many ceiling fans can be controlled with universal remotes, but you need to match the frequency or set the DIP switches correctly. Always check your fan’s compatibility before buying a universal remote.
Is It Safe To Reset The Ceiling Fan Remote Myself?
Yes, resetting is safe if you follow the steps and cut power before working near the fan. If you see damaged wires or smell burning, stop and call a professional.
What Should I Do If My Remote And Receiver Have No Dip Switches?
Some newer models use digital pairing instead of DIP switches. Follow the manufacturer’s instructions—usually, you press and hold a specific button on the remote right after restoring power to the fan.
Resetting your ceiling fan remote is a simple job that most people can handle in minutes. With a little patience and the right steps, you’ll have your fan back under control. If you ever run into trouble, remember that support is just a call away, and in most cases, you don’t need to replace your entire fan or remote.
By understanding how your system works, you can save time, money, and hassle.