If your Whirlpool Cabrio dryer has started making a squeaking noise, you’re not alone. For many homeowners, the sudden appearance of high-pitched sounds during a drying cycle can be both annoying and worrying. Is it just a minor problem, or is your dryer about to break down?
A squeaking dryer isn’t just an inconvenience—it’s often a sign that something inside needs attention. The good news is that most squeaks have clear causes and solutions. With the right approach, you can fix the noise and keep your dryer working smoothly for years.
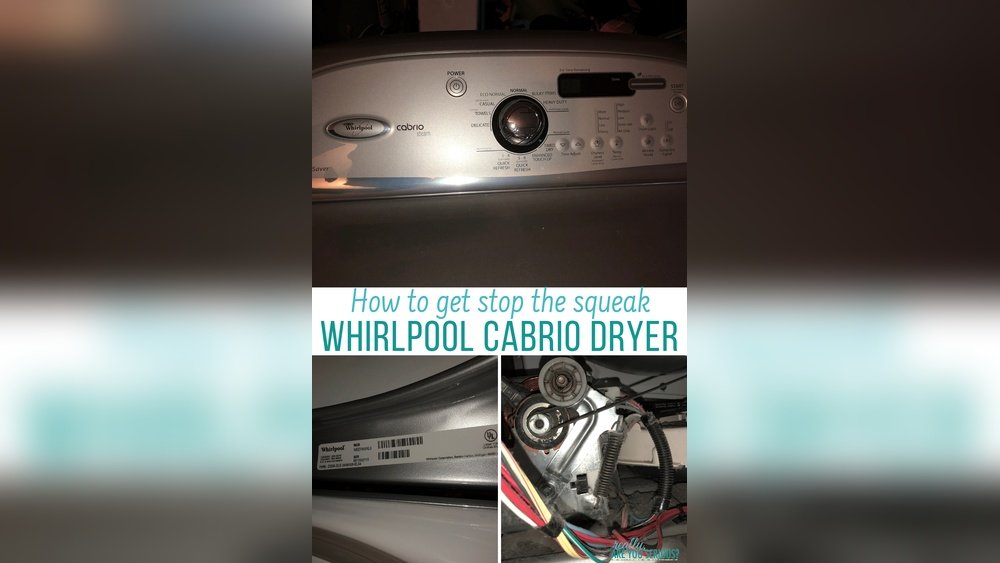
This article explains why Whirlpool Cabrio dryers squeak, how to find the source, and what you can do about it. Whether you want to try a DIY repair or decide if you need professional help, you’ll find step-by-step guidance, real examples, and tips that most guides miss.
By the end, you’ll understand your dryer better, know when a squeak is serious, and feel confident about your next steps.
Why Is My Whirlpool Cabrio Dryer Squeaking?
Dryers aren’t meant to squeak. When they do, it’s usually a sign of friction or wear in one of the moving parts. Your Cabrio dryer has a drum that spins with the help of rollers, glides, a belt, and a motor. If any of these parts start to fail, the dryer can develop a squeak.
The most common causes include:
- Worn drum rollers: These help the drum spin smoothly. Over time, they can flatten or lose lubrication.
- Damaged drum glides: These plastic or felt pieces support the front of the drum and can wear down.
- Loose or worn belt: The belt wraps around the drum and keeps it turning.
- Faulty idler pulley: This keeps tension on the belt. When its bearing fails, squeaks are common.
- Debris or foreign objects: Sometimes, small objects get stuck in the drum seal or lint trap area.
- Motor problems: If the motor bearings start to fail, you may hear squeaks or grinding.
Each of these issues can create a unique sound. A high-pitched squeal often points to friction in a spinning part, while a rhythmic squeak with each drum rotation may suggest a flat spot on a roller. Ignoring the noise can lead to further damage and even a complete breakdown.
How To Diagnose The Source Of Squeaking
Before you can fix your dryer, you need to find out exactly what’s causing the noise. This process doesn’t require special skills, but it does help to be methodical and careful.
Unplug And Inspect
Always unplug your dryer before starting any inspection. Safety should come first, especially when dealing with electrical appliances.
Listen Carefully
- Run the dryer empty and listen to where the squeak is coming from—front, back, or bottom.
- Note if the squeak is constant or only happens as the drum turns.
Check The Drum Rollers
Open the dryer cabinet (usually by removing the top panel and then the front panel). Look for the rear and front drum rollers. Spin each roller by hand. If they feel rough, don’t turn easily, or wobble, they need attention.
Inspect The Drum Glides
Glides are found at the front of the drum. Look for worn or missing glides. If you see plastic shavings or felt dust, the glides are likely worn out.
Examine The Belt
Look for a cracked, shiny, or loose belt. The belt should fit snugly around the drum and not show signs of fraying.
Test The Idler Pulley
Spin the idler pulley by hand. If it squeaks, grinds, or doesn’t spin freely, it’s likely the culprit.
Check For Foreign Objects
Look for small items (coins, buttons) stuck in the drum seal or lint trap area. These can cause unexpected noises.
Assess The Motor
If none of the above parts appear faulty, listen for squeaks coming from the motor area. Motor bearings can wear out, leading to squeaking or grinding.
Common Squeak Locations And Likely Causes
| Squeak Location | Most Probable Cause | Difficulty to Repair |
|---|---|---|
| Front of dryer | Drum glides or belt | Moderate |
| Back of dryer | Rear drum rollers | Moderate |
| Bottom of dryer | Idler pulley or motor | Advanced |
| Random/intermittent | Foreign object | Easy |

Diy Fixes For A Squeaking Whirlpool Cabrio Dryer
Once you’ve identified the source, many squeaks can be fixed at home. Here are the most common solutions, with tips to make the process smoother—even if you’re a beginner.
Replacing Drum Rollers
Drum rollers are among the most frequent causes of squeaks. They are round, rubber-coated wheels that support the drum as it spins.
Tools And Parts Needed
- Screwdriver (usually Phillips)
- Putty knife (to lift top panel)
- Replacement drum rollers (specific to your Cabrio model)
- Optional: Vacuum for cleaning lint/dust
Steps
- Unplug the dryer.
- Use the putty knife to release the top panel clips.
- Remove the front panel screws and set the panel aside.
- Locate the drum rollers (usually at the back).
- Remove the old rollers by taking off the retaining clip or nut.
- Install the new rollers.
- Spin them by hand to check for smooth movement.
- Reassemble the dryer.
Tip: Always replace both rollers at the same time. If one is worn, the other is likely close to failing too.
Replacing Drum Glides
Drum glides help the front of the drum move smoothly. When worn, they create a scraping or squeaking sound.
Steps
- Open the top and front panels as above.
- Remove the drum (if needed) for better access.
- Locate the glides (usually plastic or felt).
- Remove old glides (they may be glued or screwed in).
- Clean the area.
- Attach new glides.
- Reassemble.
Non-obvious insight: If you notice black streaks inside the drum or on clothes, this is often caused by worn glides leaving residue.
Replacing Or Adjusting The Belt
A worn or loose belt can also squeak, especially if it slips as the drum turns.
Steps
- Remove the panels and drum as before.
- Inspect the belt for cracks or shiny spots.
- Replace the belt if needed, threading it around the drum and motor pulley.
- Re-tension the belt using the idler pulley.
Tip: Take a photo of the belt path before removing the old belt. This saves confusion during reassembly.
Fixing The Idler Pulley
A squeaky idler pulley can sound like a loud chirp or squeal.
Steps
- Open the dryer as above.
- Locate the idler pulley (usually under the drum).
- Remove the belt from the pulley.
- Spin the pulley; if noisy, replace it.
- Install the new pulley and reattach the belt.
Removing Foreign Objects
Sometimes the fix is simple: remove any coins, buttons, or debris from the drum seal or lint area.
Non-obvious insight: Even a small object trapped in the felt seal can cause noise and eventually damage the drum edge.
When To Lubricate Vs. Replace
Some guides suggest lubricating rollers or pulleys. While this can stop a squeak temporarily, it is usually a short-term fix. Most dryer parts are designed to run dry; adding oil may attract lint and lead to more problems.
If a part is worn or damaged, replacement is the long-term solution.
Should You Repair Yourself Or Call A Professional?
Not everyone is comfortable opening up an appliance. Here’s how to decide if you should tackle the repair or call for help.
Diy Is A Good Option If:
- You are comfortable with basic tools.
- The dryer is out of warranty.
- The problem is clear (for example, obviously worn rollers or a loose belt).
Call A Professional If:
- The dryer is still under warranty.
- The squeak seems to come from the motor or wiring.
- You are unsure about disassembling and reassembling the dryer.
- You have tried a fix, but the noise returns quickly.
Typical Repair Costs
Here’s a comparison of estimated costs for common Whirlpool Cabrio dryer squeak repairs:
| Repair Type | DIY Cost (Parts Only) | Professional Cost | Time Needed |
|---|---|---|---|
| Drum roller replacement | $25–$45 | $130–$220 | 45–90 minutes |
| Drum glide replacement | $10–$25 | $120–$180 | 30–60 minutes |
| Belt replacement | $12–$20 | $100–$140 | 30–45 minutes |
| Idler pulley replacement | $15–$30 | $110–$160 | 30–60 minutes |
| Motor replacement | $80–$180 | $250–$400 | 1–2 hours |
These costs are estimates and can vary by location and dryer model.
Preventing Squeaks In The Future
A little routine care can keep your Whirlpool Cabrio dryer running quietly for years. Here’s how:
- Clean the lint filter after every load. This helps prevent overheating and reduces wear on moving parts.
- Vacuum inside the dryer cabinet every 6–12 months. Lint and dust can build up around rollers, pulleys, and the motor.
- Check and replace drum glides, rollers, and belt every 3–5 years. If you use your dryer often, these parts wear faster.
- Avoid overloading the dryer. A heavy drum puts more stress on rollers, belt, and motor.
- Listen for new noises. Addressing a squeak early prevents bigger problems later.
Pro tip: Mark your calendar for a yearly dryer checkup. A quick inspection can catch issues before they get noisy—or expensive.
Whirlpool Cabrio Dryer Squeaking: Myths And Misconceptions
Many owners believe certain myths about dryer noises and repairs. Let’s clear up some common misunderstandings.
Myth 1: “all Dryers Squeak A Little As They Get Older.”
Fact: While minor sounds can develop over time, a persistent squeak is not normal. It usually means a part is wearing out.
Myth 2: “a Little Oil Will Fix The Squeak For Good.”
Fact: Most dryer parts are not designed for oiling. Lubricants can attract lint and create bigger problems. Replace worn parts instead.
Myth 3: “if The Dryer Is Still Heating, It’s Okay To Ignore The Squeak.”
Fact: Heat and drum movement are separate. A squeak is an early warning of mechanical wear. Ignoring it can turn a $20 fix into a $200 repair.
Myth 4: “squeaking Means I Need A New Dryer.”
Fact: Most causes of squeaking are inexpensive to fix. With basic tools, many homeowners can handle the repair themselves.
Non-obvious insight: Sometimes, a dryer installed unevenly on the floor will squeak as it vibrates. Make sure your dryer sits level before opening the cabinet.

Whirlpool Cabrio Dryer Model Differences
Not all Cabrio dryers are exactly the same. Over the years, Whirlpool has made several versions, and some parts may vary. If you’re ordering replacement parts, always check your model number (usually on a sticker inside the door frame).
Key Differences By Model
| Cabrio Model | Drum Support Type | Belt Routing | Common Squeak Cause |
|---|---|---|---|
| WED7300 Series | 2 Rear Rollers, Front Glides | Standard | Rollers |
| WED8000 Series | 4 Rollers | Standard | Idler Pulley |
| WGD7300 Series (Gas) | 2 Rear Rollers, Front Glides | Standard | Belt |
Tip: If you’re unsure about your model, take a photo of the model sticker before buying parts.
Safety Tips When Working On Your Dryer
Dryer repairs can be safe if you follow simple rules:
- Always unplug the dryer before opening any panels.
- Wear gloves to protect against sharp edges inside the cabinet.
- Keep small parts organized (use a cup or bowl for screws and clips).
- Avoid forcing parts—if something won’t come off, check for hidden screws or clips.
- After reassembly, run a short test cycle before replacing the top and front panels to check for noises.
Non-obvious insight: The heating element in electric dryers can stay hot for several minutes after use. Wait at least 30 minutes after a drying cycle before starting repairs.

When Squeaking Means A Bigger Problem
Most squeaks are minor, but in some cases, they can signal a more serious issue:
- Burning smell with squeak: This may mean the belt is slipping badly or the motor is failing. Stop using the dryer and fix immediately.
- Loud grinding: A roller or pulley may have completely failed, causing metal-to-metal contact.
- Dryer stops mid-cycle: The motor may be seizing or overheating, especially if it started with a squeak.
If you notice these symptoms, do not continue using the dryer until it’s repaired. Continuing to run it can cause fire risk or permanent damage.
For more detailed repair instructions and parts diagrams, Whirlpool’s official support pages are an excellent resource: Whirlpool Support.
Frequently Asked Questions
How Long Can I Use My Whirlpool Cabrio Dryer If It’s Squeaking?
It’s best not to use your dryer once you notice a squeak. While it may run for a while, the noise means a part is wearing out. Continued use can make the problem worse and increase repair costs. Stopping to fix the issue early can save you money and prevent bigger failures.
What’s The Most Common Cause Of Squeaking In Cabrio Dryers?
The most common cause is worn drum rollers. Over time, these rollers flatten or lose their smooth surface, leading to a squeak as the drum turns. Worn glides and idler pulleys are also frequent culprits.
Can I Lubricate Squeaky Parts Instead Of Replacing Them?
It’s not recommended to lubricate most dryer parts. Lubricants attract lint, which can cause new problems. Most rollers, pulleys, and glides are meant to run dry. If a part squeaks, it’s better to replace it.
How Much Does It Cost To Fix A Squeaky Cabrio Dryer?
DIY repairs usually cost between $10 and $50 for parts, depending on what needs replacing. Professional repairs can range from $100 to $400, depending on labor and parts. Drum rollers and glides are the most affordable fixes, while motor replacement is more expensive.
Where Can I Find Parts For My Whirlpool Cabrio Dryer?
You can buy genuine Whirlpool parts from appliance stores, online retailers, or the official Whirlpool website. Always check your model number to ensure you get the correct parts. For more details and troubleshooting guides, visit Whirlpool Support.
A squeaky Whirlpool Cabrio dryer doesn’t have to mean stress, wasted time, or high repair bills. By understanding what causes the noise, how to find it, and how to fix it, you can keep your laundry routine quiet and your dryer running smoothly for years to come.
Don’t ignore those first signs of trouble—a simple fix today can prevent a major headache tomorrow.