
A Whirlpool Washer F8 E1 indicates a flow meter error, which means the machine isn’t detecting the correct amount of water entering the drum. This issue usually happens because the water flow sensor is failing to send pulses to the control board, or the water pressure in your home is too low to fill the unit within the required time. You should first check your water inlet hoses for any kinks or blockages that might be restricting the flow.
Causes of your Whirlpool Washer F8 E1 Error
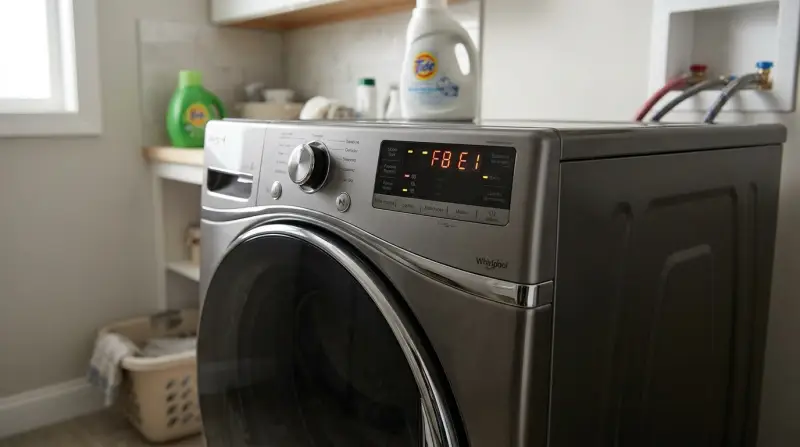
The main reason for this error is a mismatch between the water volume the controller expects and what the flow meter actually registers. When you start a cycle, the control board opens the inlet valves and waits for the flow meter to send back a specific number of pulses. If these pulses don’t arrive or stop prematurely, the machine pauses and displays the F8 E1 code to prevent a dry run or an overflow.
This often stems from a restriction in the water supply. If your home has low water pressure, the flow meter may spin too slowly, causing the controller to assume the water isn’t entering at all. Conversely, if the flow meter itself is faulty, it will fail to send any signal to the control board even if the water is flowing perfectly. In some cases, the wiring harness connecting the flow meter to the main board may have a loose connection or a broken wire, which interrupts the signal. According to Whirlpool’s official product documentation, ensuring the inlet hoses are fully open and free of debris is the first step in resolving supply-related error codes. If the water supply is strong and the hoses are clear, the fault almost certainly lies within the sensor or the electrical path.
Inspect the inlet hoses
This fix is for anyone who has verified that their home water supply is turned on and functioning. Start by pulling the washer away from the wall so you can reach the back. Locate the two hoses connected to the water valves and ensure they aren’t bent, kinked, or crushed against the wall. If a hose looks crushed, straighten it out and verify the flow.
Next, turn off the water supply at the wall valves and disconnect the hoses from the back of the washer. Check the small mesh screens inside the inlet ports for mineral buildup or debris. If these screens are clogged, use a soft brush or a toothpick to clear them out, then rinse the screens under a running tap.
A common mistake is ignoring the rubber washers inside the hose couplings. If these gaskets are cracked or flattened, they will leak regardless of how tight you wrench the connection. If you see white crusty deposits around the threads, replace the washers immediately to prevent slow seepage that rots subflooring.
Reconnect the hoses, turn the water back on slowly, and check for any leaks before starting a new cycle. If the code persists, you may need to replace the hoses if they’re internally collapsed. This work is safe for any homeowner, but if you don’t feel comfortable working with plumbing connections, contact a professional plumber to avoid water damage in your laundry room.
Reset the control board
If your hoses are clear and water pressure is normal, you can try to clear a temporary software glitch. Power cycles often reset the control board’s memory and clear out false error flags. To perform a hard reset, unplug the washer from the wall outlet or flip the circuit breaker dedicated to the appliance to the off position.
Leave the machine unplugged for at least one minute to allow the system to reset.
After the time has passed, plug the power cord back in or flip the breaker to the on position. Select a simple rinse or spin cycle to test if the machine can detect water flow without triggering the error code again.
If the F8 E1 code returns immediately, the issue is physical and not a software glitch. This process is safe for everyone. However, never attempt to open the washer’s outer housing to access internal wiring or boards. A capacitor can hold a lethal charge even when unplugged; that work is strictly for a qualified technician.
If the code persists, check the water inlet screens for debris. A clogged screen often mimics a control board failure by restricting flow. If the screens are clean and the reset failed, the pressure sensor or the board itself likely requires a professional replacement. Don’t attempt to bypass these safety sensors, as doing so risks flooding your laundry room.
Test for sensor failure
When the hoses and the reset don’t solve the problem, the flow meter itself might be the culprit. This fix is for those who are comfortable using a multimeter to test electrical resistance.
You’ll need to access the flow meter, which is typically located near the water inlet valve assembly. Because this requires removing the washer’s top or front panel, there’s a risk of voiding your warranty or causing injury if you aren’t experienced.
If you aren’t familiar with testing electrical components, call a service professional. A technician will check for continuity across the flow meter terminals. Set your multimeter to the lowest ohms setting. If the meter shows no continuity or erratic readings, it must be replaced.
A common mistake is testing the sensor while it’s still plugged into the wiring harness. This often leads to a false reading because the control board creates a closed loop. Always disconnect the sensor leads before touching your probes to the terminals.
If the sensor is fine, the fault is likely in the control board’s input circuit. This is a trade-off; while replacing the part is cheaper than buying a new washer, the labor cost for a professional can be high. If you choose to do this yourself, ensure the machine is completely disconnected from power and water before starting. If the sensor tests within the manufacturer’s specified range, stop and call a professional. Diagnosing a faulty control board requires specialized schematics that vary by model year.
What not to do
Don’t attempt to bypass the flow meter by jumping the wires. This action sends an unregulated voltage spike directly to the main control board, which often results in a total system failure that costs more than the machine is worth.
Avoid using pliers to force water inlet valves. The plastic housing is brittle; applying metal-on-plastic pressure creates hairline fractures that may not leak immediately but will burst under full water pressure during a cycle.
Never ignore an error code to force a restart. Running a washer without water intake causes the pump to cavitate, which generates intense heat. This destroys the internal motor seals within minutes, turning a simple sensor issue into a total pump replacement.
Don’t open the cabinet housing unless you have experience with high-voltage appliances. Capacitors can hold a lethal charge even when the unit is unplugged. If you see a spark or smell ozone, stop immediately; you’re likely dealing with a short that requires a professional technician.
How to stop it happening again
Regular maintenance is the best way to ensure your washer operates without flow errors.
| If you’re doing this | Do this instead | Why |
|---|---|---|
| Using old, stiff hoses | Replace with braided steel hoses | Rubber hoses crack and collapse internally |
| Ignoring water pressure | Install a pressure gauge | Low pressure causes the meter to fail |
| Letting debris build up | Minerals block water flow entirely | |
| Forcing the washer back | Use a 4-inch gap from the wall | This prevents the hoses from kinking |
Most owners wait for a leak before replacing hoses, but internal rubber degradation is invisible. If your hoses feel brittle or show tiny cracks, replace them immediately.
If your gauge reads above 80 PSI, install a pressure-reducing valve. High pressure puts constant stress on internal solenoids, leading to premature valve failure.
Many people mistakenly clean the screens only when flow stops. By then, the damage to the valve diaphragm is already permanent. If you live in an area with hard water, perform this cleaning regularly instead of waiting. This simple habit prevents the mineral buildup that causes the most common flow errors.
Frequently asked questions
Can I run a cycle while the F8 E1 code is showing?
No, you shouldn’t run a cycle while the code is active. The machine has identified a lack of water flow, and continuing to force it will lead to the pump running dry. This causes excess heat and can permanently damage the internal seals of the drain pump, leading to a much more expensive repair than a simple flow meter issue.
How long does an F8 E1 repair take?
The repair time varies by model—check the label on your specific unit for the exact layout. If you’re just clearing a clogged screen or straightening a hose, it should take about 15 minutes. If you need to replace a faulty flow meter or a control board, a professional technician usually finishes the job in under two hours, provided they have the correct parts in stock.
Is it safe to leave the washer unplugged for a long time?
Yes, it’s perfectly safe to leave the washer unplugged for as long as you need to troubleshoot the error. Your settings might reset to factory defaults, but no damage will occur to the machine. In fact, leaving it unplugged is the safest way to ensure no accidental power surges affect the board while you’re working on the plumbing connections.
Why does the error only happen on hot water cycles?
This often happens if the hot water inlet valve is clogged or the hot water house line is restricted. If the machine fills fine on cold cycles but fails on hot ones, check the hot water valve specifically. The inlet screen for the hot water side is more prone to mineral buildup because hot water systems often accumulate more sediment from the water heater.
What happens if I replace the sensor but the code stays?
If the code stays after replacing the flow meter, the wiring harness or the control board is likely faulty. The sensor sends a signal to the board; if the wire is broken or the board’s input port is fried, the signal never arrives. At this stage, you need a technician to perform a diagnostic test on the main control board to see if it’s receiving the signal.
Final Thoughts
If these simple checks don’t resolve the problem, there might be a deeper electrical fault or a faulty sensor that needs professional attention. Don’t hesitate to reach out to a local technician if you’re still seeing the alert. They’ll help you get your laundry routine back on track quickly.
Related guides
- Whirlpool Washer Stuck on Spin Cycle: Easy Fixes and Tips
- Whirlpool Dishwasher Leaking
- How to Fix Whirlpool Cabrio UL Code: Easy Troubleshooting Guide