
The most likely reason for an LG Craft Ice Maker Not Working is a physical obstruction in the ice mold or a frozen water supply line. You can confirm this by checking the ice bin for stuck cubes or frost near the water inlet. If the unit is silent, consult the official LG support website to see if your model requires a manual reset.
Why your LG Craft Ice Maker Not Working
| Cause | How common | How to confirm it | Fix it yourself? |
|---|---|---|---|
| Ice mold jam | Very common | Check for stuck spheres | Yes |
| Frozen water line | Common | Check water flow | Yes |
| Water filter clog | Common | Low water pressure | Yes |
| Temperature too high | Occasional | Check freezer display | Yes |
| Sensor failure | Rare | Error codes present | No |
| Control board fault | Very rare | Unresponsive buttons | No |
Most users mistake a frozen water line for a broken pump. If your dispenser hums but produces nothing, unplug the unit and use a hair dryer on the lowest setting near the door hinge. If water flows after five minutes, you have confirmed the line was simply iced over.
Watch for the “low pressure” trap. Many owners replace expensive filters when the real culprit is a kinked supply line behind the fridge. Pull the unit out six inches to ensure the tubing isn’t pinched against the wall.
If your freezer display shows a temperature above 10 degrees Fahrenheit, don’t call a technician yet. First, vacuum the condenser coils located at the bottom rear. Dust buildup forces the compressor to cycle prematurely, preventing the ice maker from reaching the sub-zero temperatures required to trigger a harvest cycle. If the coils are clean and the temp remains high, you’re likely facing a sealed system leak, which requires professional repair.
Safety: Inside a mains-powered machine, the parts behind the outer cover can hold a dangerous electrical charge even after it has been unplugged — that’s why they sit behind a cover. Opening the housing, or testing or replacing anything behind it, is a job for a qualified technician, never a home repair.
Clearing the ice mold obstructions
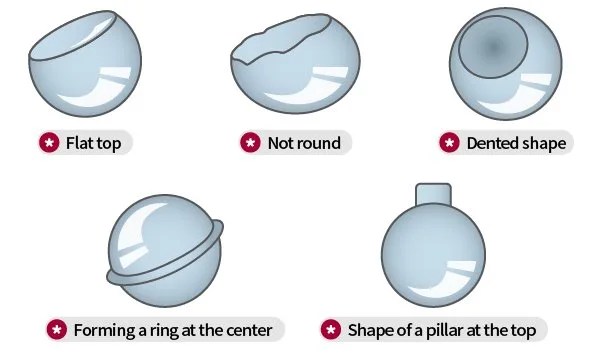
A blocked ice mold prevents the mechanism from rotating and releasing the spheres. When the internal tray can’t move, the entire cycle stalls to prevent damage to the motor. This usually happens when small pieces of ice get stuck during the harvest phase. To check for this, pull out the ice bin and use a flashlight to look inside the craft ice compartment. If you see spheres that are misshapen or stuck in the mold, you have found the issue.
To fix this, turn off the craft ice feature using the control panel. Take a cup of warm water and gently pour it over the frozen area to melt any lingering ice shards. Don’t use a knife or any sharp metal tool to chip away the ice, as this can puncture the cooling coils and cause permanent damage.
A common mistake is using boiling water, which can crack the plastic housing or damage internal sensors. Stick to lukewarm water, roughly 100 degrees Fahrenheit, to safely dissolve the blockage. Once the area is clear and dry, turn the feature back on. It typically takes about 24 hours for the system to resume normal production after a reset.
This process requires patience, as the system must reach the correct temperature before it begins the next cycle. If you hear a grinding noise while the tray tries to rotate, stop immediately and check for hidden debris again. If the motor remains silent after clearing the path, the issue may be electrical, which requires a professional. This fix costs only your time, provided you avoid damaging the interior plastic or cooling components. If the tray remains stuck despite a clear path, the internal gear assembly may have stripped, requiring a technician to replace the motor housing.
Resolving frozen water supply lines
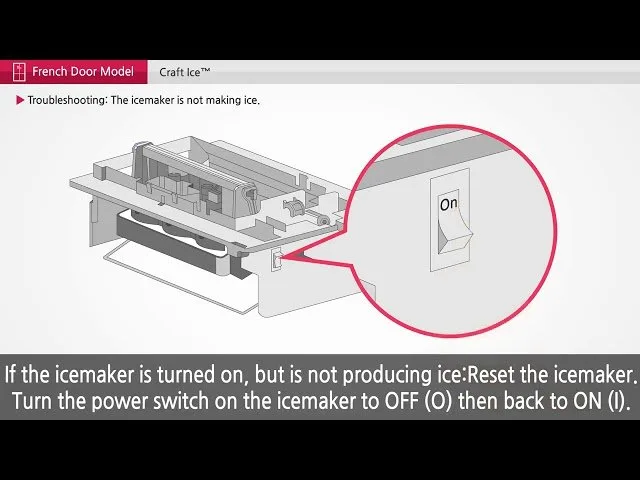
A frozen water supply line stops the flow of water to the ice maker, even if the rest of the refrigerator works perfectly. This occurs when the ambient temperature in the freezer fluctuates or if the water pressure is too low to keep the line moving. You can tell this is the cause if your door water dispenser is also slow or producing no water.
To address this, increase your freezer temperature slightly if it’s set below the recommended setting, as extreme cold can freeze the water inside the thin supply tube. If the line is indeed frozen, simply unplugging the refrigerator for a few hours can allow the ice to thaw naturally. Ensure the area around the water inlet is clear of frost.
If you notice the water pressure is weak at the dispenser, check the water line behind the unit to ensure it isn’t kinked or pinched against the wall. A common mistake is assuming the ice maker is broken when the real culprit is a lack of water supply. This error often leads homeowners to purchase expensive replacement parts unnecessarily.
The decision rule is simple: if the dispenser works but the ice maker does not, the blockage is likely localized to the small tube feeding the ice mold. If both are dead, the issue is likely the main supply line or the inlet valve. If the line is clear but water still doesn’t reach the tray, the internal valve might be stuck.
If thawing the line and checking the water pressure doesn’t restore flow, the problem is likely internal and requires a technician. This fix is simple but requires waiting for the ice to melt. This process usually takes between four and six hours depending on the ambient temperature and the density of the ice blockage.
Replacing the water filter
A clogged or expired water filter restricts the flow of water, which prevents the craft ice maker from filling the mold correctly. The system requires consistent pressure to form the clear spheres; if the flow is too slow, the cycle will fail. You can confirm this by checking the filter light on your display or noticing if the water dispenser is significantly slower than it was when the filter was new.
To fix this, remove the old filter and install a fresh, compatible cartridge. Most manufacturers recommend changing the filter regularly, though this varies by model—check the label on your specific filter housing. If the water flow improves immediately after replacing the filter, the old one was the bottleneck. Keep in mind that some filters require a specific seating position; if it isn’t pushed in or turned until it clicks, the water won’t flow properly. If you still have no ice after replacing the filter, you may have air trapped in the line. To clear air, dispense a few gallons of water through the door dispenser to flush the system. This process is inexpensive and prevents many common ice maker issues. If the filter is new but the unit still fails to produce ice, the water inlet valve may be the problem. This is a part that requires careful handling, and if you aren’t comfortable working with water connections, it’s best to call a professional.
The less likely causes
-
Freezer temperature settings: If your freezer is set above zero degrees Fahrenheit, the ice won’t freeze fast enough to initiate the harvest cycle. Aim for exactly zero degrees; even a five-degree variance can stall the internal thermostat that signals the tray to dump.
-
Door switch issues: If the refrigerator thinks the door is open, it will disable the ice maker to save energy. Check the interior light; if it stays on while the door is closed, the switch is faulty. A failed switch is a cheap part to replace compared to the cost of a new unit.
-
Control board glitches: A simple power cycle by unplugging the unit for one minute can often clear temporary software errors.
-
Water inlet valve failure: If the valve isn’t opening to allow water into the mold, this part must be replaced by a qualified technician to avoid leaks. If you hear a faint humming sound but see no water, the solenoid is likely burnt out.
What a fix usually involves
Fixing these issues usually involves basic maintenance, such as clearing ice jams or replacing a water filter. These tasks are straightforward and typically require no special tools beyond your hands and perhaps a soft cloth.
If the problem is a frozen line, the cost is essentially zero because it only requires time for the ice to melt. These tools can melt the plastic liner or damage internal sensors, turning a minor clog into a permanent structural failure.
Replacing a filter involves the cost of a new cartridge, which is a small part of the total refrigerator price. If the issue is a failed motor or a faulty water valve, you’ll need a replacement part from the manufacturer. These parts are relatively affordable, but the labor cost for a professional to install them can be higher.
Always check your warranty status before attempting any repairs, as some actions can void your coverage. If you need a professional, search for an authorized service center in your area to get an accurate quote based on your specific model.
Never attempt to open the sealed cooling system or electrical housing yourself. This carries a risk of injury from pressurized refrigerant and can destroy the appliance. If you hear a high-pitched clicking sound, the compressor is likely failing; this is a professional-only repair that requires specialized diagnostic equipment.