
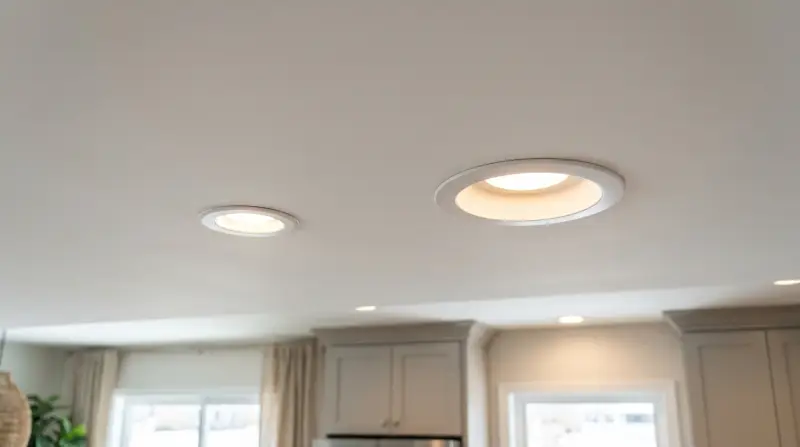
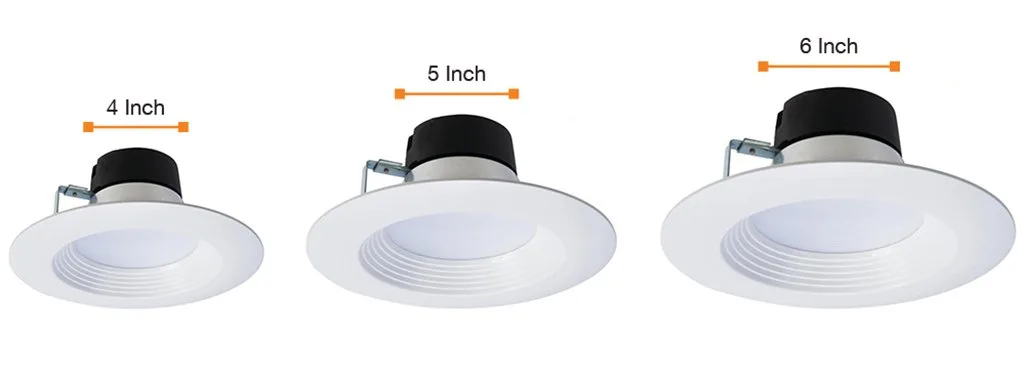
The choice between 4 inch vs 6 inch recessed lighting depends primarily on whether you want a modern, focused beam or a broad, ambient wash for your space. Smaller 4-inch fixtures provide a sleek, minimalist look perfect for highlighting specific areas, while 6-inch fixtures excel at providing general illumination for larger rooms. If you have low ceilings or need to highlight artwork, opt for the smaller size; if you need to light a large living area with fewer holes in the ceiling, the larger size is the industry standard.
Comparing 4 inch and 6 inch recessed lighting
| Method | How long | Effort | Cost | Best for |
|---|---|---|---|---|
| 4-inch LED | Short | Medium | Medium | Task lighting |
| 6-inch LED | Short | Medium | Low | General ambient |
| 4-inch Trimless | Long | High | High | Minimalist design |
Choosing the right size is a trade-off between visual impact and total light output. A 6-inch housing typically accepts higher lumen output bulbs, allowing you to space them 6 to 8 feet apart. Use this size for basements or rooms with 9-foot ceilings where coverage matters most.
Conversely, 4-inch fixtures are superior for task lighting in kitchens or over vanity mirrors. They reduce visual clutter, but you must space them closer—roughly 3 to 4 feet apart—to prevent dark spots on your counters.
If you’re retrofitting existing holes, you must match the housing size to avoid expensive drywall patching. A common mistake is choosing trimless fixtures for a renovation without checking joist clearance. Always verify your joist layout before buying, or you’ll be forced to move the entire lighting plan.
Choosing the smaller profile
Using 4-inch fixtures creates a refined look that doesn’t overwhelm a ceiling. Follow these steps to install or upgrade:
- Measure the existing hole diameter; if it’s exactly 4 inches, you can use a standard retrofit trim kit.
- Turn off the circuit breaker to ensure no power reaches the junction box.
- Remove the old trim and bulb, then snap the new LED housing into the existing clips.
- Test the light connection by flipping the breaker back on; the light should turn on instantly.
These are excellent for task lighting, such as over kitchen islands or reading nooks, because they focus light tightly. They’re also ideal for hallways where you want to minimize the footprint of the fixtures. The main weakness is that they require more units to light a large room evenly, which increases your total material cost. This isn’t for homeowners who want to minimize the number of holes in their drywall, as you’ll need to install more units to achieve the same brightness as a 6-inch setup. If your ceiling height is under 8 feet, these are often preferred as they don’t dominate the room’s visual space.
Utilizing the larger standard
The 6-inch fixture is the workhorse of home lighting, providing maximum coverage with the fewest units. Follow these steps for installation:
-
Calculate your room size; for a standard room, place 6-inch lights 4 to 6 feet apart for uniform coverage. If your ceiling height exceeds 9 feet, tighten this spacing to 4 feet to prevent dark spots on the floor.
-
Cut the drywall hole using the template provided by the manufacturer, typically measuring 6.25 inches for a 6-inch housing. Use a dedicated hole saw bit to ensure the edge remains clean, as a jagged cut complicates the final trim seal.
-
Wire the junction box following the local electrical code, ensuring ground wires are connected securely.
-
Insert the light housing and secure it with the provided tension springs or mounting screws.
These are perfect for general ambient lighting in basements, garages, or large open-plan living areas. Because they’re the most common size, you have the widest variety of trim styles and bulb options available.
One genuine weakness is that they can look bulky in small rooms or on low ceilings, where they tend to draw the eye upward and clutter the ceiling plane. If your ceiling is under 8 feet, consider 4-inch fixtures instead to maintain a cleaner aesthetic. This varies by model — check the label for the specific aperture size, as some “6-inch” trims actually fit slightly different housing diameters. Always verify the trim compatibility list on the box before purchasing, as mismatched brands often lead to light leaks around the rim.
Installing architectural trimless units
For a high-end, invisible look, trimless or “mud-in” fixtures are the professional choice. These units are installed before the drywall is finished.
-
Mount the rough-in plate directly to the ceiling joists before hanging the drywall.
-
Install the drywall so it covers the edge of the plate, then apply joint compound over the flange. Use a high-quality, paper-faced metal bead to prevent the compound from cracking over time.
-
Sand the ceiling smooth and paint it to match the surrounding area exactly.
-
Insert the light module once the paint has fully cured to avoid damage.
This method delivers the cleanest aesthetic possible because the light appears to emerge directly from the ceiling surface. It’s ideal for modern, minimalist homes where you want the architecture to be the focus rather than the hardware.
The major downside is that this requires professional drywall finishing skills. A common mistake is applying too much mud, which hides the fixture’s lip and makes installing the final trim impossible.
This isn’t a quick weekend DIY project. The finishing process requires multiple drying days for the compound to shrink and settle. If you aren’t comfortable with advanced mudding and sanding techniques, hire a professional.
Which one should you use?
If you’re in a hurry, choose the 6-inch fixtures because they’re widely available at every hardware store and require fewer units to cover a room. For those doing this for the first time, 6-inch retrofit kits are the most forgiving choice because the larger size hides minor imperfections in your ceiling cuts. If you want the best possible result regardless of the effort, choose the 4-inch trimless method; it offers a high-end, professional appearance that makes the lighting look like an integrated part of the building.
The trade-off is clear: you’re choosing between the ease of installation and the aesthetic impact. While 6-inch lights are simpler to manage and cheaper to install, they lack the subtle, clean look of 4-inch units. If you choose 4-inch lights, you must accept that you’ll need to purchase more fixtures and spend more time measuring the layout to ensure the light is evenly distributed. Don’t make the mistake of using too few 4-inch lights in a large room; it will result in dark spots that are expensive to correct later, as you’ll need to cut more holes and run new wire.
The rules that apply whichever way you choose
Regardless of the size you pick, you must follow safety standards to prevent fire hazards. Always confirm that your chosen fixtures are rated for IC (Insulation Contact) if they will be installed in a ceiling with attic insulation above. If the fixture lacks an IC rating, you must maintain a three-inch clearance from all insulation to prevent overheating. If you’re unsure, check the manufacturer’s manual or consult an electrician. Before starting, ensure you have a voltage tester to verify the power is off at the switch.
Partway through your project, check that your layout is symmetrical; light fixtures that are off-center are obvious once the work is complete. A common mistake is failing to account for ceiling joists, which can force an unplanned shift in your grid. If you hit a joist, don’t cut it; shift the light position by a few inches to maintain structural integrity.
At the end, verify that all connections are inside the junction box and that no wires are pinched. If you’re adding a new circuit, you’ll likely need a permit, so contact your local building department to understand the requirements for your area. Any work involving electrical panels or new circuits carries a risk of fire or injury and should be handled by a licensed professional. Always keep the manufacturer’s installation manual handy, as it contains the specific clearance requirements for your exact model.
Frequently asked questions

Can I replace 6 inch lights with 4 inch lights?
Yes, you can replace them, but you’ll need to install a conversion plate or patch the drywall to cover the larger hole. Since the 6-inch hole is significantly larger than the 4-inch fixture, the new light won’t cover the gap on its own.
How long does it take to install recessed lighting?
It typically takes about 30 to 60 minutes per fixture for a retrofit installation in an existing ceiling. If you’re starting from scratch and need to run new wire through joists, allow for several hours per room. This varies by model — check the label for specific mounting requirements, as some newer “canless” LED designs are much faster to install than traditional housing-based systems.
Is it safe to install recessed lighting near insulation?
No, it isn’t safe unless the fixture is specifically marked as IC-rated for direct insulation contact. Non-IC rated fixtures require a specific clearance distance, often 3 inches or more, to prevent overheating and potential fire hazards. Always check the housing label to confirm it’s safe for your specific ceiling type; if you can’t find an IC rating, you must build a protective barrier around the light.
What happens if the light isn’t centered?
If the light isn’t centered, it will create uneven shadows and highlight imperfections in the ceiling surface. This is a common mistake that’s difficult to fix once the drywall is cut. To avoid this, mark your ceiling grid with a chalk line before cutting, and verify the measurements from each wall at least twice to ensure the spacing is perfectly uniform across the entire room.
How many lights do I need for a 12 by 12 room?
For a 12 by 12 foot room, you generally need four 6-inch lights placed in a square pattern, spaced about 6 feet apart. If you choose 4-inch lights, you’ll need more units, typically six to nine, to ensure the light levels remain consistent across the floor. This assumes a standard 8-foot ceiling; if your ceiling is higher, you may need more lights or fixtures with a narrower beam angle.
Final Thoughts
Ultimately, the best choice comes down to the atmosphere you want to create in your home. Take a moment to walk through your rooms tonight and notice where the shadows fall. Once you’ve identified those dim corners, you’ll be ready to pick the perfect fixtures that’ll brighten your space just right.
Related guides